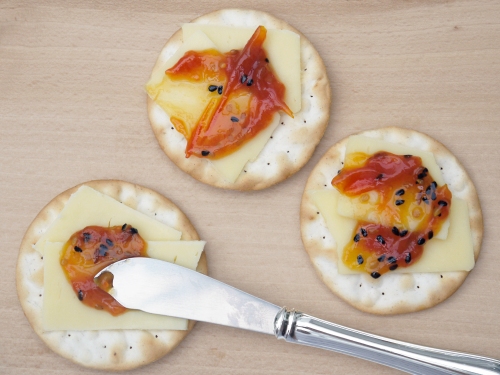
It’s a public holiday today in London – but my visions of a warm day at the beach or in the country were knocked on the head by the lashing rain that appeared this morning! Making the most of an unexpected day in the house, I’ve finished sorting through three years worth of administration and vacuumed and generally tidied the house. I know – very rock’n’roll! Then the moment came to reverse all the good work in the kitchen by embarking on a spontaneous culinary exploit.
So, forgetting the rain, today was also the start of what might be tentatively called “festive baking” as I’m making something that I’m looking forward to eating at Christmas – a sharp-but-sweet spicy tomato jam that is a great addition to a cheeseboard. It also means I can use some of our garden produce and enjoy them later in the year – our tomatoes were better this year than we managed last year (2014 yielded just three tomatoes!), but I’ve also got some big plans for next year to really get the most out of our garden. It might be small, but I’m determined to use it to grow useful things out there!
This is actually somewhere between a sweet jam and a chutney – it sets and is made with a lot of sugar (like jam), and while it has spices, salt and vinegar that you’d expect in a chutney, it doesn’t have onions or sultanas. It is in turns fruity, sharp, tangy and savoury, with little bursts of flavour from the spices I used. It is absolutely delicious with strong cheddar on oatcakes or crackers, and a little goes a long way.
I made this using cherry tomatoes – partly the result of a glut that we’ve got in the garden at the moment, but you could just as easily do this with bigger tomatoes, red, yellow or even green. I cut half of the cherry tomatoes in two, and trimmed the rest into quarters so that there is some variation in size in the finished jam. If you’re using bigger toms, then you’ll need to chop them into smaller pieces, unless you’re the kind of person that enjoys really chunky jam! I also let the tomatoes cook down in a bit of water so that they break down a bit before adding the sugar. If you add the sugar with the tomatoes at the start of cooking, it can stop them breaking down and leave you with large lumps. This doesn’t affect the flavour, and I think is really just a matter of aesthetics.
A word of warning – this recipe does not make a lot of jam, but that is not really an issue as you only need a little as it is packed with flavour. As it is easy to make, you can play around with different versions – I like nigella and cumin seeds, but you can also try aniseed or ginger and chilli. Using different colours of tomatoes also looks pretty – yellow tomatoes will keep their golden hue, while red tomatoes will produce anything from a deep orange to a ruby colour. I’ve ended up with one small jar that I can eat over the next couple of weeks, plus a large jar that I can keep in a cupboard for the December festivities. Now…let’s see what cheese I’ve got in the fridge to test out this batch?
To make spicy tomato jam (makes 2-3 small pots):
• 600g cherry tomatoes
• 100ml water
• 2 teaspoons nigella seeds
• 1/2 teaspoon cumin seeds
• 4 whole cloves
• pinch freshly-ground black pepper
• 1 teaspoon salt
• 75g soft brown sugar
• 100g white sugar
• 2 teaspoons pectin powder
• 60ml white wine vinegar
• juice of 1/2 lemon
1. Rinse the tomatoes and cut into a mixture of halves and quarters, removing the stalk part from each. Place in a saucepan with the water and cover. Bring to the boil, then simmer gentle for around 20 minutes.
2. In the meantime, dry toast the nigella and cumin seeds – put them in a saucepan and warm over a medium heat until they smell fragrant. Once done, pour them onto a cold plate.
3. Add the rest of the ingredients (apart from the lemon juice) to the tomatoes. Mix and bring to the boil, then reduce the heat and simmer for around 10 minutes. Add the lemon juice, the boil until the setting point is reached(*) before decanting the jam into prepared sterilised jam jars(**).
(*) How to check for a set? Chill a saucer in the fridge. Put a little jam on the cool plate, and return to the fridge for a minute. Push with your finger – if the jam visibly “wrinkles” when you push it, the jam is done. If it stays liquid, then cook longer and check again after a few minutes.
(**) How to sterilise jam jars? Wash in hot, soapy water, and then rinse very well – do not dry them. Now place up-side down on the shelf of a cold oven, and heat to 100°C / 210°F for 20 minutes. Remove from the oven using gloves, allow to cool slightly (they should still be warm) and fill with the hot jam. You can leave the jars in the oven with the heat turned off until you need them, as this keeps the glass warm, and warm glass is much less likely to crack when you add warm jam (science, eh?). Remember to sterilise the lids by washing in hot, soapy water, then rinsing well and then boiling them in a pot of hot water for a few minutes.


