Monthly Archives: January 2011

Candied Kumquats

I am a dreadfully compulsive shopper, notorious for seeing things that look interesting but without even the vaguest idea of what I will do with them, all in furtherance of some abstract aim of having a “well-stocked larder”. The most recent manifestation of this habit all started with a mission into central London to track down some elusive yuzu fruit, but without any success(*).

In trawling various shops, I came across other exotic fruit, and this is how I came to have two punnets of kumquats sitting in the kitchen. Cue feelings of guilt about not doing something with them…

I think kumquats are absolutely delicious, and I am happy to eat a few of them on their own, peel, pips and all. As you bit into them, you get the rich sweetness from the skin and a burst of the aromatic perfumed oil, then the citrus tang of the kumquat flesh. They always make me think of the Far East – kumquats do originate in that part of the world, but I think it is their dainty size, elegant shape and delicate flavour that makes this connection for me. Does that make sense?

Now, to say that I didn’t know what to do with them is not entirely correct, as I managed to munch my way through a fair few of them as I pondered what the options were. Ultimately I thought it would nice to make something exciting with them, but I settled on the idea of making candied kumquats. Not perhaps so exciting, but I imagined that I would later be able to add them, chopped, to cake batters or use them and their rich syrup as a topping on a chocolate dessert, all to add a little sweet citrus zing.

I was aiming for a pot of kumquats that would be sweet and soft, but would hold their shape, all the while enrobed in a rich syrup. The flavour is quite pronounced – you need to like oranges – and a little reminiscent of marmalade. And if you are a little freaked out by the idea of eating the skin of an orange, fret not. These kumquats keep their shape, but area wonderfully soft and seem to melt in the mouth as you eat them.

To make candied kumquats:

• 400g kumquats
• 300ml water
• 200g white sugar
• pinch of salt

Wash the kumquats and pat dry with a clean towel.

Cut each fruit in half (across the fruit) and use the point of a sharp knife to remove the seeds(**).

Place the kumquats, water, sugar and salt in a pan and leave on a medium heat. Stir a couple of times to be sure the sugar has dissolved, then bring to the boil. Reduce the heat, and leave the kumquats to simmer, covered, for around two hours until the fruit is translucent and the syrup has thickened (remember it will thicken further when cool).

Pour the kumquat and syrup into a clean jar(***). Seal and store in the fridge until needed.

(*) If anyone does know where I can get hold of yuzu fruit in London, I would be most grateful! I did have them in some wagashi recently, and am keen to try doing something with yuzu myself.

(**) At this stage, if you are worried that the kumquats are too bitter, boil some water in a pan. Add the kumquats, boil for 1 minute, then drain. Repeat. This should get rid of any bitterness, and then continue with the recipe.

(***) Such as, eh, the large and very heavy Le Parfait glass preserving jars that you forced someone to carry all the way across Europe on holiday last year…

Worth making? If you have the patience to slice and de-seed kumquats, this is a superb recipe. The result is surprisingly sophisticated, and makes a wonderful addition to good ice-cream or on a simply piece of cake. You also get the benefit of a rich, sweet kumquat syrup which also works well on desserts or, for the more louche cook, in a cocktail.

7 Comments

Filed under Recipe, Sweet Things

Scottish food: Tattie Scones, or Something New for Breakfast

Oh, those oatcakes were so healthy. Now for a change of pace. This winter was cold and I became a really big fan of a cooked breakfast. A hot plate of potatoes, beans and mushrooms seemed just the thing to set me up for the day. Ideally I would have it every morning, but it remains a bit of a weekend treat as I am just not really organised enough to sort my stuff out during the week.

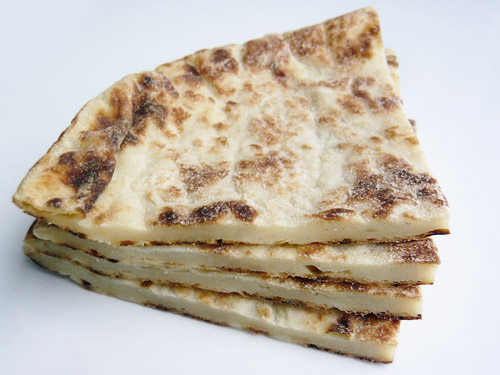
Today’s post combined the pleasures of a cooked breakfast with a traditional Scottish recipe, tattie scones (or potato scones, if you prefer). Don’t confuse these with normal scones. These are not big and fluffy, but more like a thick, heavy potato pancake. The recipe is a little be reminiscent of Norwegian lefse, but the heroic amount of butter in here means that the dough is a heck of a lot easier to work with – just don’t think about what it is doing to your arteries. These “scones” might not be in need of cream and jam, but they make an excellent accompaniment to breakfast, either covered in lots of cheese and popped under the grill, or served with mushrooms and baked beans.

Surprisingly photogenic, aren’t they?

As I have recently found while blogging about traditional Scottish food, the recipe is very simple. Just potatoes, butter, flour and a little salt to round out the flavour. One tweak that I make is to add a little baking powder. This may not be terribly original, but it does add a little bit of lightness to the tattie scones which I think is quite welcome. Add it or don’t. You’re not missing out, but equally adding it doesn’t take you a million miles from the authentic taste experience.

What I do have to confess is that they can be a bit of a mess to form into shape. If you’re feeling bold, turn the dough onto a well-floured worktop and try rolling it. It will work, but the dough it so moist and sticky from the mashed potatoes that it will often stick to everything. Far easier to butter the frying pan, then shape them directly there (while the pan is still cold, of course!). There are two ways to make them – one large circle, then cut into wedges, or make them as individual smaller rounds, more like pancakes. I go with the wedges, as ’twas ever so in my house, and I quite like the way they look on the plate. Plus, looks pretty impressive as you stand by the cooker, flipping a large pancake, with your brunch guests oohing and aahing.

And finally, if you make them and don’t eat them all in one go, they will happily keep for a couple of days in the fridge, ready to be reheated in the toaster or in a dry frying pan. But I ate them like this – and there were none left!

To make tattie scones (makes one round, or six individual scones, serves 2):

• 250g potatoes(*)
• 50g plain flour
• 25g butter
• 1/4 teaspoon salt
• 1/4 teaspoon baking powder (optional)

Peel the potatoes and cut into chunks. Boil until soft, then drain. Return to the pan, add the butter and mash. Add the salt, baking powder and flour, and stir with a spoon until combined.

Lightly grease a frying pan with butter, then add the dough. Use your hands to flatten it, and put over a medium heat. Cook for 3-4 minutes, then flip over(**). Cook for another 3-4 minutes. Both sides should have lots of brown flecks, but will not be evenly coloured. Serve warm or cold.

(*) This is the weight after cooking. Be sure to use floury potatoes if you can. Waxy potatoes make the tattie scones heavier and the dough is impossibly sticky.

(**) You can either flip in the air, but if you’re not feeling brave, slip the pancake onto a well-floured plate. Then put the frying pan on top, flip over, remove the plate, and the tattie scone will be upside down!

7 Comments

Filed under Recipe, Savoury, Scottish Food

Scottish food: Shortbread, the National Biscuit

Ah, tomorrow is 25 January, Burns Night!

To mark the event, what could be more fitting than the classic Scottish biscuit, shortbread? Just butter, sugar and flour, but combined and baked, they turn into something meltingly delicious, buttery, sweet and incredibly more-ish. There really are few things better with a cup of tea. If you visit Edinburgh or Glasgow, you will see the stuff everywhere, but in my humble view, quite right too.

I like to keep shortbread simple, so I don’t go crazy with flavours. Of course, shortbread can be great with vanilla, spices, citrus peel, dried fruit or chocolate chips, and I would not turn it down if it were offered to me. I just happen to think that the simple sweet, buttery flavour is just great on its own. I will go as far as adding a little pinch of salt, but that’s about it. The only tweak that I make is to add a couple of spoonfuls of cornflour in place of some of the plain flour, which makes the shortbread just that little bit more melting when you eat it. But be sure just to add a little!

Shortbread is also a great recipe if you are looking for biscuits that keep their shape. No egg, baking powder or water, so the biscuits might puff up just a little bit, but generally come out of the oven as you put them in. If you are shopping, you might be tempted by the fancy, intricate petticoat tails variety, but at home, it’s usually a choice between rounds or fingers. I prefer fingers – far easier to dip into your tea! At this stage, I have to confess to being a bit of a nerd – I use a metal rule to cut the dough into strips, the measure equal lengths of dough to make all the shortbread the same size. But hey, sprinkled with sugar and baked, they do look good!

To make shortbread:

• 50g icing sugar
• 100g unsalted butter
• 150g plain flour (or 125g plain flour plus 25g cornflour)
• pinch of salt

Preheat the oven to 180°C (375°F). Line a baking sheet with greaseproof paper.

In a bowl, combine the butter and sugar until creamy. Add the flour and salt, and work until you have a smooth dough. You will probably have to use your hands towards the end.

Sprinkle a worktop with flour, and turn out the dough. Roll to 1cm thickness, and use a cutter or a knife to make the biscuits. Transfer to the baking sheets, and chill the biscuits for 30 minutes in the fridge.

Top the shortbread with a sprinkling of caster sugar, and bake for 15-20 minutes until the biscuits are a pale golden colour.

Worth making? A super-simple recipe that provides a melt-in-the-mouth texture. Can also be customised according to taste with spices, citrus peel, vanilla, chocolate chips or dried fruit.

1 Comment

Filed under Recipe, Scottish Food, Sweet Things

Scottish food: Oatcakes

Do you do superfoods? Every week, it seems like there is something that we should all be eating by the bucket-load to ensure we are all in tip-top-shape. Blueberries, spinach, grapefruit, pumpkin seeds, wheatgrass, cranberries, magic hocus-pocus desert cactus oil…OK, that last one is clearly made up, but I find it quite funny that we keep looking for the silver bullet to solve all our problems. If you haven’t worked it out by now, I am a great believer in “a little bit of what you fancy and everything in moderation” coupled with “eat what’s in season as that’s when it’s best“.

Making a not-very-logical link, what is behind this little rant? Well, I just read a piece on superfoods, and it just got me a bit wound up. Being told about this wonderful thing called “oats” as if they have just been brought forth from the Amazonian jungle. Meh. I’ve known about them for years. Many a winter morning has been kick-started with porridge. But I do agree that oats are pretty darn good – gluten-free (but make sure you buy from the right supplier!), low GI (so they release their energy slowly, so you have energy throughout the day), as well as the less sexy considerations that they leave you feeling full and are rich in fibre. That, and they are very Scottish. I like that!

Two of the most well-known uses for oats are intimately linked with Scottish cuisine – porridge and oatcakes. I realise that the former is very personal (some like porridge with milk and sugar, some make it with cream and add honey and condensed milk, others make it with water and a pinch of salt), so I will instead turn to oatcakes. I absolutely love them. Indeed, they are my snack of choice at work. I usually always have a packet or two stashed at the back of my filing cabinet in case I get peckish during the day. Some might think this is an attempt to show off and look virtuous, but I do happen to find them very tasty and incredibly more-ish, so really rather good for me that they are also healthy.

But how to make oatcakes? Easy? Worth the effort? Well, it is an absolute doddle. You just boil up water and butter, add salt, and pour into some ground oats. This makes a dough, then cut out the oatcakes. Bake, and you end up with a pretty stack of savoury biscuits a lot like this:

Commercial oatcakes are fine, but one of the best things about making oatcakes yourself is that they are very crisp, and have a lovely toasted nuttiness. That, and they are crisp without being too dry.

I find their texture works very well when you pair them with cheese – and in my case, that would be slivers of very tangy, mature cheddar. Perfect after dinner, as a snack, or to nibble on in the evening when watching a film. If you’re feeling fancy, you can even make very small oatcakes, and use as the basis for canapés for…eh…those glamourous parties that we are all throwing these days.

Just be warned – one you start making them, you might find it difficult to stop and switch back to store-bought!

To make oatcakes (makes 16):

• 175g medium oats(*)
• pinch of bicarbonate of soda
• scant 1/2 teaspoon salt
• 15g butter
• 75ml water

Preheat the oven to 160°C (320°F). Grease two baking trays with butter or non-stick spray.

Put the oats and bicarbonate of soda into a bowl and mix.

In a saucepan, heat the salt, butter and water. Bring to the boil, then pour into the oats. Mix to a soft dough using a spoon, then with your hands. The dough should be soft and hold together, but should not be sticky.

Sprinkle more oatmeal on a worktop, lay the dough on top, and roll out the dough to 2-3mm thickness. Use a round cutter (6cm diameter) to cut out the oatcakes, and transfer them to the baking sheets. Gather the scraps in a bowl, add a teaspoon of water if needed, and mix until you have a ball of dough. Use to cut out more oatcakes, and keep going until all the dough is used up.

Bake for 30 minutes until crisp and just lightly golden at the edges. Leave to cool on the baking tray. Store in an airtight container.

(*) Make sure you use medium oats. If they are fine oats, the dough will be too dry. And don’t use rolled oats, as the texture will be all wrong, and then the guests at your glamourous party expecting perfect canapés will be shocked, and we don’t want that…

Worth making? The oatcakes you can buy are nice, but these are much nicer! They have a more “toasted” taste and additional nuttiness, which goes extremely well with cheese after dinner. Definitely worth trying!

7 Comments

Filed under Recipe, Savoury, Scottish Food

Scottish food: Clapshot (Potato & Swede Mash)

To contrast with the very, very sweet tablet I posted a few days ago, clapshot is the polar opposite. Very simple and very savoury. Looking at the list of ingredients, I concede that it does not sound so very exciting, but I can assure you that it all works together beautifully.

Clapshot originates in the north of Scotland, with Orkney usually suggested as its birthplace. This would probably have been the main part of the meal back when life was a lot less comfortable than it is today, but for modern tastes, this makes a fine side dish too.

Now, as if just to prove the point of how different the Scots are, when we talk about “turnip” we mean the orange root vegetable others refer to as swede. If you use white turnips…well, I have never made this with white turnips, but I would imagine that it does not become as soft as swede, so it will be altogether more lumpy, so the dish won’t look as good. By all means try it, but you have been forewarned! In contrast, swede becomes wonderfully juicy and tender when boiled, and changes from a dull peachy hue to a vibrant orange colour, which looks rather fetching against yellow potatoes and flecked with green chives and black pepper. The taste is interesting, and incredibly more-ish: the sweetness and aroma of the swede comes out and mixes with the sharpness of the pepper and chives, tempered by the creaminess of the butter. All this from potato and turnip!

Simple? Yes. But something to tickle the tastebuds? Most certainly.

To make clapshot (as a side for four or main course for two):

• Approximately 500g swede, peeled and roughly cubed
Approximately 500g potatoes, peeled and roughly cubed
• 50g butter
• salt, to taste
• freshly ground black pepper, to taste
• 2-3 tablespoons milk
• 2 tablespoons chopped fresh chives

Bring a large pan of water to the boil. Add the turnip and potato, and cook until the vegetables are tender. Drain, and return immediately to the pot.

Add the butter, chives,  salt, pepper and milk, and use a masher to roughly combine the turnip and potato. Make the mixture as rough or smooth as you like (I like to leave it a little lumpy). Serve straight away while still hot.

If you want to prepare ahead of time, omit the chives when mashing the clapshot. Reheat in an ovenproof dish covered with tin foil, and mix the chives into the clapshot when it comes out of the oven.

If you are feeling creative or want to mix it up a little, you could add a pinch of nutmeg, or use the butter to fry a little chopped onion to add to the mash.

Worth making? Given how simple this sounds, and how quick it is to make, clapshot is very tasty, and a nice way to vary the selection of winter vegetables.

7 Comments

Filed under Recipe, Savoury, Scottish Food

Scottish Food: Tablet

Very excited as LondonEats turns one today! Thanks to all for stopping by and your kind comments over the past twelve months! Taking stock of what I have been up to, I see I have made so many things over the last year, but looking through my recipe index, I noticed that something was missing. Japanese sweets? Got them . French macarons? In there too. Dutch pancakes? You bet. Scottish food…ah, well, bit of a black hole there.

To address this, I’m going to be doing a few posts which celebrate the cuisine of Scotland. But let’s get one thing straight: this does not include the deep-friend Mars bar! This has become the modern stereotype of Celtic cuisine, and one which I am proud to say I have not tried. But mention to people that you come from Scotland, and this is one of the first things that pop in to their heads. Not some of the finest smoked salmon in the world, not the fresh soft fruits, not the forest mushrooms or rich fruit cakes. No, it’s a battered fried chocolate bar. Well, today I start on the path to (trying to) change this.

My timing is also rather good, as later this month we Scots will celebrate Burns Night. This commemorates the birth of the man regarded by many as Scotland’s national poet, Robert Burns, in an evening of haggis, potatoes and turnip, washed down with whisky and accompanied by some of the man’s best-known poems and finally, some dancing as the tables are cleared and the music goes on for a cèilidh.

Let’s start off nice and easy. Scots are known for their sweet tooth, and there is nothing much sweeter than tablet. It looks like fudge, has the colour of fudge, and might even smell like fudge, but it is essentially pure sugar, with enough butter and condensed or evaporated milk to hold it together. It really is that sweet and cloying, but it makes 5 million Scots very happy indeed.

With tablet, I think the right texture matters, and it is only fair to warn those that might want to make this that tablet does not share the smooth, soft texture of fudge. In fact, you are aiming to make something that is quite grainy. That is they way I grew up eating it, and for me, that is the way it should be. You can even see the ghostly frosted fleck from the sugar as it cools on the surface of the tablet. I do like the grittiness against my teeth as I eat it, although my teeth probably won’t last long against this stuff.

You could try to flavour tablet with vanilla or any number of spices, but I really don’t bother as I like it the way it is. Plus, this way you get all the rich flavours of cooked milk and caramelised sugar, which can be so easily lost when you add more aromatic ingredients. What I think is worth doing is adding a little pinch of salt to the mixture. Then simply boil, pour in a tray, cool and cut into pieces. Job done!

To make tablet:

• 150ml milk
• 1kg white sugar
• 1 tin (410g) evaporated milk(*)
• 50g unsalted butter
• pinch of salt

Prepare a large baking tray (e.g. 23 x 33cm) by lining with foil and greasing well with butter.

Put all the ingredients into a large pan. The mixture will bubble up later, so use the largest you can. Heat gently and stir until the sugar has dissolved and the mixture is smooth.

Bring the the boil, then reduce the heat and simmer until the mixture has turned a rich, caramel colour. At this stage, start to test the tablet – drop a spoonful of the mixture into a glass of ice-cold water, and it should form a soft ball when rolled between your fingers. If the mixture is too soft, keep cooking until this stage is reached. If using a candy thermometer, you are aiming for 112-115°C (234-240°F), but testing with the bowl of water is far more fun.

Once ready, remove from the heat. Use a wooden spoon to beat the mixture. You are aiming for a mixture that is thicker and feels grainy (it may also lose its very glossy appearance) but will still flow. Pour into a prepared baking tray, and leave to set, ideally overnight. Once set, cut into pieces and store in an airtight box.

(*) Be careful! This is evaporated (unsweetened) milk, and not the thick, sweet condensed milk.

Worth making? You don’t know sweet until you’ve had tablet. Not really very healthy, but traditional and it is very simple to make, and if you’ve got a sweet tooth, you’ll love this.

11 Comments

Filed under Recipe, Scottish Food, Sweet Things

Phở Chay (Vietnamese Vegetable Soup)

I’m not a great shopper. In all the New Year sales, there was little that I was focussed on buying, other than a set of very large bowls. Dull!

Or is it? Like millions of others, New Year for me (aside for sparklers, streamers and champagne at midnight) means that it’s time to try being a little healthier, and so I figured that I could use these larger bowls to start making healthy noodle soups, something that would be filling without meaning lots of oil or lots of pasta. With that in mind, here is one of my first attempts. I am calling this phở chay (Vietnamese vegetable soup). Or maybe faux-chay? OK, bad joke…

Now, I use the term calling quite on purpose.  I cannot make any promises about how authentic this recipe, but I can at least say that it is made from things that you stand a sporting chance of finding in a well-stocked kitchen and it is pretty darn tasty. Perhaps the only thing I don’t usually have in the house is lemongrass, which I just added as I found it skulking in the back of the fridge, the victim of a well-intentioned but never-attempted citrus and  lemongrass posset.

To bulk up the broth, I have also used the ingredients that I like in this sort of soup – marinated tofu chunks and green beans, and soba noodles as I much prefer them to rice noodles. Soba has the rich, earthyness of buckwheat, and I very much appreciate that it is more substantial and chewy than rice noodles.

Now, when you look at making a phở, it can look like one of those “bit of a faff” recipes, but in fact I have managed to do the whole thing in just over an hour. Just think of it as a simple two-step process:

Part the First: make the broth. I have omitted any attempts at frying anything to start with, and just throw it all in a large pot with lots of water. Onions and other vegetables, plus stock, soy sauce and rice wine vinegar, to serve as the basis, and then a range of aromatics and spices. Star anise and cinnamon seem pretty much essential, and ginger is very much a “nice to have” (I’ve made it without ginger; it’s good, but with ginger it’s better). A teaspoon of sambal olek provides a little more heat, and a heroic amount of garlic tops the whole thing off. But I digress: put everything in a pot, boil then leave to simmer for an hour. One of the very useful things about this soup is that the broth will be strained to remove the vegetables and spices, so there is no need to waste time trimming things so that they look pretty on the table, unless that is your bag. But when you do come to strain the broth, keep the garlic cloves: they are transformed into soft lumps of sheer deliciousness, which are absolutely sublime added to mash or spread onto slices of very crisp bread.

Part the Second: adding “stuff” to the broth. I just go with whatever is to hand. Some sort of noodle is clearly essential, and while rice noodles are traditional, soba noodles really do work a treat here and I much prefer them. Visually not as much of an impact as white rice noodles, but the taste and texture really is great. I also like to add tofu, which I bake, then add to the broth to boil for 10 minutes before serving. This means that it has the chance to soften in the broth and the flavours mix. Then…top it all off with vegetables of your choice. Quick-cooking items such as mushrooms can be sliced and left raw, beansprouts can be thrown in as they are, while string beans or asparagus can be quickly boiled before serving.

Then, assemble it all! Put noodles and vegetables into your serving dishes, then ladle over the broth. Top with spring onions and a sprig of basil, and you’re done! Nothing more to do than get chopsticks and say: Chúc ngon miệng! (*)

For the stock:

• 10 cups water
• 1 large onion, peeled and quartered
• 2 stock cubes
• 2 sticks cinnamon
• 2 star anise
• 1 clove
• 1 cardamom pod
• 3 tablespoons low-salt soy sauce
• 1 tablespoon rice wine vinegar
• 1/2 stick lemongrass
• 1 teaspoon brown sugar
• 6-8 cloves garlic, peeled and crushed
• 1 inch piece of ginger, peeled and sliced
• 1/2 teaspoon sambal olek / chilli paste

To put in the soup:

• marinated tofu chunks
• 75g rice noodles / soba noodles per person, cooked, drained and rinsed
• 2 handfuls bean sprouts
• 2 handfuls mushrooms, sliced
• other vegetables (string beans, shredded lettuce, shredded spinach, shredded carrot), briefly boiled if necessary
• Thai or regular basil, mint leaves and/or lime wedges to garnish

To make the broth: Place all the stock ingredients in a large pan. Bring to the boil, cover, and simmer for at least an hour (can easily be made the night before and allowed to sit so the flavours are able to infuse the broth with their aromas and flavours). Once ready, strain to remove the solids and the broth is ready. You may have to add more water at the end, according to taste.

To prepare the soup: measure the “soup stuff” into bowl, and add enough piping hot broth to cover. Top with sprigs of Thai basil, mint and/or a wedge of lime.

Worth making? I was a little daunted by this at first, given that there are a lot of ingredients, but it was actually very simply to make. The only thing you need is time to allow the broth to simmer, so you get the maximum amount of flavour out of the spices – and I am afraid there is no shortcut for that. I would recommend trying to be light handed with the stock and soy sauce – you can always add more later, and we want the flavours of the anise, ginger, garlic et al to shine in this soup.

(*) Google tells me that this means bon appetit in Vietnamese! – I hope it does!

5 Comments

Filed under Recipe, Savoury

Poached Quince

Ever dreamed of being in an Edward Lear poem? Do you imagine yourself with a feline companion, drifting across the waves in a vessel while searching your luggage for a runcible spoon? If so, then this one will appeal to you…

I am a bit of a sucker for exotic things in stores, especially fruit. I feel the need to buy them, reasoning that I will surely be able to use them very easily. Needless to say, there can be a tendency for some of them to languish in the kitchen until I finally feel a bit guilty and then need to come up with a way to use them, often at short notice as something threatens to get rid of them...

So it was recently with a couple of quinces. They looked so pretty, so bright and yellow, and thus were of course a critical pre-Christmas purchase. They graced the festive fruit bowl, together with clementines and pomegranates, but in the last day or two, as the tree came down on Twelfth Night, they started to look a little forlorn. To make something with them, I thought I would keep it simple, and do something to highlight the colour and aromas of quince, that could be used with yoghurt and muesli in the mornings, or in the evenings as a simple dessert. Poach ’em!

This is a really simple recipe – peel, core and slice the fruit, then poach in a simple sugar syrup, with spices if you feel like it, but that is entirely optional. The flavour of quince is aromatic and delicate, so if you are minded to add a little extra something, then use a light hand. I added on (just one) clove and a piece of vanilla pod. The vanilla is delicate enough to work with the quince, and all the little flecks of black look rather cool. Like this:

What is sort of cool about quince is that it magically change colour when cooked. If you need proof, below are the slices of quince when first cut, and then after they have been poached for about an hour. They change from pale yellow to a pinky, peachy hue. Cook them even longer, and they will tend towards a deeper amber-red, if that’s your thing.

When you eat the poached quince, you also have a wonderful aromatic syrup. Either spoon this over the fruit, cook further (without the quince) to form a rich syrup, or use it as a syrup for ice cream, sorbets or drinks. It’s a New Year. Time to be creative!

To make poached quince:

• 2 quince, peeled, cored and sliced
• 200g white sugar
• 4 cups cold water
• spices according to taste (vanilla, cloves,
cardamom, cinnamon) (*)

Place the quince slices, sugar, water and spices (if using) in a saucepan. Bring to the boil, cover with a lid, then reduce the heat and simmer on a low heat for around an hour. When done, the quince turns pink and the syrup will be a little thicker.

Serve with cream, yoghurt or ice-cream as a pudding, or chopped with muesli for breakfast.

(*) Remember to use just a little – one clove or one pod of cardamom or just a bit of cinnamon…

Worth making? Yes! If you’re keen to try making something with quince, this recipe is both super-simple and yields great results.

2 Comments

Filed under Recipe, Sweet Things

On Location: Brighton Beach and Veggie Food

I started a new job back in July, and as much fun as that has been (and thankfully – still is!), sometimes, you need to get away from it all and have a change of scene. Time for a little pre-Christmas trip (yes, you can see that I am a little behind with blogging!). Not being such a fan of the usual travel hassle of using a London airport, and with a trip to Brussels in December ruling out another Eurostar journey, it was going to be a British trip, and what better than the seaside favorite, Brighton?

Funny thing about Brighton is the beach. Not a long strip of powdery, golden sand. It’s pebbles. And that means a walk along the seafront is a good lower body workout. All that effort and the bracing sea air left me utterly exhausted, which was good, given the heroic quantities of food consumed over the weekend. But as you can see, the coast is still quite picturesque, with the ever-changing sea and skies over the English channel.

But first things first – the tourist highlights. Obviously the beach, and there was the obligatory trip to the penny arcade on Brighton Pier. I know piers and arcades are dreadfully naff, but I still like to go in with a couple of pounds, get 100 two pence coins, and play the cascade machines. Once the pennies are gone, I stop. I like the thrill of this sort of gambling, but I am far too sensible to ever waste a serious amount of cash. Sort of a “thrill lite”.

For slightly the more highbrow, the crowning glory is Brighton’s most famous landmark, the Royal Pavillion (below, lit by night). And yes, it does look like an oriental palace has been plonked in the heart of a very British seaside town. What started as a little holiday house for the then Prince Regent back in the 1820s grew to become an ostentatious display of faux-indo-chinese architecture. But still, there is something rather wonderful about this structure, so unexpected. At the moment, there is a skating rink next to the Pavillion, so everything is covered in winter lights and all in all it looks really quite magical.

Of course, for a food lover, another big draw of Brighton was the prospect of visiting a few well-known vegetarian restaurants! Determined to enjoy a menu where I had too much choice to know what to do with, dinner on Friday was in Food for Friends, a bistro-style affair which claims to be the original Brighton veggie restaurant. And I loved it. The decor is fun and fresh, the maze-like shape means the place feels very intimate and cosy, and the food was downright excellent.

We started with a selection of dips (one butternut squash, one beetroot-feta, and one hummus). The butternut in particular was great – cleverly paired with cinnamon and toasted pinenuts – inspired! I also took the chance to enjoy a glass of English sparkling wine from the Ridgeview Estate in nearby Sussex. If you come across this stuff, I  highly recommend it. I’ve even had a French friend agree that it was excellent (even if I did hide its English origins when I served it). My starter was a sublime ricotta and spinach bake – soft, creamy and souffle-like, and packing a strong, rich flavour that worked very well in slices of crisp olive-oil coated toast. To balance this, my main was a tasty halloumi-mango salad, which hit the spot. Ripe fruit, an interesting selection of leaves and other “bits and bobs” in the salad (nuts, sprouts etc), and wonderful chunks of creamy halloumi cheese. Yes, creamy rather than just plain salty. However, while I went for salad with all the best intentions, I have to admit that once I finished my main, I then ate someone’s potato gratin and sun-dried tomato beignets. Not because I was hungry, but just because it all tasted so darn good. Having eaten to capacity, dessert was not going to happen (rare for me!), but the staff were obliging enough to offer a sample of their special mulled wine to round off the meal. They have a secret recipe involving fresh ginger, lemongrass, star anise and chili peppers, which makes for an aromatic, warming drink that was perfect for the chilly evening. Delicious!

So all in all – very impressed with Food for Friends, and will happily go back next time I am in Brighton. In fact, I was so impressed, I went back the next day, and picked up a copy of their cookbook. Beautiful pictures and some very inspirational recipes, from quick’n’tasty to fancy. I would post pictures of the meal, but it was too dark and I had drunk too much English fizz, red wine and dessert wine to work a camera with any degree of competence, but I did take the bill with me, as someone had included a rather thoughtful little handwritten note on it. I like little touches like that!

The next day, I went for breakfast in town, and chanced upon Tic Toc, a cosy little cafe with a nice selection of breakfast bits.

I know that I should be trying new things, but I was rather boring, and went for the simple but utterly delicious cheddar cheese on toast covered in bakes beans with a good dose of black pepper. Very, very tasty, and something I think I will start making for myself in the mornings. They also had good coffee, fresh clementine juice, and nice baked goods also on offer, which was the perfect set-up to head out to the beach for a long, bracing (i.e. freezing) walk on the English seaside.

Dinner on the Saturday was at the famous Terre à Terre. The atmosphere here was more list a busy London restaurant, with the bonus of friendly and attentive staff(*). A refreshing change to be served by people who were cheerful and knew about the food they were serving!

From the menu, the food looked fabulous, and I was having real trouble deciding on a starter. No worries! You could order a grazing platter with all manner of little goodies, so no need to miss out on anything. Noodles, tofu, Indian things, Spanish things…and my favourite, mild halloumi which was battered and deep-fried, served with a side of fries. Finally, veggie fish’n’chips! Worked like a dream. And for mains, I had a proper soufflé made with local Sussex cheese and a mountain of watercress…plus whatever I could steal from across the table when not being observed (a very tasty rösti dish). I cringe slightly as I write such a gushing post, but it really was all delicious, and I was impressed with how innovative the food was, as well as the effort made to make it look visually stunning. If I were going for dinner with a big group of friends, this is the one I would come to. Again, too dark and too much wine consumed for decent pictures, but I can promise you it’s worth visiting.

Ah Brighton…it was a good couple of days, and I am sorry I did not jump on a train to come and see you sooner. But I promise that I’ll be back soon, but don’t hold it against me. It might just be in the springtime though…

Food for Friends, 17-18 Prince Albert Street, The Lanes, Brighton BN1 1HF. Tel: 01273 202310.

Tic Toc Café, 53 Meeting House Lane, Brighton BN1 1HB. Tel: 01273 770115.

Terre à Terre, 71 East Street, Brighton BN1 1HQ. Tel: 01273 729051.

(*) OK, there are a lot of really great staff in London too.

1 Comment

Filed under On Location

Potato Gratin

Happy New Year!

Another year is over, and we are all thinking about what 2011 will bring. There are those things we know will happen – work, the changing seasons, the promise of holidays – as well as all those unexpected events that will keep life interesting. This blog belongs in the latter category – I started it as a little hobby to keep myself out of trouble and as a way of recording my recipes and challenging myself to make new things, and I am thrilled that so many people are stopping by to check out what I have been doing. Thanks to each and every one of you!

At this time of year, we have usually all consumed our own body weight in cookies, mince pies and chocolates, so it is only natural for the mind to turn to more savoury dishes. While I fully expect that by 8 January my mind will be turning even further to the healthy side of life (light salads, healthy soups), I plan to ease in to this with a satisfying savoury favourite with…eh…rather a lot of cream. It’s my take on potato gratin, or gratin dauphinois if we’re feeling fancy. So not so very healthy, but one step at a time, after all…

I made this recently at Christmas drinks. All that mulled wine and endless plates of biscuit were well and good, but you reach the point where you want something savory, if for no other reason than to stop your guests from lapsing into a hyperglycaemic coma. It was such a hit that the dish was stripped before I could even get to taste it, and people were hovering around the kitchen asking if there was more…

There are a few tricks to guarantee a good result. Firstly, the potatoes: you can use any variety, but if you’ve got the choice, waxy ones are best. Next, do you use raw or parboiled? I have tried this using both, and unless you are an obsessive-compulsive sort, uncooked potatoes are just fine.

What does make a bit of a difference is washing the potatoes. Once you’ve sliced them as thinly as possible, tip everything into a large bowl, cover with cold water, then use your hands to slosh the potatoes around. Tip into a colander or sieve, then repeat. You’ll be truly amazed by just how much starch you remove this way. This means that once you pour over the cream, the potatoes will cook in the liquid, rather than forming a gloopy sauce. We want silky and creamy, not gloopy!

Next, how to season? I like a hit of garlic, but it can easily be too much. The trick here is to whack a clove with the back of a knife, slice in half, and rub the halves around the inside of the baking dish. This gets a subtle whisper of garlic flavour in the final dish. I also season each layer of potato with some salt, and lots of freshly ground black pepper and fresh nutmeg.

And of course the cream. Instinct might say “pour it on”, but there is a trick here too. Rather than just cream, I use a 50/50 mixture of double cream and water. This provides enough liquid for the potatoes to cook in so they become soft, but it reduces down in the oven the just coat the potatoes, and avoids a gratin that can sometimes be too greasy.

And…cheese? A lot of people use it, but I give it a miss. Just dot the top with butter for a glorious golden finish.

So go forth, enjoy this warm, comforting culinary classic, and next week this little cook is moving over to the New Year health drive.

To make potato gratin:

• 50g butter
• potatoes (as many as fit into your dish), peeled and thinly sliced
• 1 clove garlic, peeled
• ground salt
• freshly ground black pepper
• freshly grated nutmeg
• 150-200ml double cream

Preheat the oven to 200°C (400°F).

Cut the garlic clove in half, and rub all over the inside of the serving dish (mine was 20 x 30cm). Spread the base of the dish with half the butter.

Place the sliced potatoes into a large bowl. Cover with cold water, and stir well. The water should turn white from the potato starch. Drain the potatoes, and rinse a second time. Drain again and shake off any excess water.

Layer 1/4 of the potatoes in the dish. Add salt, pepper and nutmeg to taste. Add another layer of potatoes, then more seasoning, then more potatoes, then more seasoning, and then a final layer of potatoes.

In a jug, combine the cream and the same volume of water and stir well. Pour over the potatoes (the cream mixture should come 2/3 of the way up the potatoes). Cut the rest of the butter into small pieces and scatter over the potatoes.

Bake the gratin for one hour until the top is golden, and a knife can be easily inserted. Serve warm.

Worth making? The is a classic side dish, but makes an equally good main dish with a fresh green salad on a chilly winter evening. Definitely one to try! Can also be made ahead of time and re-heated.

Leave a comment

Filed under Recipe, Savoury