Monthly Archives: December 2016

{12} Nadalin de Verona

And here we are! The final installment of 2016’s edition of the Twelve Bakes of Christmas!

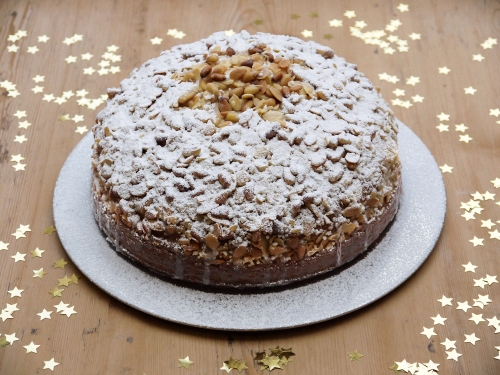
Today I’ve turned my hand to a very traditional Italian cake, the Nadalin de Verona. This is a rich dough raised with yeast, which should hint that it has a long history, pre-dating our modern raising agents. It is flavoured with butter, vanilla and lemon zest, and topped with pine nuts, chopped almonds and sugar.

nadalin2

It is fair to say that the big name of the Italian festive cake world is the panettone, closely followed by the pandoro. I make panettone fairly often, as it is easy with a bread machine and it always proves popular. However, I’ve never had a go at pandoro. The name means “golden bread” and it gets this colour from many, many, many egg yolks in the dough. I’m sometimes a very lazy baker and don’t like ending up with lots of spare egg whites. I guess I’ll get round to making a pandoro the next time I have to make a pavlova…

nadalin1

But back to the star of today. The nadalin (also called the “natalino”) dates back as far as the 13th century, and is suggested as the ancestor of the modern pandoro. It is said to have been created to mark the investiture of the Della Scala family as the Lords of Verona. It is often linked to the most famous tragic romance of all time – the nadalin appears first in 1303, the same time that the events of Romeo and Juliet as said to have taken place. I’m not clear quite what the link is, but this cake may have featured on a medieval banquet table where either of the star-crossed lovers were present.

nadalin3

Now, in the interests of Christmas, I’ve actually made the nadalin not just once, but twice!

I looked at a few recipes before making the nadalin, and settled on the “authentic” version on the website of the City of Verona tourist office. However I am sorry to say it didn’t quite work for me. It is made from eggs, a lot of butter and quite a bit of sugar. My baking instincts said this would be a very rich dough and the yeast might struggle to get a good rise, and it turned out to be so. It was of course perfectly tasty, but it didn’t have the lightness I prefer from sweet breads. This is all personal preference, but what to do?

Well I mentioned that I make panettone quite often, so I looked at my own recipe and adjusted to reflect the flavours of the nadalin – out with the dried fruit, and in with the vanilla and lemon zest. I also added a small handful of crushed sugar cubes to add some additional sweetness to the dough. Entirely optional, but this seemed like a sensible way to get a bit more sugar in the dough without making it too rich to rise well. I’m pleased to say this all worked very well, and the result is a light, sweet and fragrant festive bread.

To finish the nadalin, it is brushed with melted butter and topped with pine nuts and chopped almonds. They were a delicious addition, as they toast during baking to provide some crunch and flavour contrast.

Traditionally the nadalin is baked in a star shape. However I’ve bought so many pieces of baking equipment recently that I had to make do with the round cake tin I already had.  To make up for my cake being the “wrong shape” I made a simple star template and placed it on top of that nadalin before dusting with icing.

The nadalin is traditionally enjoyed with cocoa or a special wine after Christmas Eve mass. I would also quite happily much on a piece of this on a chilly winter evening too!

And with that, my 12 Days of Christmas Baking is over for 2016. I hope you’ve enjoyed it – I’ve enjoyed finding new inspiration, trying new baking techniques and eating the results! See you for the 2017 edition – if you have any suggestions of local specialities that I should try, leave a comment below.

To make a Nadalin de Verona (nom-traditional)

For the dough:

• 2 eggs
• 150ml milk, boiled and cooled
• 75g butter
• 50g sugar
• Zest of 1 lemon
• 1 teaspoon vanilla extract
• 1 1/2 teaspoons dried yeast

• 400g strong white flour
• small handful of sugar cubes, crushed

To decorate:

• melted butter, to brush
• 50g pine nuts
• 50g chopped almonds
• 20g pearl sugar

To finish:

• 100g icing sugar
• water
• icing sugar, to dust

1. Make the dough – I used a bread machine for all the hard work. Put everything apart from the sugar cubes into the bread machine. Run the dough cycle.

2. Crush the sugar cubes. Work into the finished dough.

3. Line a cake tin (or wide saucepan) with greaseproof paper. Take the dough out of the machine, form into a ball, and press into the tin. Leave in a warm place, loosely covered with clingfilm, until the dough has doubled in size. Traditionally this is for 3 hours, but as my recipe is lighter, this could happen more quickly.

4. Just before you’re ready to bake, preheat the oven at 180°C (350°F).

5. Now prepare the topping. Melt some butter, and mix the pine nuts, flaked almonds and pearl sugar in a bowl.

6. Brush the nadalin generously with the melted butter. Sprinkle over the nut mixture and press down very gently.

7. Bake the nadalin for around 45 minutes to an hour until risen and golden, and it sounds hollow when tapped. If the nuts are browning too quickly, cover loosely with tin foil.

8. When baked, remove the nadalin from the oven. Make a simple icing with 100g icing sugar and 3 tablespoons of boiling water, and drizzle on top of the nadalin – this will form a glaze, and help keep the nuts in place.

9. Leave to cool completely, then dust with icing sugar before serving. I used a star template as a nod to the traditional shape.

6 Comments

Filed under Christmas, Recipe, Sweet Things

{11} Marquesas de Navidad

I’m all for including a bit of history around Christmas treat, and I assumed that marquesas de navidad had some long historical pedigree – with sugar, lemon and almonds, they share a lot in common with marzipan. Some sort of medieval delicacy? Something enjoyed during the heyday of the Spanish Empire by Queen Isabella? Their name means “marchioness of Christmas” which sounds very noble indeed. And they are made in these unusual square shapes – obviously special, as I had to hunt high and low to find them.

marquesas1
Well…no. Apparently they were created as recently as 1924 by a confectioner in the town of Sonseca in the Spanish region of Toledo. They were a hit, their popularity spread, and the rest is history. Still, it is nice that new Christmas baking appears from time to time – and of course, everything was baked for the first time at some point in the past!

marquesas2
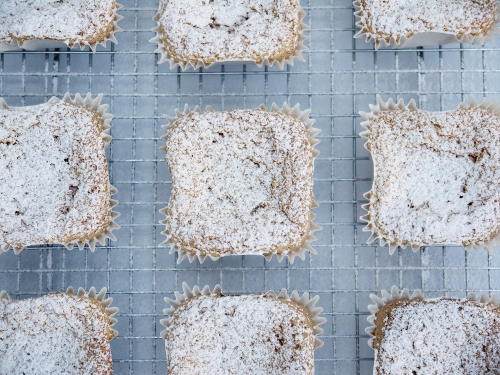
While a comparatively new kid on the block, these marquesas are very straightforward to make – just whip eggs and sugar, then fold in the remaining dry ingredients. The result is a bit like a marzipan cake – they’ve got a fresh note from the lemon zest, and the lovely perfume of almonds, but they are also very light. Simple and delicious. Perfect!

marquesas3

To make Marquesas de Navidad (makes 10)

• 2 large eggs
• zest of a lemon
• 1/2 teaspoon almond extract
• 60g caster sugar
• 60g icing sugar
• 125g ground almonds

• 20g plain flour
• 20g cornflour
• 1/2 teaspoon baking powder
• icing sugar, for dusting

1. Preheat the oven to 180°C (350°F). Line a muffin tray with 12 paper cases.

2. Put the eggs, caster sugar, lemon zest and almond extract into a large bowl. Beat with an electric whisk for at least 5 minutes until thick and foamy.

3. Mix the ground almonds, icing sugar, flour, cornflour and baking powder, then fold into the egg mixture in three portions. Try not to knock too much air out of the mixture – you should end up with a thick batter that still flows.

4. Fill the cake cases to three-quarters full. Bake for 12-15 minutes until puffed and golden.

5. Remove the baked marquesas from the oven and leave to cool – the tops will sink and create dimples in the top. Dust with icing sugar before serving.

Leave a comment

Filed under Uncategorized

{10} Joulutorttu

Christmas treats are often all about cakes or cookies, but today’s recipe is one from that forgotten part of the baking world…Christmas pastries!

I’ve been making joulutorttu, which are traditional star plum pastries from Finland (yes, Finnish baking is getting a double-feature this year). If you think that name is a mouthful, they are also called tähtitorttu, which means star pastries. Those names really are enough to make you give up and reach for more mulled wine…

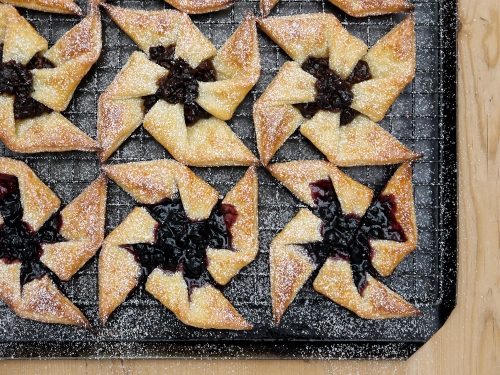
The traditional way to make these pastries is with plum jam or prune filling. I had a look in my cupboards at home, and while I have plenty of jars of jam, I’m lacking anything made with plums. I went for the next best thing – a jar of blueberry jam, which I reasoned was suitably Nordic to be able to pass off as vaguely authentic. I also made some prune filling as a test – I just chopped up some prunes, then cooked them with water, cinnamon, orange juice and some brandy. In the first picture, I’ve used the jam in the top and bottom rows, and the prune filling in the middle row – you can see the different textures.

joulutorttu4

joulutorttu1
There are actually a few different ways to make these little guys. If you are feeling lazy, or are busy, or have pets/small children, then it is quite acceptable to buy a sheet of puff pastry and use that as the basis for the stars. Just be sure to make good, clean cuts so that you get lots of puffing at the edges.

I, of course, opted for a more challenging version. I’ve used a pastry recipe from the Nordic Bakery cookbook. It suggests using a really rich pastry that is made with a decadent amount of butter plus the same amount of quark to bring it all together. I’ve never worked with a pastry like that, so I wanted to give it a go. However, I didn’t have quark to hand, and being too lazy to make the short walk to the main street, I swapped it for some skyr. This is a high-protein and low-fat type of yoghurt which originates in Iceland (and those Icelanders take it very seriously, swearing that the stuff you get in Britain isn’t anywhere near as good as the real thing…well, I like the stuff here just fine, and it worked in my recipe!).

The dough is very soft, and at first I thought it would not work. But I wanted to believe, so I assumed the flour would soak up some of the moisture, and after chilling it overnight, the pastry was indeed perfectly workable. It rolled out easily, and it was straightforward to cut and form into those classic windmill shapes.

Now, the real magic was in the baking. The pastry? Just wonderful. As it has a high butter content (made with equal weights of butter, skyr and flour), it is rich, soft and has a lovely deep golden colour. It is definitely worth the effort of making it yourself. But I do have to warn you – it is a funny dough too. I made my twelve stars from the first rolling of the dough, and they worked perfectly. I then gathered up the scraps and made some more…and boy did they go haywire! It might have been due to the pastry on the first batches being comparatively cool, whereas the later batch was a bit warmer, but they puffed up extravagantly, almost like puff pastry, but they also struggled to bake properly without getting too dark. To avoid this, I recommend working with the dough in two batches, and in each case roll the dough out as square as you are able, so that you minimise any offcuts and can avoid re-rolling the dough.

joulutorttu3

joulutorttu2
Of my two flavour choices, the spiced prune was nice, but I loved the blueberry. I would happily make that flavour again. If you are making a large batch, you can also use various different flavours – plum is traditional, but apple and cinnamon would work well, and I think something sharp like raspberry would be delicious too.

All in all, these Christmas stars from the north were a great success. They are incredibly more-ish. I think I wolfed down three of them in fairly quick succession. They are also at their most delicious while still fresh. They will keep for a couple of days in a tin, but I don’t think you want to delay eating them, and frankly – they taste so good I don’t think you’ll have many hanging around for long.

joulutorttu5

To make Finnish Christmas Star Pastries (makes 12):

For the dough

• 250g butter
• 250g skyr or quark cheese
• 250g strong white flour
• 1 teaspoon baking powder
• pinch of salt

For the filling

• jam or marmalade (or see my prune recipe below)
• 1 egg, beaten
• icing sugar, to finish

1. Make the dough. Mix the butter and quark/skyr. Add the rest of the ingredients and mix until it comes together in a dough – the dough will seem very soft. Wrap in cling film and leave to chill overnight.

2. Preheat the oven to 200°C (400°F). Line a few baking sheets with greaseproof paper.

3. Sprinkle a worktop with flour, then roll out the dough thinly – no more than 5mm. Try to get as square a shape as you can. Cut out squares of 10cm x 10cm. Transfer each to the greaseproof paper, leaving some space between the pieces.

4. Make a small diagonal cut about one-third  towards the centre of the square from each corner, but do not go all the way. Add a spoonful of jam in the centre, then starting at the top, bring the top-right piece into the centre. Repeat on each side to build up the windmill effect. Secure the overlapping dough in the centre with some water and pinch together, then push down and add a dab more jam to cover. Repeat until you have a full tray (I baked them in batches of 4).

5. Brush each pastry with the beaten egg, then bake for around 8 minutes until a rich golden colour, turning after 4 minutes to get an even bake.

6. When done, remove from the oven, and leave to cool for a few minutes on the paper. Transfer to a wire rack to cool, then dust with icing sugar before serving.

To make plum filling: finely chop 100g of prunes. Add 150ml water and a large pinch of cinnamon. Bring to the boil then simmer until the mixture seems thick and almost too dry. Add a tablespoon of brandy and a tablespoon of orange juice. Mix well and leave to cool.

3 Comments

Filed under Uncategorized

{9} Hallongrottor

I’ve made some rather elaborate things in the last couple of weeks, so today I’ve turned my hand to something easy. If you’re looking to amuse some small kitchen helpers with limited attention spans, then this might be one to try.

These little biscuits are called hallongrottor, a Swedish bake which means “raspberry cave”. I guess they are a type of thumbprint cookie, but with just about the cutest name possible. I realised that I’ve ticked off Norway, Denmark and Finland already this year, so it only seems fair to make something from Sweden.

hallongrottor1

Making these little guys is a complete breeze. You just need to work with some very soft butter, and whip it until it is super-soft. Add icing sugar and beat some more, then add your flavourings and beat some more. You could make this by hand with a whisk and lots of elbow grease, but your arms will thank you for using an electric beater. One for the Christmas list if you don’t already have one!

Finally, you work in the flour, then roll the dough into balls. To get them more or less the same size, I rolled this out on a worktop into a long sausage, then cut into equally sized pieces. How equal? I used my precision Japanese steel ruler. Every piece was two centimetres exactly. Sounds nerdy, but it will get you pretty good even sizes without the faff of weighing each piece.

hallongrottor2

To finish them off, you then roll them into balls, then make a dent for the jam. I tried various kitchen implements, but by far the easiest way was to bend my index finger, and poke the middle “bony bit” into the top. You may want to use clean hands for that part…and then just pop your jam of choice into the dent. I tried using a small teaspoon and it was a complete mess. Use a piping bag, and beat the jam until soft before trying to pipe it in. I didn’t do this at first, and so the nozzle of my piping bag got blocked, then lots squirted out when I squeezed hard, so be careful!

I actually made two versions of these – one using just plain flour, and one using a about one-fifth cornflour. It is definitely worth using the cornflour – the texture is lighter and more crumbly – so that’s the recipe I have included below.

hallongrottor3

To make Hallongrottor (makes 15)

• 100g butter
• 50g icing sugar
• 1/2 teaspoon baking powder
• 1/2 teaspoon vanilla extract
• 1/2 teaspoon ground cinnamon (optional)
• 100g plain flour
• 25g cornflour
• jam (I used seedless raspberry)

1. Preheat the oven to 180°C (355°F). Put 15 mini cupcake cases on a baking sheet.

2. Put the butter in a bowl and beat until very soft. Add the icing sugar, baking powder, vanilla and cinnamon, and beat well until fluffy. Add the flour and cornflour, and mix well. Put the bowl in the fridge for 10 minutes.

3. Remove the dough from the bowl, roll into a long sausage and cut into 15 pieces. I roll it out to 30 cm long, and cut into 2cm chunks – this gets roughly equal sizes.

4. Roll each piece into a ball, then put into a paper case. Make an indentation in the top, and fill with a little jam.

5. Bake for 10 minutes until golden, turning half way to get an even bake.

Leave a comment

Filed under Christmas, Recipe, Sweet Things

{8} Kourabiedes

Kourabiedes are a traditional cookie from Greece. And that should set some alarm bells ringing…

I always approach making traditional cookies with a little bit of trepidation. In this case, I have visions of Greek mothers and grandmothers raising their eyebrows and rolling their eyes. In my head, there is this Greek chorus of collective tutting as an entire people just know that their version is clearly superior to my attempt. And that their recipe is obviously better than everyone else’s attempts as well…

kourabiedes1
With that disclaimer out there, I still think that my attempt is pretty decent. I mean, with all that icing sugar on them they look like they are made of snow!

In fact, they are part of a family of similar cookies – polvorones in Spain, Russian tea cakes or Mexican wedding cakes, or Austrian vanilla crescents. What they have in common is a sweet, crumbly pastry with chopped nuts, with the whole cookies dredged in icing sugar to provide even more sweetness.

kourabiedes2
This is a very easy recipe to make. You just need to whip up the butter to get it nice and soft, then whip lots of air in as you add the sugar, egg yolk and various flavours. I’ve used vanilla as a background flavour, and combined it with brandy and orange blossom water. It is also important to use toasted nuts in this recipe – the nuts all some crunch to contrast to the soft, crumbly texture of the biscuit, but toasting them means the cookies had a richer flavour.

Shaping them is a doddle too – I found that it was worth chilling the dough slightly before shaping, as it made it a little easier to handle, but otherwise just scoop up spoonfuls of the mixture and roll them in your hands. However, I would not recommend my usual roll-into-a-sausage-and-cut-into-slices approach, as the mixture is a bit too soft for that. Tablespoons all the way!

Once you have baked the kourabiedes, you get another chance to add more flavour. I’ve seen recipes where Greek matriarchs liberally sprinkle ouzo over the hot cookies, which might be the way to go if you like aniseed flavours. I went for a less adventurous option and brushed them with some brandy cut with a little rosewater. There was a little sizzle, a puff of steam and a lovely aroma!

While the kourabiedes are still warm, you also need to get them into a dish full of icing sugar. They will still be fragile, so handle them with care. The icing sugar will combine with the butter in the cookies to form a sweet coating, then move them to a cooling rack and use a sieve to give them another coating of icing sugar. Get into the festive mood by imagining that this is snow. Then leave them to cool, and pile them high on a plate to serve alongside good strong coffee, or perhaps that herbal tea you picked up on holiday in Greece.

Καλά Χριστούγεννα (Kala Hristouyienna, Greek for Merry Christmas)!

kourabiedes3

To make Kourabiedes (makes around 30)

For the dough:

• 250g unsalted butter
• 125g icing sugar
• 1 egg yolk
• 1 tablespoon brandy

• 1 tablespoon orange blossom water
• 1/2 teaspoon vanilla extract
• 75g toasted almonds, ground
• 75g toasted almonds, chopped
• 1 tablespoon baking powder
• 300g plain flour
• pinch of salt

To finish:

• 1 tablespoon brandy
• 1/4 teaspoon rosewater
• icing sugar, to cover

1. Preheat the oven to 180°C (350°F) and line a baking tray with greaseproof paper.

2. Put the butter in a bowl and beat well until light and fluffy. Add the icing sugar and egg yolk, and beat for another couple of minutes. Mix in the brandy, orange blossom water and vanilla and give it another good whip, then fold in the ground almonds.

3. In a separate bowl, combine the chopped almonds, flour, baking powder and salt. Fold into the butter mixture and mix until it all comes together. You might need to use your hands at the end. Pop in the fridge to chill for 10 minutes.

4. Take generous spoonfuls of the dough. Roll half of them into balls, transfer to a baking sheet and flatten slightly. Roll the other pieces of dough into balls, then shape them into crescent shapes and transfer a baking sheet.

5. Bake the cookies in batches of 12 for around 15 until just golden, turning them half-way to get an even bake. In the meantime, mix the brandy and rosewater in a dish.

6. Once baked, remove from the oven and brush immediately with the brandy-rosewater mixture. Allow to cool for a moment, then roll them in icing sugar. Transfer to a cooking rack, and dust generously with more icing sugar and leave to cool.

2 Comments

Filed under Christmas, Recipe, Sweet Things

{7} Florentines

I can never resist a good Florentine. There is something about those golden discs of caramel, studded with cherries, citrus, nuts and ginger and dipped in chocolate that is just magical. They might not strictly be a Christmas treat, but I think they lend themselves very well to this time of year.

florentines1
In my younger days, I assumed that Florentines were named after the city of Florence, but it turns out this is only partly true. I should have suspected this to be the case when, years ago, I had a few hours to explore Florence while waiting for a train connection (and hey, it was Florence, I was hardly going to hang out at the station for three hours!). Were there shops groaning under the weight of these biscuits? No. I found one pasticceria selling square Florentines, so I cut my losses and went with one of them. But clearly this was not a biscuit that the citizens of this city were clutching close to their collective bosom.

So what is the truth? Well, this is lost in the mists of time, but the name probably has something to do with the French, and the resemblance of these caramel discs to the gold coins of Florence (incidentally, the British two shilling coin was also known as the florin).

florentines2
There are two ways you can make these cookies. If you drop spoonfuls onto a baking sheet lined with greaseproof paper, they will spread out and you get large, crisp and delicate Florentines (there is enough butter in them to prevent sticking). However, you can drop small teaspoons into the bottom of a non-stick muffin tray – they’ll be slightly thicker but perfectly round so good if you’re giving them as a gift and need to travel with them and want them to look fancy. My pictures are of these “neat” Florentines, and I think they look very pretty.

However…if you’re going to use a muffin tray, please make sure that it is sufficiently non-stick! I assumed non-stick means non-stick. Well, I have two pans. One works like a dream, but the other is anything but non-stick. I found myself trying and ultimately failing to remove one batch from the tray, and had to junk the lot. As the mixture does not need to be baked quickly, you can take your time and do a test version to make sure it works. If it doesn’t, just switch to making the bigger versions using a tray with greaseproof paper. You don’t want all that work to go to waste and they will still taste fantastic!

To finish them off, you can leave them as they are (or “naked Florentines” as I’ve seen them called) but I think you really do need to spread one side with chocolate. If you are a milk or white chocolate fiend, then by all means go for it, but I think it really has to be dark chocolate on these little beauties. I think it works so well with the toasted nuts, ginger and citrus in the biscuits, and why mess with a classic? To make them look impressive, use tempered chocolate for a nice shine and snap, and use a fork to make a wave pattern in the chocolate.

Incidentally, if you think you’ll do a lot of dipping things in chocolate, it really is worth getting a food thermometer. They are not expensive and it means you can get your chocolate to the right temperatures. I’ve tried various methods over the years, but using the thermometer is hands down the easiest and most reliable method I’ve every tried. Never have dull chocolate again!

florentines3
In terms of the ingredients, you can play around with them to get a mixture that you like. You can use slivered almonds instead of flaked, or swap some of the almonds for pistachios, hazelnuts or even a handful of jumbo rolled oats. You can also adjust the proportions of cherries, peel, ginger and sultanas, or even omit some of them altogether, but try to keep to the same overall weight. You can even go for a retro vibe if you can get your hands on some green candied angelica – I remember those flecks of bright green in Florentines from my childhood, but it seems to have vanished from most supermarket shelves these days. If you find some – it’s a sign that you should make Florentines!

To make Florentines (makes around 24)

Dry ingredients

• 90g flaked or slivered almonds
• 90g glacé cherries
• 60g candied peel, chopped
• 20g glace ginger
• 30g sultanas
• 15g plain flour

For the caramel

• 45g butter
• 30g soft brown sugar
• 30g white sugar
• 1 tablespoon double cream
• large pinch of salt

To finish

• 150g dark chocolate

1. Preheat the oven to 180°C (350°F). For large Florentines, line two large baking trays with greaseproof paper rubbed with a little butter. For small Florentines, get a non-stick muffin tray and rub lightly with butter.

2. Prepare the dry ingredients – chop the cherries, peel and ginger as you prefer, then add the almonds, sultanas and flour. Toss so that everything is coated and well-mixed.

3. Make the caramel – in a small saucepan, heat the butter and sugars. Bring to the boil, then take off the heat, add the cream and salt, and stir well. Pour onto the dry ingredients and mix well.

4. Put generous teaspoonfuls of the mixture onto a baking sheet or into a muffin tray. If using a baking sheet, flatten them as much as you can, but leave enough space for them to expand as they bake.

5. Bake the Florentines for 8 minutes, turning around half-way to get an even bake. They will be soft at first, but will harden as they cool.

6. To finish the Florentines, melt the chocolate (for a professional finish, you want to temper it – find out here). Using a teaspoon, spread some chocolate on the underside of each Florentine, then using a fork to make a wave pattern in the chocolate. It might not be obvious at first, but you’ll see it once the chocolate sets.

2 Comments

Filed under Christmas, Recipe, Sweet Things

{6} Kransekager

Each year, reaching my sixth post is something of a relief – we’ve made it to the half-way point without the kitchen catching fire or being destroyed by scalding molten sugar and burning butter. It feels like we’re on the home stretch, even if it means I’ve got to produce another six bakes to complete the series. Every time I do this challenge, I really enjoy it, but baking against a (self imposed) deadline of Christmas Eve does sap a little of the fun out of the process. And then we do it again the next year…

To celebrate getting this far, I’ve made a celebratory cake. Kransekager hail from Denmark, as well as Norway where they go by the radically different moniker of…eh…kransekake. They are made from a mixture of ground almonds, sugar and egg whites, which is mixed into a marzipan-like dough, and then baked until golden. The result is a slightly crisp exterior, with a soft, chewy centre, and they are utterly delicious. They also happen to be gluten-free if that’s your thing.

The impressive way to make them is by shaping the dough into ever-smaller rings (krans means wreath), then drizzling each layer with white icing to build a tall conical tower that can hide a bottle of champagne. These cakes are popular at Danish weddings, and in Norway on national day on 17 May. I’ve seen some suggestions from Danes that kransekager should be eaten at midnight on New Year’s Eve with champagne. I’m not a massive fan of champagne with very sweet things, so I’ll leave that one to you. To each their own!

kransekager2
There is also a variation on the kransekage tower. Rather than a cone which rises into the air, the rings can be arranged into an overflødighedshorn (say that after a few glasses of champagne!) which means “horn of plenty” or “cornucopia”. This can then be filled with sweets and chocolates, for a truly dazzling showstopper. If you’re looking for a way to serve all your Christmas baking in a memorable way, then this might be the way to do it. Perhaps I’ll have a go at that next year.

All these fancy cakes are great when you’ve got the time, but as you can see, I’ve avoided the elaborate cake tower and a fantastical horn of plenty, and instead made a simple bar form, with either end dipped in dark chocolate.

kransekager1
I have found a few Danish versions online which all suggest using marzipan, sugar and egg white. However I’ve learned the hard way that what we call marzipan in Britain has quite a high proportion of sugar to nuts (usually a 3:1 ratio, rather than the 1:1 in Danish “raw” marzipan). The result in the past has been that I’ve ended up making things that were so sweet they were inedible! No worries about that here – I’ve made this using equal parts of ground almonds and icing sugar to get the perfect balance. I’ve also added a little bit of almond extract for that distinctive flavour. I love it, and a little really enhances the kransekager, but if you want to leave it out you can.

kransekager3
These were really easy to make – the dough comes together easily, and it straightforward to shape. I opted for some long batons – you just measure out the dough, roll it into a ball, then roll into a long sausage. I’ve finished them with traditional white royal icing, but I dipped the ends into dark chocolate  – this provides a flavour contrast to the sweetness, but it also tidied up the messy ends after I’d baked them. I was originally going to leave them with just the icing, but I picked up the chocolate tip from Gitte at My Danish Kitchen. If you’re interested in finding more Danish recipes, her blog is great and there are so many recipes on there – it it’s Danish, I think Gitte has made it at some point!

To make Kransekager (makes 10)

For the marzipan dough

• 1 large egg white
• 150g ground almonds
• 150g icing sugar
• 1/2 teaspoon almond extract

For the icing

• 75g icing sugar
• 1 tablespoon egg white
• few drops of lemon juice

To finish

• 100g dark chocolate

1. Preheat the oven to 180°C (355°F). Line a baking tray with greaseproof paper, and rub the paper with a dot of butter to prevent sticking.

2. Lightly beat the egg, then add the ground almonds, icing sugar and almond extract. Mix to form a soft dough (start with a fork, then finish with your hands).

3. Divide the mixture into 10 pieces. Dust a worktop with icing sugar. Form each piece into a ball, then roll each one into a sausage, around 9cm long. Press the sides so that you have a long triangle. Transfer to the baking sheet, leaving space between each for the kransekager to expand slightly.

4. Bake the kransekager for around 13-15 minutes until just golden, turning half way for an even bake. Remove from the oven and leave to cool.

5. If dipping in chocolate: temper the chocolate, then dip either end of the batons in the chocolate. Transfer to a sheet of greaseproof paper and leave to set.

6. Make the icing – briefly whisk the egg white, then add the icing sugar and lemon juice. Beat until smooth but stiff – add more icing sugar is needed. Transfer to a piping bag and drizzle a zigzag shape on top of the kransekager. Leave to set.

2 Comments

Filed under Christmas, Recipe, Sweet Things

{5} Cavallucci

When I started doing my annual Christmas baking project all those years ago, I tended to focus on what I knew, and with the exception of panettone, pretty much everything was from Northern Europe. Over the years I’ve looked beyond the well-known bakes, which has led me to look more and more at Italian Christmas cookies.

We have all seen those rainbow cookies with a chocolate glaze, but what I find interesting are the traditional regional specialities. Every part of the country seems to have its own unique baked goods, often reflecting the traditions and ingredients of the area the recipe comes from, which makes it rewarding to explore, as well as to make and then eat. Yes, unlike looking at lots of churches and medieval villages, exploring the culinary landscape has the bonus of being delicious. And today’s Christmas treat takes us to the city of Siena. Meet my batch of cavallucci.

cavallucci1
The name cavallucci literally means “little horses”. They are said to date back to the time of Lorenzo de’ Medici (also known rather modestly as Lorenzo the Magnificent and who ruled Florence in the late 1400s). Their name comes either from the fact that the original cookies had an impression of a horse on top, or due to the fact they were eaten by stable hands who worked as part of whatever passed for the postal system of the gentry in those days.

Fortunately the flavour of cavallucci is very far removed from anything horse-like. They contain a lot of walnuts and candied orange peel, as well as traditional spices including coriander and aniseed.

cavallucci2
Luckily, this is a recipe that is fairly simple to make. Once you’re prepared the dry ingredients (flour, nuts, spices, candied and dried fruits), you add a sugar and honey syrup to forma dough. This is left to cool for a moment, then rolled out and sliced into individual cookies for baking. No fancy moulds, no intricate decoration, no gilding and no messing around with icing or tempered chocolate. What a relief! And if you’re looking for a vegan option, swap the honey for your favourite syrup. Or if you’re a honey fan, you can swap some of the sugar and water for more honey.

cavallucci3
These are very rustic-looking little morsels of festive cheer. They look like they have been dipped in sugar, but they’ve actually been rolled in flour before baking. I think it looks rather nice, as it goes them a slightly snowy appearance, and it means the cookies have a more balances level of sweetness.

As I was making these, I was reminded of that other Siena classic, panforte. You prepare the dry ingredients, add lots of spices, nuts and candied peel, then bind it all with a sugar syrup, although the ratios of ingredients are different, and cavallucci include some raising agent. I did wonder if a raising agent was traditional, and I think it probably is not, but most of the classic recipes that I found, including that of the Siena tourist board, suggest using baker’s ammonia. I used this too as I have some in my baking cupboard, and I’m always on the look out for a recipe that uses this most stinky of ingredients. It certainly makes the cavallucci puff up nicely in the oven and you get a lovely light texture, with a crisp outside and slightly soft centre. If you can’t get hold of baker’s ammonia, other recipes suggest using baking soda, so it should be alright to use that instead – if you do give it a go, let me know how you get on.

To make Cavallucci (makes 50)

• 200g shelled walnuts
• 100g candied peel (e.g. orange, lemon, citron)
• 30g icing sugar
• 2 teaspoons baker’s ammonia
• 2 teaspoons ground coriander
• 1 teaspoon mixed spices
• 1/4 teaspoon aniseeds, crushed
• pinch of black pepper
• 650g plain flour
• 300g white sugar
• 150ml water
• 25g honey

1. Preheat the oven to 150°C and line a baking sheet with greaseproof paper rubbed lightly with some neutral oil.

2. Roughly chop the walnuts and candied fruits. Put in a large bowl and add the icing sugar, spices, baker’s ammonia (or baking soda) and flour. Mix well.

3. Put the sugar, water and honey into a saucepan. Heat gently until the sugar has dissolved and there are no crystals left (you want the sugar to just dissolve, but do not let it boil). Remove from the heat, allow to cool for a few minutes, then pour the liquid over the dry ingredients. Mix well with a wooden spoon. It should be firm but sticky.

4. When the mixture is still warm but cool enough to handle, take teaspoons of the mixture and drop onto a plate dusted with flour.

5. Roll each piece into a ball (it should be coated lightly with flour), place on the baking sheet and flatten to around 1cm thickness.

6. Bake the cavallucci for around 15 minutes until they are puffed up, but they are still pale (they only get a very slight colour during baking).

4 Comments

Filed under Uncategorized

{4} Piparkakut

Gingerbread biscuits are found across the Nordic countries around Christmas time. There are some different shapes, different spices and some might have nuts or fruit added, but they share a spicy flavour and crisp texture. The Finnish version are piparkakut. I won’t even try to work out if that is the singular or plural name, as the Finnish is fiendishly complex! Instead I will distract you with my “elk in a snowy forest with squirrels under the stars” gingerbread fantasy. Hands down these are my favourite cookie cutters from what is probably an unnecessary large collection to being with!

piparkakut1
These cookies are incredibly more-ish. Because they are so light and crisp, you can happily much on two, or three, or four of them, and really not get full at all. In contrast, try eating four British mincemeat pies in one sitting and you’ll be floored for the rest of the day!

I made these using “dark syrup” (tumma siirappi in Finnish). This is a thick, sweet syrup that has almost a chocolate-like flavour, but none of the bitterness of molasses or black treacle. It also seems to be the right stuff as a quick search online shows pictures of syrup containers with gingerbread figures on them! But if you can’t get hold of this stuff, you can happily use golden syrup. Honey would work in a pinch, but it tends to produce slightly different results, so you might not get the same crisp texture as you get with syrup.

I made these once with a special ingredient that I thought would make them extra-fancy. I had dried some peel from Seville oranges, so I thought I would grind it up and add it to the dough for an extra aromatic orange flavour. Well, it worked…except that it worked just a little bit too well. The flavour and aroma were superb, but after a moment a strong medicinal flavour and a numbness took over, rather like sucking on a throat lozenge. Sadly my attempt to be fancy just ruined the whole batch! I did leave them for a couple of weeks in a dark cupboard in the hope that they would improve, but that eye-wateringly extreme orange flavour was still there, lurking in the dark, waiting for me. Never again! Just stick with a normal orange, or perhaps some Clementine or mandarin zest if you want to feel fancy. I’ve still got that jar of dried Seville orange peel hidden in a cupboard, taunting me…

piparkakut2
This recipe is great if you want to make a lot of very intricate cookies that keep their shape after baking. As you can see, the various cutters I used worked really well and I got nice sharp edges. I mean, if you’re going to go to the effort of making an elk, you want people to know that it is an elk, right? I’ve left them plain, but you can easily coat them in dark chocolate, or ice them with intricate patterns.

Finally, a word of caution. You might think a teaspoon of baking soda is not really enough in this recipe. Well, don’t be tempted to up the quantity of baking soda – I’ve tried adding more to provide more rise (assuming this would provide a crisper cookie too) but it easily turns into a soapy aftertaste. Yes, I’ve had a few issues with trying to mess around with this recipe in the past!

Makes around 40-50 cookies

• 110g (80ml) dark syrup or golden syrup
• 100g caster sugar
• 100g butter
• 2 teaspoons ground cinnamon
• 1 teaspoon ground ginger
• 1/2 teaspoon ground cloves
• zest of 1/2 orange
• 1 large egg
• 400g plain flour
• 1 teaspoon baking soda
• 1/4 teaspoon salt
• cold milk, to bind

1. Put the syrup, sugar, butter, spices and orange peel into a saucepan. Warm gently, then bring to the boil. Leave to cool.

2. Beat the cooled sugar mixture with the egg until fluffy. The mixture will be very soft.

3. Mix the flour, baking soda and salt, and stir into the rest of the ingredients. Add more flour if too wet, or add cold milk (a tablespoon at a time) to bring it together. Wrap in cling film and leave to chill overnight in the fridge.

4. The next day, preheat the oven to 150°C (300°F). Line a baking sheet with greaseproof paper.

5. Roll out the dough thinly (around 3-4mm). Cut out the cookies and transfer to the baking sheet. Tip: roll the scraps together and pop in the freezer to chill – it makes the dough easier to work with.

6. Bake for around 10-12 minutes until browned and slightly puffed, turning half way to get an even bake.

Note: It is worth baking one cookie first to test how long you need to bake them. If you are making different sizes, it is best to bake the same sized cookies together. Also be careful if your cookies have thin parts (like the legs on the elk) as they can burn easily.

1 Comment

Filed under Christmas, Recipe, Sweet Things

{3} Biscotti di Regina

Biscotti di Regina originate from Sicily, and the name means “queen’s cookies”. I’m not sure if they are named for or after a particular queen, but with a name like that, they are promising a lot!

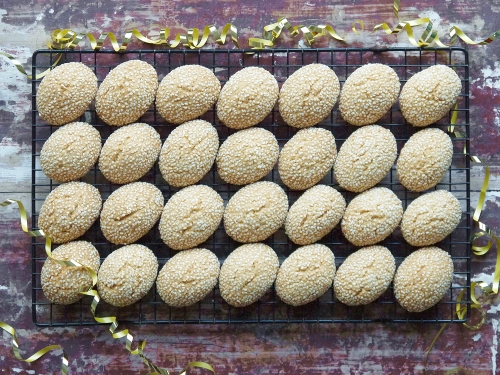
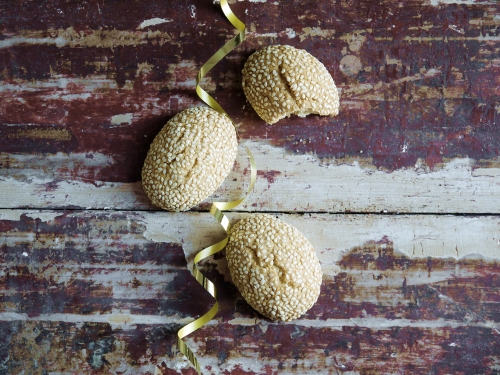
These delightful little morsels are sweet and buttery, with a coating of sesame seeds the pop slightly when you bite into them. They also look very pretty, as the seeds form a neat pattern on the outside of the dough. I think they are a nice addition to the festive table, providing a contrast to all that chocolate, ginger, citrus and dried fruit. Yes, I know, shocking to believe that those flavours can all get a bit much, but sometimes you want something simple to enjoy with a cup of tea.

biscottiregina4
I think these cookies have something of a Middle Eastern flavour, what with the sesame seeds and orange blossom water. Hardly surprising when you think about the history of trade across the Mediterranean.

However, if you want to play around with the flavours, you could swap the vanilla and orange blossom water for something else – aniseed is a typically Italian choice, and orange or lemon zest would add a stronger citrus note than the orange blossom water. If you’re feeling particularly creative, you could really depart from Italian flavours, and add things  like cardamom or even rose water. There are even versions that use saffron, if you want cookies with a spectacular golden glow.

biscottiregina1
These biscotti are very straightforward to make – just rub the butter into the dry ingredients, then add egg and flavourings to get a soft dough that is just very slightly sticky. You’re rolling these guys in seeds, so you want it to be a bit sticky. If it is clinging to your fingers in great lumps, you’ve probably got too much liquid, so just add a bit more flour.

I shaped the biscotti by rolling into balls, then flattening into a squat sausage shape, so when they baked they formed an oval shape. If you prefer, roll them into very long, thin fingers for a more elegant shape to dip in coffee or vin santo, and adjust the baking time accordingly. For finishing, I used hulled white sesame seeds, which I think makes them look quite festive, almost like they’re coated in snowflakes. If you’re feeling adventurous, add a few black sesame seeds for some contrast, or go the whole hog and roll them in only black sesame seeds for a dramatic look.

biscottiregina2

To make Biscotti di Regina (makes 30)

For the dough:

• 375g plain flour
• 225g butter
• 150g caster sugar
• 1 1/2 teaspoons of baking powder
• 1/2 teaspoon of salt
• 1 egg
• 1 teaspoon vanilla extract
• 1 teaspoon orange blossom water
• cold milk, to bind

To decorate:

• 100g sesame seeds

1. Preheat the oven to 175°C (350°F) and line a baking sheet with greaseproof paper.

2. In a bowl, combine the flour, sugar, baking powder and salt. Add the butter and work until it resembles breadcrumbs.

3. Beat the egg with the vanilla and orange blossom water. Add to the main bowl, and work to a smooth dough. If necessary, add cold milk, a tablespoon at a time, to bring the mixture together. It should be firm, but slightly sticky.

4. Divide the dough into three batches. Roll each piece into a long sausage about 30cm long, and cut into 10 pieces (3cm each).

5. Roll each piece into a ball, then form into a sausage shape between your hands. Roll in the sesame seeds to coat completely, then transfer to a baking sheet (leave enough space between each piece to expand).

6. Bake for around 25 minutes until golden, turning after 15 minutes to get an even bake.

3 Comments

Filed under Christmas, Recipe, Sweet Things