Tag Archives: sweden

{10} Struvor

When I made my Slovak ginger cookies I boasted proudly that I had not bought a special cutter to make them. This was not due to some new-found restraint on my part, but because I had already bought my novelty baking item for the year. That item was a rosette iron, which is used to make light, crisp, fried cookies in intricate patterns.


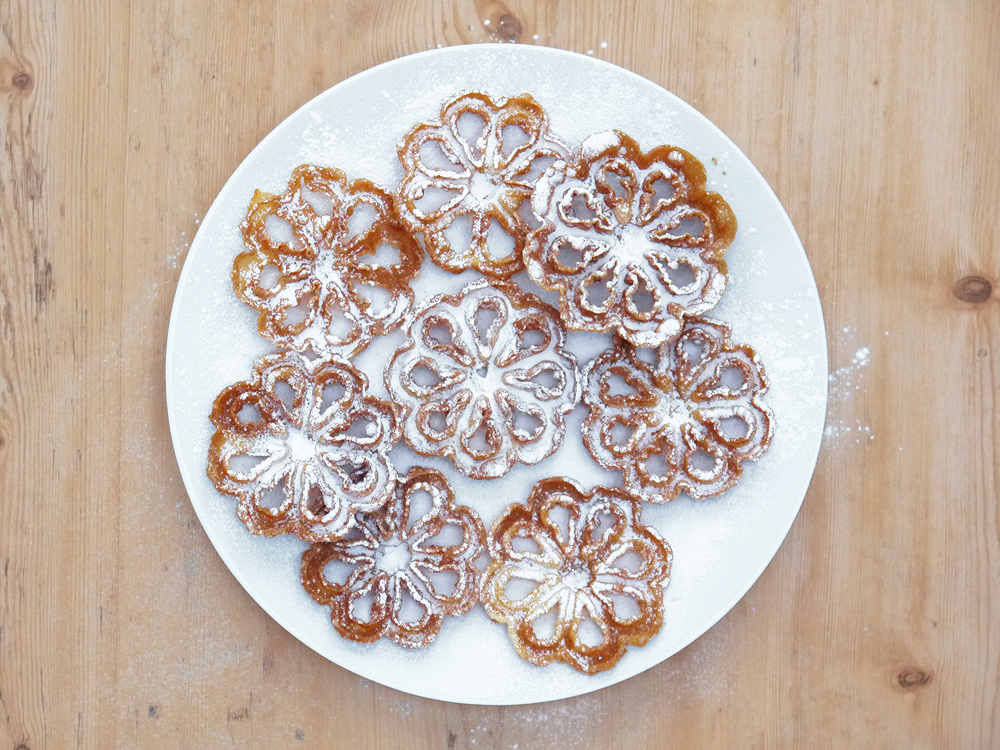
In English these are called rosette cookies and are popular in parts of the US with Scandinavian heritage. They appear with similar fancy patterns in Norway and Denmark, and as funnel cakes in Finland, but I’ve gone with the Swedish name struvor as I’ve lived in Sweden, and have used the recipe from Johanna Kindvall at Kokblog as my inspiration this year.


I must admit making fried cookies is a style of baking I’m not familiar with. I’m all for enjoying a donut or fried snacks, but making them at home tends to leave me a bit uneasy as I’ve got a bit of a fear of cooking things in a big bubbling vat of oil. But in a year that has made doing many things impossible, I felt it was right to give them a go. I also made sure I had suitable fire safety equipment in my kitchen, so I felt a bit happier with the big sizzling pan knowing that I was probably not going to set fire to the house (spoiler: the house is still fine).

While they look complex, they are actually quite easy to make if you have the equipment and enough time. But this is not a recipe to make when you have pets or small children running around!  The mixture is similar to pancake batter, so takes just a few minutes to mix up. You then heat the rosette iron in the oil, then when it is very hot, you dip it carefully into the batter. A thin layer of the batter will cook on impact, and then when you put the iron back into the oil, the cookie will release itself from the iron and fry to a golden colour.

I learned from experience that you need to let the rosette iron get very hot in the oil before you start. My first two attempts were really bad – the iron was not hot, so the dough did not stick, and they were a complete mess. It was just trial and error that helped me work out how to do it properly. Apart from that, the only advice I can offer is to make sure you have lots of kitchen paper on plates to drain excess oil from the cookies, and to make sure you’re able to open lots of doors and windows so your house does not enjoy the lingering aroma of cooking oil! Once you’ve got the knack, you’ll be able to turn out plate after plate of these little guys.


With the frying part done, I finished my struvor off in a few different ways. Some were dusted with icing sugar, and they were delicious. I dipped some others in cinnamon sugar and a few I finished off with sugar and ground cardamom. All tasted good, but my favourite (and the one recommended by Johanna) was the cardamom. It is a fresh, citrussy flavour that brings a bit of zing to these cold dark days.

So, how are they? Really, really great. They’re crisp, sweet and really feel very festive. They’re certainly not something you would eat every day, but that’s pretty much the point isn’t it? They transported me to a Christmas market where some sort of sweet, fried delight is de rigueur.

Struvor are best made fresh, but if you struggle to eat them all in one sitting (which is easy as even a small batch can easily run to 30…) you can store them if you don’t put sugar on them right away. Put them in an airtight container and pop them in the freezer, then revive them in a warm oven when you’re ready to eat them. While they’re not quite as good as when freshly made, they will regain their crispness and a sprinkling of sugar will revive their charm.

To make Struvor (makes around 30), based on the recipe on Kokblog

For the batter

• 150ml whole milk
• 1 tablespoon cream
• 1 egg
• pinch of salt
• 2 tablespoons lager
• 90g plain flour
• 300ml vegetable oil, to fry

To finish

• icing sugar, cardamom sugar or cinnamon sugar

1. Prepare your work area. Layer several sheets of kitchen roll on a couple of large baking sheets.

2. Make the batter. In a large bowl, beat the egg. Add the milk, cream, salt and lager and. Finally add the flour and salt and mix until smooth. Leave for 10 minutes to rest.

3. Get your sugar ready. Mix caster sugar with spices of your choice, and spread out on a plate. If using icing sugar, put some into a small sieve and keep close at hand.

4. Time to fry! Put the oil into a saucepan, and heat to 180°C. When up to temperature, dip the rosette iron into the oil to heat it – you want it to be good and hot, so leave for at least 30 seconds. Take the iron out, and dip just the bottom part of the iron into the batter (be careful that it does not come all the way up and cover the iron, or the cookies will not form).

5. Put the iron back into the oil, and submerge the batter in the oil. The cookie should start to peel off like magic, but you may need to give it a little helping hand with a knife.

6. Let the cookie fry for a few seconds, then turn it over and cook for another few seconds until golden. Remove the cookie from the pan, allow excess oil to drain, then transfer to the tray lined with kitchen roll. Allow to cool for a moment.

7. If using cardamom or cinnamon sugar: press one side of the still-warm cookie into the sugar, then leave to one side to cool completely. Now start with the next cookie…

8. If using icing sugar: when you’ve cookies all your cookies, dredge liberally with icing sugar.

Leave a comment

Filed under Christmas, Recipe, Sweet Things, Uncategorized

{2} Finska Pinnar

As much as I love mince pies and things coated in chocolate, I also like more simple cookies, so that’s what we’ve got today.


These are Swedish butter biscuits called finska pinnar. The name translates cryptically as “Finnish pins”. I’ve tried to find out why they are called this but with no success. I did find an article on the website of the august Swedish Newspaper Svenska Dagbladet and even they don’t know the origin of the name. A mystery for the ages.

These are very quick and easy cookies to make – there is no elaborate rolling and shaping of cookies. You just roll it out, flatten with your hands, and cut into pieces, so this is a good one to make with children where you want to keep it easy. There is also no need to leave the dough to chill before you shape it, which is good when willing but impatient elves are keen to get going!


The dough itself is not that sweet, so you are relying a generous topping of chopped almonds and pearl sugar. You need an egg yolk for the dough, and then you use the egg white to glaze the tops. The art is then to get as much chopped almonds and pearl sugar on top, so you’ve got extra sweetness and some crunch to contrast with the buttery shortbread.

Of course, it would not by my Christmas basking selection if there was not some sort of random ingredient in here. Many recipes I looked at call for a bitter almonds to give finska pinnar their almond flavour. That’s the way to go if you’re keen on a bit of drama and some danger in your life, as apparently you need to be careful just how many you use. They contain cyanide and can be toxic if you eat too much! In the end I went for the easier option and just added a dash of almond extract to get all the flavour without the danger. Okay, so I might be exaggerating just a touch for dramatic effect…

To make Finska Pinnar (makes around 40)

For the dough

• 375g plain flour
• 250g unsalted butter
• 1/2 teaspoon salt
• 125g caster sugar
• 1 teaspoon almond extract
• 1 egg yolk

To decorate

1 egg white
40g whole almonds, roughly chopped
pearl sugar or granulated sugar

1. Preheat the oven to 200°C. Prepare three sheets of greaseproof paper.

2. Put the flour, butter, salt, sugar and almond extract into a bowl. Rub together until the mixture resembles breadcrumbs. Add the egg yolk and quickly mix to a soft dough.

3. Divide the dough into 4 pieces. Roll each into a long rope, about finger thickness. Press them lightly to around 1/2 cm thickness. Cut into 4cm slices.

4. Transfer the cookies to the greaseproof paper. Brush lightly with the beaten egg white, then sprinkle generously with chopped almonds and pearl sugar. Put on a tray, and chill in the fridge for a few minutes.

5. Bake for 8-10 minutes until golden, turning half-way to get an even colour. Remove from the oven, allow to rest for a moment, then transfer to a wire rack to cool completely.

1 Comment

Filed under Christmas, Recipe, Sweet Things

{8} Knäck

Had enough cookies yet? Then you’ll like today’s festive goodness – knäck, a traditional Swedish Christmas sweet. They are delicious caramels that are easy to make, and while the mixture simmers on the stove, you’ve got a kitchen that smells delicious.


To make knäck you only need to put cream, sugar and syrup in a pan. You cook it to the right temperature, then pour it into your preferred shapes. It is traditional to use little paper cups, and I’ve also made some paper cones from greaseproof paper. To stop the cones unravelling, I used some gold-polka-dot washi tape, and secured them with red and white baker’s twine. I’ve always had a bit of an aversion to piles of cookies tied with twine (seriously – who does that apart from in pictures?), but I feel pretty pleased with myself that it is entirely functional here. To note, I did not oil or grease the cups. The caramel did stick to the cups, but by the next day the caramel had absorbed a bit of moisture from the air, and the paper cups could be peeled off easily. The greaseproof paper was true to its name, and the caramel cones/spikes came right out.

The only “tricky bit” here is getting the caramel to the right temperature. I’ve said it before, and I’ll say it again. Get a candy thermometer. I’ve got a fairly basic electronic one, and it’s defiantly a great investment. Any time you are working with a sugar syrup (or doing things like tempering chocolate or making jam) it makes life a lot easier. I’ve tried testing whether something has reached the hard ball stage by dropping teaspoons of boiling sugar into cold water, and it’s far easier to push a button and check we’ve hit 130°C. If you don’t have one, perhaps you could ask Santa for a last-minute stocking filler?


If pouring the caramel into individual moulds is not your thing, you could just pour the caramel mixture into a single large sheet (called knäckbräck) and then break it into pieces later. This would be a good idea if you want to present it at a party and smash it up theatrically. Come to think of it, I remember that being a “thing” many years ago – you could buy a block of toffee, and it came with its own little hammer to break it up. Anyway, the single sheet approach is probably the best way to make knäck if you have kids and animals running around and not a lot of time to carefully pour hot syrup into fiddly containers.

One thing to watch is that you don’t end up with pieces of caramel you can’t eat. I recommend you opt for a “less is more” approach. If you fill the little cups too much, or your knäckbräck is too thick, you’re setting up yourself and any guests for dental problems. If the layer is thinner, you’ll actually be able to eat them.

The actual texture of this recipe is a hard caramel at room temperature, but they soften as you eat them. I recommend a little patience as you eat them, just to avoid cracking teeth and fillings being pulled out. I know I’m making the same point over and over, but I really don’t want people having dental issues over the festive period.

A good thing about knäck is that you have lots of scope to play around with flavours. I opted for simple toasted flaked almonds. I’ve also added some salt as I think this improves the taste and takes them away from simple sweetness to something more complex. Get creative! Play around with flavours – just before pouring, you can add citrus zest, or peppermint oil, or cocoa powder (or a combination of these) – or switch out the almonds for other nuts or dried fruit, or sprinkle the finished knäck with seeds, coconut, or even crushed candy canes for a properly festive twist. If you’ve got some helper elves in the kitchen, you could get a little production line going with different toppings.

To make Knäck (makes around 50 pieces)

• 200ml double cream
• 200ml golden syrup or Swedish light syrup (“ljus sirap”)
• 200g white caster sugar
• 1/2 teaspoon salt
• 20g butter
• 50g chopped or flaked almonds, toasted

1. Heat the oven to 160°C. Spread the almonds on a tray and bake until they are lightly golden and fragrant. When they are ready, just turn off the heat but leave them in the oven so they stay warm.

2. While the almonds are toasting, make the caramel. Put the cream, sugar, syrup and salt in a large saucepan. Heat and bring to the boil.

3. Keep the mixture on a gentle rolling boil until it reaches 130°C on a sugar thermometer. It took about 20 minutes for me, but focus on the temperature rather than the time.

4. In the meantime, line a baking tray with 50 small paper cups. If you are using paper cones, find a way to keep them upright – I pushed them through a cooling rack balances above a saucepan to hold them.

5. When the caramel is ready, remove from heat. Add the butter and warm almonds, and mix quickly until combined.

6. Acting quickly but carefully, pour the mixture into the paper cups and leave to cool. If the caramel gets too thick as you are pouring it out, reheat it gently until it flows easily again.

Leave a comment

Filed under Christmas, Recipe, Sweet Things

{9} Hallongrottor

I’ve made some rather elaborate things in the last couple of weeks, so today I’ve turned my hand to something easy. If you’re looking to amuse some small kitchen helpers with limited attention spans, then this might be one to try.

These little biscuits are called hallongrottor, a Swedish bake which means “raspberry cave”. I guess they are a type of thumbprint cookie, but with just about the cutest name possible. I realised that I’ve ticked off Norway, Denmark and Finland already this year, so it only seems fair to make something from Sweden.

hallongrottor1

Making these little guys is a complete breeze. You just need to work with some very soft butter, and whip it until it is super-soft. Add icing sugar and beat some more, then add your flavourings and beat some more. You could make this by hand with a whisk and lots of elbow grease, but your arms will thank you for using an electric beater. One for the Christmas list if you don’t already have one!

Finally, you work in the flour, then roll the dough into balls. To get them more or less the same size, I rolled this out on a worktop into a long sausage, then cut into equally sized pieces. How equal? I used my precision Japanese steel ruler. Every piece was two centimetres exactly. Sounds nerdy, but it will get you pretty good even sizes without the faff of weighing each piece.

hallongrottor2

To finish them off, you then roll them into balls, then make a dent for the jam. I tried various kitchen implements, but by far the easiest way was to bend my index finger, and poke the middle “bony bit” into the top. You may want to use clean hands for that part…and then just pop your jam of choice into the dent. I tried using a small teaspoon and it was a complete mess. Use a piping bag, and beat the jam until soft before trying to pipe it in. I didn’t do this at first, and so the nozzle of my piping bag got blocked, then lots squirted out when I squeezed hard, so be careful!

I actually made two versions of these – one using just plain flour, and one using a about one-fifth cornflour. It is definitely worth using the cornflour – the texture is lighter and more crumbly – so that’s the recipe I have included below.

hallongrottor3

To make Hallongrottor (makes 15)

• 100g butter
• 50g icing sugar
• 1/2 teaspoon baking powder
• 1/2 teaspoon vanilla extract
• 1/2 teaspoon ground cinnamon (optional)
• 100g plain flour
• 25g cornflour
• jam (I used seedless raspberry)

1. Preheat the oven to 180°C (355°F). Put 15 mini cupcake cases on a baking sheet.

2. Put the butter in a bowl and beat until very soft. Add the icing sugar, baking powder, vanilla and cinnamon, and beat well until fluffy. Add the flour and cornflour, and mix well. Put the bowl in the fridge for 10 minutes.

3. Remove the dough from the bowl, roll into a long sausage and cut into 15 pieces. I roll it out to 30 cm long, and cut into 2cm chunks – this gets roughly equal sizes.

4. Roll each piece into a ball, then put into a paper case. Make an indentation in the top, and fill with a little jam.

5. Bake for 10 minutes until golden, turning half way to get an even bake.

Leave a comment

Filed under Christmas, Recipe, Sweet Things

{7} Saffron and Almond Buns

Right, enough with the biscuits! I think it’s time to broaden the festive fare, and move over the buns, and what buns they are! I’ve decided to make a “twist” on traditional Swedish lussebullar, the famous saffron buns served around St Lucia on 13 December, but I’ve made them in a spiral rather than the usual scroll shape. If you want to know more about this, I recommend this article on Foodie Underground by Anna Brones and Johanna Kindvall (who also did the fabulous illustrations) for some history on the buns and the Scandinavian traditions around the celebration of St Lucia.

This is actually an adaptation of my cinnamon bun recipe, but without the usual spices. Instead, the dough contains saffron, so it turns the most glorious shade of golden yellow when you’re making it. Really, it is almost worth doing just to see that bright, glowing colour. It will make you happy, honestly! Not only is it a treat for the eyes, but the aroma of the saffron is also quite intoxicating (if you happen to like saffron, of course).

saffronbuns2

You could just make these without any filling (usually there is none in authentic lussebullar), but I got a tip from a reader, suggesting using grated almond paste and sultanas per a family recipe. In all honesty, I was  sold on this idea the moment I read about it, but could not resist a peek into my copy of The Flavour Thesaurus to check whether saffron and almonds are a “thing”.

Well, it turns out they are, the book confirming that almonds and saffron are a good combination. Apparently, it’s the bitter notes in saffron that marry well with the sweet-bitter flavours in almonds. I also happened to have half a bar of almond paste from making Bethmännchen a few days ago, so a perfect way to make sure it didn’t go to waste. In a nod to the original recipe, I skipped the sultanas in favour of currants, and I think they worked well – their smaller size suited these buns, and the contrast of the yellow and black looks really quite jolly.

saffronbuns1
Of course, the important thing here is the taste test, and I am happy to report that my fake Scandinavia festive saffron buns are utterly, ridiculously delicious!

The saffron and almonds are fragrant, and they were amazing while fresh and still warm (or cheat – 10 seconds in the microwave if you’re a little late to the party). They also don’t need much by way of decoration – nothing more than a quick glaze when they come out of the oven to give them a lovely shine, but otherwise, they look stunning as they are. Bright and sunny, such a contrast to the grey chill outside. These would be a perfect addition to a festive brunch!

saffronbuns3
In all honesty, I have to say that this is a bit of  cheat’s version of proper lussebullar. They are normally shaped into intricate scrolls or other shapes, and my roll-and-slice approach just skips all that. However, if you’re busy around Christmas and want something a little different, I really cannot recommend these highly enough.

To make Saffron Buns (makes 12):

For the dough:

• 2 teaspoons instant yeast
• 50g white caster sugar
• 60g butter
• 150ml milk, scalded and cooled
• 0.5g saffron threads (a teaspoon)
• 2 eggs
• 1/2 teaspoon salt
• 325g strong white flour

For the filling:

• 100g currants
• 120g almond paste

For the glaze:

• 50g white sugar
• 50ml water

1. Put the milk in a saucepan. Bring the boil, remove from the heat, crush the saffron strands, add to the milk and leave the lot until lukewarm.

2a. If using a bread machine: put one of the eggs, the saffron milk and the rest of the dough ingredients into the mixing bowl. Run the “dough” cycle. Simples!

2b. If making by hand: put the flour and butter into a bowl, and rub with your fingers until the butter has been incorporated. Fold in the salt, sugar and yeast. In a separate bowl, combine the milk mixture and one egg, then pour into the dry ingredients. Stir with a spoon, then work with your hands until you have a smooth, stretchy, silky dough (at least 5 minutes). Leave the dough a warm place for an hour until the dough has doubled in size. Knock back and knead again for 2-3 minutes.

3. Once the dough is ready, turn it onto a floured surface. Roll into the largest rectangle you can. Sprinkle over the currants, and grate the almond paste directly onto the dough. Roll up into a sausage. Use a sharp knife to cut into 12 slices.

3. Lay each slice, cut face up, on a bun case. Cover with cling film or a damp cloth and leave to rise for at least an hour until doubled in size.

4. Preheat the oven to 200°C. Beat the remaining egg, and use to brush on the buns.  Bake for 10-12 minutes until golden, turning half way if necessary. If they are browning too quickly, cover loosely with tin foil.

5. In the meantime, make the sugar glaze. Put the sugar and water into a saucepan, bring to the boil and cook for 1 minutes.

6. When the buns are done, remove from the oven and brush them while still warm with the hot sugar glaze.

Worth making? Just one word – sensational!

4 Comments

Filed under Christmas, Recipe, Sweet Things

{11} Pepparkakor

Many years ago, when I arrived in Stockholm to study there for a year, I discovered pepperkakor, Swedish spicy gingerbread biscuits. Admittedly, I arrived there in August, and it was not really until December that we got into the Christmas mood, but you get my drift.

Unlike the slabs of soft, squidgy gingerbread we know in Britain, these are rolled out thinly, cut into just about any shape you can imagine, and then baked until crisp. They can be finished with royal icing and jazzed up with silver balls, drizzled with melted chocolate, or left au naturel. Or served in the shape of an elk. To each his own…

pepparkakor8

I love pepparkakor for the very simple reason that they are among the least fussy of Christmas biscuits. They don’t need masses of decoration, and given they are rarely drowning in icing, jam or chocolate, you can happily nibble on them on an almost constant basis. Their spiciness also goes well with tea, coffee or the ubiquitous mulled wine.

As you can see, I’ve got a little crazy when it comes to cutting out shapes. Sure, I’ve got loads of the traditional stars, hearts, and circles, but I’ve also got a whole gingerbread forest going on here – trees, elks, foxes and squirrels. The elk, in particular, looks nothing short of amazing.

pepparkakor3

pepparkakor4

While the woodland fantasy was purchased in Ikea (where else?), for the hearts and stars, it was an altogether classier affair. I received two copper cutters from my friend Anne, which not only cut the dough easily, but they look really lovely. They’ve already acquired a prime spot in the kitchen on the knick-knack shelf. These things are too pretty to hide away in a drawer.

pepparkakor5

For the recipe, I’ve used the version from Signe Johansen’s excellent Scandilicious Baking, albeit with a few tweaks. The main changes I have made is to play around a little with the spices. While Signe added a dash of black pepper as a nod to the origin of the name of these treats, I quite like the heat from pepper, adding half a teaspoon of black pepper. I don’t find this to be too much – it is actually very rich, warming and aromatic – but if you’re a little less keep, feed free to go easy on the pepper. I’ve also thrown in some coriander and allspice, and toned down the cinnamon. I like cinnamon, but I do like to get the flavours of the other spices I am using. I’ve also added the zest of a clementine for an added dash of festive goodness. The flavour is not overpowering, rather it serves to complement the spice.

I’ve also used dark brown sugar to provide the colour for these biscuits, and in place of Signe’s almost equal weights of treacle and golden syrup, I’ve used just two tablespoons of treacle here. I’m just not mad keen on treacle, but if you’re a treacle (or molasses) fiend, then by all means, knock yourself out.

Now, while I’ve banged on about how amazing pepparkakor are just as they are, they also serve as the perfect foil to go totally nuts in the decoration department. Whip up some royal icing and get going – silver balls look particularly good, and if you want to do something a little different, try studding them with a few red peppercorns. Not only do these look really pretty and festive, but when you bit into them, you get the warm, rich hit of spice. If you want to use them the way I’ve used the silver balls here, then feel free, but do taste one before serving to your guests. They’ll thank you for that, believe me!

pepparkakor6

When it comes to actually making these biscuits, I’ve got a few practical tips. First, it really is important to keep the dough chilled. It makes it much easier to roll out and cut (the colder dough comes out of the cutters). Second, if you want to cut out very fussy shapes, you’re best to roll the dough onto a sheet of greaseproof paper, then cut out the shapes and remove the excess. I tried cutting the elks on the worktop, and they all fell apart as I tried to move them onto the tray. Finally, it is worth putting the tray with the cut dough into the fridge for a few minutes before baking – this will help to keep the edges of the shapes in place. If you’ve gone to all the effort of cutting out pepparkakor to look like elks, you want them to look like elks!

pepparkakor7

pepparkakor9

It’s worth knowing that this recipe does make masses of cookies. You can either make half the amount, or bake it in batches as you need to whip up new batches (or if you’re going to leave it a while between bakes, freeze the dough in batches). If you make these cookies and find that they get a bit soft after a few days, just pop into a low oven and allow to dry out for a few minutes. They will come out soft, but will crisp up when cool, getting back their ginger snappiness in no time.

So…what’s your favourite spicy biscuit at this time of the year?

To make pepparkakor, adapted from Scandilicious Baking (make 50-80, depending on size):

• 75g light brown sugar
• 75g dark brown sugar
• 150g butter
• 1 clementine, zest only
• 50ml milk
• 120ml golden syrup (add 2 tablespoons of treacle if you want)
• 2 egg yolks
• 2 teaspoons ground cinnamon
• 1 teaspoon ground ginger
• 1/4 teaspoon ground cardamom
• 1/2 teaspoon ground cloves
• 1/2 teaspoon ground black pepper
• 1/2 teaspoon ground allspice
• 1/2 teaspoon ground nutmeg
• 1/2 teaspoon ground coriander
• 1 teaspoon bicarbonate of soda
• 450g plain flour

1. Put the two types of brown sugar and the butter into a bowl. Beat until light and fluffy. Add the clementine zest, milk, syrup, egg yolks and spices and beat well for another minute.

2. Add the flour and bicarbonate of soda and mix to a soft dough. Wrap in cling film and chill in the fridge overnight.

3. Preheat the oven to 150°C (300°F). Line a baking tray with greaseproof paper.

4. Take pieces of the chilled dough. Roll out very thinly on a well-floured worktop and cut out whatever shapes your heart desires.

5. Bake the cookies for around 10 minutes until browned but not too dark. They might need more or less time, depending on their size. When done, remove from the oven, the leave to sit for a moment then transfer to a wire tray to cool completely.

Worth making? These biscuits are highly recommended – very spicy, very crisp and very, very more-ish.

4 Comments

Filed under Christmas, Recipe, Sweet Things

Swedish Pancakes

When it comes to Scandinavian food, it’s all to easy to fawn over the cool aesthetic of places like Noma or think that it’s all about cinnamon buns. However, something that I really like is one of the simplest things you can make – straightforward Swedish pancakes, served the merest dusting of icing sugar and topped with lingonberry jam.

swedishpancakes3

These are made with one of those handy-to-remember recipes, based on a ratio of 2-3-6. That’s 2 decilitres of flour, 3 eggs and 6 decilitres of milk. Yes, the decilitre. Odd, huh? This is something that you come across fairly rapidly if you dare to venture into Swedish cooking, but it does at first prompt a little confusion if you’re not used to it. It’s equivalent to 100ml, but as you might have worked out by now, I’ve got a bit of an aversion to volumes-based measurements. I’ll happily measure our liquids in a jug, but when it comes to dry ingredients, I always go with my natty set of digital scales. If you’ve never tried, you really need to get a set! So much easier for getting precise quantities. Never again do you need to worry about whether flour needs to be compacted or not before adding to batter…anyway…

swedishpancakes2

These pancakes are similar to crepes. The batter is very thin (you would think that the flour is not enough for all that milk, but it is!), so when you add the batter to the frying pan, you need to make sure you quickly spread the batter to get them thin and round. When it comes to flipping, you need to be quite confident with these little fellows. If you use a non-stick pan, then the butter in the batter will stop them from sticking. It’s then just a case of shaking the pan to loosen the pancake, and then you need to flip them with a firm, confident motion. Do it this way, and the pancake with do a mid-air somersault that should impress onlookers. However, if you lose your nerve, then you’ll end up with a pancake that folds itself in half and sticks into a big, doughy mass. Be confident!

The lack of sugar in the batter also means that these pancakes work equally well with savoury or sweet flavours. If you’re trying the keep with the Swedish theme, I’d add some cheese or mushrooms. Otherwise, jam is a favourite, with lingonberry being the classic.

Now, you may or may now know that I am a bit of a compulsive collector of all manner of edible berries. I subscribe to the school of thought that says you should never pick things that you are not completely sure of, so if you’re going to don your country finest and go foraging for berries this weekend, just stick with what you know.

Anyway, I was on a trip to Finland and managed to come away with a decent amount of lingonberries from the forest to the west of Helsinki. They made it back to London, and have been hidden in the back of the freezer for a while now. I thought they would be perfect with these pancakes – I just popped the berries into a saucepan, added some water and a little sugar (one quarter of the weight of the berries) and within minutes, I had a simple lingonberry compote. If you’re not familiar with the flavour, it’s sweet and tart, but less sharp than cranberries, and it’s great on top of pancakes. If you’re in Sweden, you’ll even find the stuff served with meat and potatoes. Sadly it was too much like jam for me to think of it as something to eat with savoury dishes!

These are great for breakfast – I make the batter the night before, so you can whip up a batch first thing in the morning.

swedishpancakes1
To make Swedish Pancakes (makes 16):

• 200 ml (100g) plain flour
• 1/2 teaspoon salt
• 600ml milk
• 3 eggs
• 3 tablespoons butter, melted and cooled

1. In a bowl, mix the flour and salt with half the milk until smooth. Add the rest of the milk and eggs, and beat well. Leave to sit for 30 minutes (or overnight in the fridge).

2. Add the melted butter to the batter in a thin stream, stirring constantly.

3. Heat a non-stick frying pan on a medium heat. Add enough batter to make a think pancake, tilting the pan to make sure the batter is evenly spread. Cook until set, then shake to loosen the pancake. Flip and cook the other side.

Worth making? Of course. Who doesn’t like pancakes?

14 Comments

Filed under Recipe, Sweet Things

Sweet Beets

I think beetroot is one the most under-appreciated vegetables. It’s got a lot going for it – a sweet, earthy flavour and a colour that is literally shocking. But it has done rather badly thanks to the favoured British way of serving it. I mean, why would you want to use it in its lovely fresh state when you can pickle the thing in vinegar and turn it into something astringent and rather naff? I mean, why?

Well, time to change that. I love cooking with beetroot, and find that it is really versatile. It makes a great sauce for pasta or gnocchi (cooked up with cumin seeds, cream and fresh dill), sensational hot and cold soups and beetroot juice gives you vibrant, natural colours in savour and sweet dishes. When icing a cake, beetroot will give you one of the hottest pinks you could wish for. It can also be used in baking, making wonderful beetroot and chocolate cakes that are moist, chocolatey and nutritious. Convinced yet?

One of the easiest things to make is a Swedish-style beet and apple salad. Worth making for the stunning colour alone. My timing is also spot on – tomorrow is Sweden’s national day, so the country will be awash with flags, smörgåsbord and (probably) beetroot salad.

beet_salad_1

This salad is just apple and beetroot, finished off with a little onion, sour cream and seasoning. It is by turns fruity, savoury, creamy and fresh. It is also incredibly easy to make – just chop-chop, mix-mix, and you have a colourful and delicious summery salad, which is great with a light lunch or as part of a brunch spread. This is my take on the version served at London’s Scandinavian Kitchen – I was too shy to ask them for their recipe (which I would imagine is secret anyway) so I’ve tried to re-create this so I can get my fix in the meantime.

beet_salad_2

This makes a good lunch served alongside other Scandinavian delights like dill potato salad, crispbread and goodies like meat and fish.

To make Swedish beetroot and apple salad:

• 4 medium beetroot
• 4 crisp apples, peeled and cored
• salt, to taste
• pepper, to taste
• 1/2 small white onion, very finely chopped
• sour cream (use a 300ml pot)
• dill, to finish

1. Cook the beetroot – drop them whole into boiling water, cover and simmer until the beets are tender (around an hour). Drain and leave to cool (this is a good thing to do the day before).

2. Peel the cold beets – trim off and discard the top and bottom, and use the back of a knife to rub off the skin – it should just come off without the need to cut the beets. Once peeled, cut the beets into small chunks and put into a large bowl.

3. Peel and core the apples, cutting into small cubes. Add to the beets.

4. Add the onion, salt and pepper to the beets, plus as much sour cream as you like. You want the beets and apple to be well-coated, but not swimming in cream. Stir well until everything is shocking pink. Enjoy cold, and watch your tongue change colour!

Worth making? This is a straightforward summer recipe – easy, fresh and delicious. Recommended!

13 Comments

Filed under Recipe, Savoury

Cinnamon Buns for Busy People

I’m a mega fan of a good cinnamon bun (as well as their cardamom cousins). But much as I love to make buns using yeasted dough, but there is one problem – these are recipes that taste great when they’re fresh, but if you need to allow several hours of proving time to get a nice, puffy dough, then it’s not really compatible with the idea of a lie-in at the weekend when you want to munch on cinnamon buns for breakfast. So what can you do?

I’m aware that some folk have mastered the technique of slow-rising the dough overnight in the fridge. I’ve tried it in the past, but with less than stellar results, so it’s something I still have to perfect. In the meantime, I’ve come up with a solution (of sorts). The technique is pretty much identical to the “traditional” method, but uses baking powder in place of yeast. This means that you don’t need to leave the dough to rise, and can get them done is less than an hour. It also means the recipe is foolproof, and you still get a decent amount of lift, and in the case of one bun, a rather spectacular amount!

So, how do they compare to the buns made with yeast? In fairness, this baking powder version is not quite as as light and fluffy, but I think that this is a reasonable trade-off when you need to whip up a batch in a bit of a hurry. However, they do look good and you’ve got my word that they still taste utterly delicious. That, and you get those extra hours in bed at the weekend rather than having to get up at 6am to prepare a fresh batch…

Cinnamon_no_yeast2

Cinnamon_no_yeast

To make cinnamon buns (makes 12):

For the dough:

• 180ml milk
• 60g butter
• 1 medium egg
• 50g caster sugar
• 280g strong white flour
• 1 teaspoon salt
• 1 generous teaspoon freshly ground cardamom
• 4 teaspoons baking powder

For the filling:

• 60g butter, soft
• 60g caster sugar
• 3 teaspoons ground cinnamon

1. Preheat the oven to 200°C (400°F). Line a baking tray with white bun cases.

2. In a saucepan, bring the milk to the boil. Take off the heat, add the butter, then leave until the butter has melted and the mixture is lukewarm.

3. Make the filling – beat the sugar until soft, then add the sugar and cinnamon. Mix until very soft and smooth. It should be easily spreadable.

4. Whisk the egg and divide in two (you need half for the dough, and half for the glaze).

5. Put the flour, sugar, salt, cardamom and baking powder into a bowl. Mix, then sieve well. Add the milk mixture and half of the egg, and mix to a soft dough. If needed, add more flour, and knead lightly until you have an elastic dough.

6. Turn the dough onto a floured surface. Roll into a large rectangle until the dough is about 1/2 cm (1/4 inch) thick. Spread with the filling, then roll up into a sausage. Cut into 12 slices with a sharp knife, and lay each piece, cut face up, on a bun case.

7. Take the remaining egg (remember that?) and mix with a tablespoon of water. Brush the buns with the egg wash and sprinkle with pearl sugar. Bake the buns for about 12 minutes until puffed up and golden.

7 Comments

Filed under Recipe, Sweet Things

Knäckebröd (Swedish Rye Crispbread)

The eagle-eyed among you may have noticed that my post about a rather hot lentil soup included some sort of crackers on the side. What were they? While I am sure that folk are not exactly lying awake at night, fretting with uncertainty, I’ll clear up the mystery – they were some terribly healthy Swedish-style rye crispbreads, and of course, they were home-made. We’re good like that round here.

Yes, for when you think about Swedish cuisine, you will pretty quickly get to the classic crispbread (via all the other stereotypes – cinnamon buns, amusingly named sweets like skum and plopp, meatballs, fermented herring…). I find crispbread – or knäckebröd (k-ney-keh-br-uh-d) in Swedish –  to be something of a wonder. It’s incredibly simple, but very tasty when made well, and provides the perfect foil for all manner of toppings. It’s rich in fibre, so clearly good for you, but it also has that amazing crispness. Personally, I love the sort of crispbread that seems to shatter. Those crispbreads that are dry and a bit powdery don’t really do it for me. I prefer the stuff that is thin and slightly toasty, that gives you that noticeable crack as you sink your teeth into it.

For all my culinary Swedophilia (as seen from cinnamon buns, “vacuum cleaner” cakes and dream cookies), I’ve never gotten round to making knäckebröd. Until this weekend that is, and I’m happy to report that it was really rather easy, and the results really rather successful. I was particularly pleased with this picture, when the fellows stacked up neatly like a pile of crisp autumn leaves. They’re probably supposed to stay flatter than mine did, but I actually like the mad, warped shape these guys developed in the oven.

I used a dough which was mostly rye flour and a little plain flour (about 4 parts rye, 1 part plain) in the hope this would make the dough a little easier to work with. Did it work? No idea, as the dough was predictably heavy, as you’d expect with mostly rye flour.

I also went for a yeast dough. It would have been simpler and quicker to just make a plain dough without the yeast, but I wanted to have as much flavour in the crispbread as I could get. I wasn’t using much more than rye flour and salt, so this fermentation stage was going to matter. I started the yeast using some honey and warm water, then mixed up the dough and left to prove overnight. All that rye flour meant that the dough was extremely dense, and while it had not exactly puffed up overnight, it was clear that the yeast had worked it magic, and there was a distinctive sour aroma when I removed the lid from the bowl. The use of yeast was wise indeed.

Now, it was time to bake these bad boys. The trick, I have now learned, is that you need to work in batches. No point in rolling out all the dough, as you are aiming to get something that is about a millimeter thick. If you roll all the dough in once go, you’d better have a very large kitchen. Trust me – small batches here work wonders, and it’s much easier to take out your frustrations with the rolling pin to roll it out to wafer-thinness.

Some people also have nifty little rolling pins that make the characteristic holes all over the knäckebröd, but I had to make do with a fork. In fact, I quite like the randomness of them, they look a little but more artisanal. Sometimes it is nice to get things that look absolutely perfect. Macarons should look perfect. Crispbread…well, it should look very rustic, no?

After the baking, it was time for the taste test. I could not have been more thrilled with how they turned out. At first the toasted flavour comes across, giving way to a tinge of yeast and the sour tang of the proving process. But most thrilling of all (or as thrilling as things get when it comes to crispbread) was the proper, sharp crack as you bit into them. It was beyond doubt that these guys were seriously crisp.

So there you have it – a super-easy recipe that makes excellent crispbread. But keep in mind that I’m not Swedish, I’m not an expert, and I’m probably biased. In some ways, I have to be, given that I now have a pile of 30 crispbreads in the kitchen, which are slowly being eaten for breakfast and with dinner (note that knäckebröd is not interchangeable with poppadom when eating curry, no matter how good you might think it would be…). That said, you can buy good crispbread these days, and I’m not sure this is something I’ll be knocking up on a weekly basis (if for no other reason than to avoid another glut of the stuff) but this is something that it will be worth tweaking with lots of seeds and/or extra spices in the dough to make crackers for a party. Now it’s just me going mano a mano with those 30 crispbreads…

Now, I said that I like the sort of knäckebröd that is so crisp that it seems to shatter? As you can see from below,  I’m as good as my word!

To make knäckebröd (makes 30):

• 1 tablespoon dried yeast
• 250ml lukewarm water
• 1 tablespoon honey
• 1 teaspoon salt
• 125g plain flour
• 400g rye flour

1. Dissolve the yeast in the warm water. Add the honey and three tablespoons of flour. Set aside somewhere warm until the mixture is bubbling.

2. Combine the rest of the flour, the salt and the yeast mixture until you have a smooth dough. It should be firm, but if it seems too dry, add more water, a tablespoon at a time, and work until smooth. I ended up adding three extra spoons of water.

3. Cover the bowl with cling film and leave the rest overnight. The mixture will only expand slightly, but should smell “yeasty” and slightly sour the next day.

4. The next day, prepare to bake the crispbread. Preheat the oven to 220°C (430°F). Line a baking tray with greaseproof paper, but do not grease.

5. Take one-quarter of the dough. Place on a well-floured work surface (use more rye flour) and roll out as thin as you can – around 1-2mm is idea. Use a bowl as a template to cut out rounds and transfer to the baking sheet (I baked four at a time). Use a fork to prick all over the surface of each crispbread.

6. Bake the knäckebröd for around 8-10 minutes until the pieces are browned. Watch carefully as there is not much difference between done and burnt!

Worth making? An easy recipe with great results. As good as the stuff you can buy, which might put you off, but nice to try if you want to put some unusual flavours in the mixture.

18 Comments

Filed under Recipe, Savoury