Tag Archives: ginger

{6} Zázvorníky (Slovak Ginger Cookies)

Last year I had great success with walnut cookies from Slovakia that looked like walnuts. So I was naturally delighted to find another Slovakian recipe, this time for ginger cookies. And guess what? They’re shaped to look like root ginger. Pretty clever, yes?
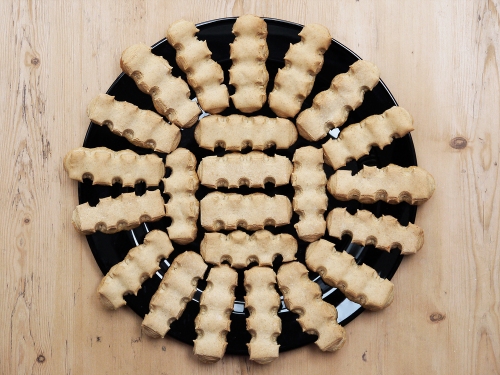

I loved the look of these cookies as they combine three things I really like in baking – an interesting shape, lots of warming ginger, and I get to use baker’s ammonia (aka my favourite novelty raising agent). Fun times!

Baker’s ammonia is an uncommon ingredient today, but is has a long history that pre-dates baking powder (indeed, baking powder was invented only as recently as 1843 by Alfred Bird when he was looking for a leavener that was both egg and yeast-free). Baker’s ammonia was originally derived from the ground-up antlers of red deer, hence its other name “salt of hartshorn”, but it is now made chemically.

In its pure state, it has a really pungent smell of ammonia and you can’t eat it, but the benefit of baker’s ammonia is that it gives cookies great lift and crispness as it breaks down completely during baking to create gas. This does mean when you open the oven door you are treated to a really pungent waft of ammonia. The cookies themselves are completely ammonia-free, but it is important that anything you make with baker’s ammonia is fairly thin so that they can expand and that stinky gas can escape. For this reason it is not used as a raising agent in cakes. And be warned – you can’t try the cookie dough that has baker’s ammonia in it!

You can see in the picture below what effect baker’s ammonia has. The cookies will double or triple in height during baking creating a lightness that baking powder can’t beat.


You might look at this recipe and wonder if two tablespoons of ginger is really right? Yes it is. The flavour is ginger, and only ginger (with the addition of a dash of vanilla, which the Flavour Thesaurus tells me is a good pairing). So if you’re making a cookie which is all about ginger, then you really want to make sure that there is enough in there to really pack a punch. After baking the flavour really is delicious – they’re fairly sweet, but after a moment the warmth of the ginger tempers that. Heck, you might even want to add a third tablespoon of ginger is you want them really fiery. And if you wanted to make them even more special, dipping the bases into dark chocolate would be fabulous, as you’ll have the awesome ginger-chocolate combination along with the crunchy biscuit.

There is also a special cutter for making zázvorníky. I’ve seen people describe it as looking like a piece of ginger root, and that is enough for me. If walnut cookies are shaped like walnuts, it is just a matter of logic that ginger cookies should look like ginger. But it does feel like we are starting to veer into Doctor Seuss territory where cookies must only ever be shaped like the thing they are flavoured with.
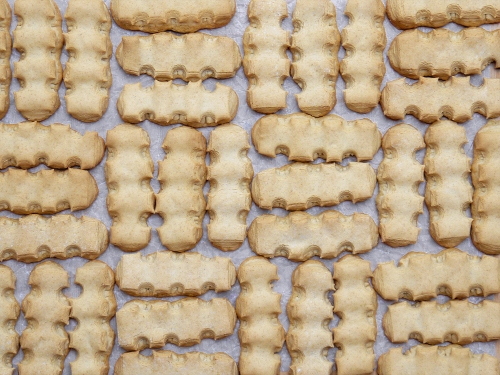

Sadly, I could not find a zázvorníky cutter anywhere, so I had to improvise. I had three options. First, I could have gone online and ordered a bespoke cookie cutter based on my design which would be 3D printed. This was my original plan, but I’ve been warned on more than one occasion that I have too much kitchen equipment already. Second, you could just freestyle them with a knife and perhaps a paper template, which I think could be very meditative but would also take a bucket load of patience.

Which brings me to the third option: I improvised by cutting the rolled dough into rectangles (2x8cm), then I used a large round piping nozzle to cut half-circles along the sides. This proved to be really easy and effective, plus I got a bit of credit for not buying another single-use item. Win-win!

These cookies need to rest overnight, and in the morning you get to bake them with the joy of your kitchen already being clean. The drying is essential – it means they keep their shape, and the lift from the ammonia is directed down so that the gain a lot of height. As a result, I think they do sort of look like ginger rhizomes after baking. What do you think?

I really enjoyed these. They’re fairly easy to make, and the shape is unique and fun, and they really taste great. A clear yes from me.

To make Zázvorníky (makes 50)

• 250g plain flour, plus 50-75g extra as needed
• 2 tablespoons ground ginger
• 1/2 teaspoons baker’s ammonia
• pinch of salt
• 250g icing sugar
• 2 large eggs, at room temperature
• 4 tablespoons melted butter, cooled
• 1/4 teaspoon vanilla extract

1. Put 250g flour, ginger, baking ammonia and salt into a bowl. Mix well and set aside.

2. In a separate bowl, add the eggs and icing sugar. Beat with an electric whisk until pale and fluffy, around 5 minutes. The mixture is done when a lifted beater leaves a “ribbon” on the mixture.

3. Add the cooled melted butter (and vanilla if using) and fold gently. Finally, add the flour mixture and mix well until if forms a firm dough. You may need to add more plain flour – add 25g at a time until you have a firm dough. I added an extra 50g in total.

4. Roll out the dough to about 1/2 cm thickness. Cut out whatever shapes take your fancy, and transfer to a baking sheet. You can make different shapes, but try to keep the same sizes on each sheet so that they bake evenly. I cut rectangles of 2×8 cm, then used a large piping nozzle to cut semi-circles along the edges.

5. Leave the cookies to rest, uncovered, overnight so that the tops dry out.

6. The next day, preheat the oven to 170°C (340°F). Bake the cookies for 10-12 minutes. They are done when they are puffed up and lightly golden. Remove from the oven and allow to cool.

Note – store in an airtight container. Cookies made with baker’s ammonia can soften over time, but you can restore their crunch by putting them in a low oven for a few minutes to dry them out a little.

Leave a comment

Filed under Christmas, Recipe, Sweet Things

Scottish Food: Perkins for Burns Night

I was having a look back at some past posts and I realised that it has been 4 years since I last did a Scottish recipe in honour of Burns Night. I did manage 2 years ago to make some lamingtons for Australia Day, so it’s not been a complete failure, but I did think that it was time to have another go.

So what should I make? I was doing a bit of research and I chanced upon a recipe for perkins, traditional spiced Scottish biscuits made with oats. Super! I could make those! Except I had no clue what they were. I must say, it was an odd feeling to be researching something from my home country, but yes, it turns out there are Scottish biscuits that I have no idea existed. And it seems that I’m not the only one – Amy at Baking with Granny seems to have had a similar reaction to perkins as they were suggested to her via Facebook.


I started looking for some ideas of what they were, and after wading through dozens of websites referring to perkins recipes “like granny used to make” and telling me they were “excellent with a cup of tea” it became apparent fairly quickly that I probably do know what they are, I just don’t know them as perkins. They’re flat, slightly chewy cookies made with oats, syrup and spices – not dissimilar to Anzac biscuits. I guess I would call them “oat biscuits” or “oat crumbles”. Anyway, there are some suggestions that they are linked to the famous Yorkshire parkin which shares many of same ingredients, but I’m sure there are the spirits of many proud Yorkshire housewives ready to haunt my nightmares for suggesting that parkin could have come from anywhere other than God’s Own County. So I’ll just say “those ingredients lists and similar names are such a coincidence”. In fact, beyond the oats, spice and golden syrup, I don’t think they are that similar. I think parkin should contain treacle, which these definitely do not.

As for a recipe, I found on on the website of the National Trust for Scotland. Bingo! Surely if anyone knows about traditional biscuits, it will be these people? I mean, a day out to a castle or a stately home always involves a visit to the tea shop and some cake or biscuits. So, dead cert?

Well…I started to read the recipe and there were a few gaps. It needs “flour” which I assumed would be plain, since there is baking soda in there to leaven them. Then “oatmeal” but what was that? Fine oat flour? Coarse? Oat flakes? Big ones? Small ones? I just improvised – I took jumbo rolled oats, ground them in a food processor so they were about half flour and half chopped oats and reasoned that a bit of texture in a biscuit isn’t a bad thing. I was pleased that they did measure out the golden syrup by weight rather than volume, which in my opinion is the right way to do it. By the time you’re measured 100ml of syrup, you’ve usually coated about 5 utensils with sugar and it is a mess. The size of the egg is also not clear – I went with medium and hoped for the best, thinking that if it was too dry I could always add some milk, but if the mixture gets too sticky, it’s always a pain to add more flour as it can throw off the quantities. Thus, the recipe you see below uses the Trust’s quantities, but is based on my tweaks to ensure it would actually works. I also had to double the number of almonds – the recipe asks for split blanched almonds, which I’ve never seen on sale. By the time I had skinned some almonds, I lacked the will to split them apart with a sharp knife, so I just used them whole.


But the recipe wasn’t the strange part. I was not entirely convinced the picture they used was of the actual recipe they were presenting. Their biscuits looked too big, too smooth, too pale. Mine – and those made by quite a few others, including Baking with Granny – are flatter, rougher and with a deeper golden colour. If I’m making something I don’t mind that it doesn’t look exactly the same, but I’d like some sort of family resemblance as a minimum! Let’s just say there is a Russian website with gingerbread cookies that look awfully, awfully similar.

Making them was actually very easy – throw it in a bowl, and get mixing. Because they are leavened with baking soda, you also get a bit of chemical magic during baking, which gives that amazing golden colour. They go in as fairly pale balls of dough, and during baking they sort of puff up and then collapse. If you look at them about half-way, they look very pale and are only just starting to colour. However the baking soda will work its spell on them and a few minutes later they get a crinkled texture and take on a deep golden colour. So watch them like a hawk, of if you’re feeling very Scottish, like a golden eagle. I actually did a test run with the first cookie to see how it worked and how long it had to be in the oven. I’d rather get one wrong and save a batch than try baking 20 and ruin the lot. How you approach it depends on whether you’re a gambler.

For all that, how do they taste? They’re actually delicious – the oats mean they are substantial, and they have a lovely deep flavour from the syrup and spices. It’s the sort of biscuit that might also be improved massively by the addition of a layer of chocolate if you’re in the mood to start messing around with a thermometer to get that glossy, shiny finish, but all that Scottish restraint perhaps points to keeping them pure. I’ll definitely make them again, and the chocolate option is rather appealing. Views?

To make Perkins (make around 45):

• 250g rolled oats
• 250g plain flour
• 180g caster sugar
• 1½ teaspoon baking soda
• 1 teaspoon mixed spice
• 1 teaspoon ground ginger
• 1 teaspoon ground cinnamon
• 125g butter
• 1 medium egg, beaten
• 180g golden syrup (*)
• 60g whole almonds, blanched (**)

1. Preheat the oven to 160C (320°F). Line two baking sheets with greaseproof paper.

2. Put the oats in a food processor. Grind until medium-fine – about 2 minutes. Half should be flour, the rest should be chopped oats.

3. In a bowl, combine the oats, flour, sugar, baking soda and spices. Mix well, then sieve to ensure there are no lumps. You’ll have some oats left in the sieve – tip those into the bowl.

4. Add the butter, and work with your hands until it is incorporated. The mixture will seem quite dry – you don’t get a “breadcrumb” texture.

5. Add the egg and the syrup, then use your hands to mix to a firm dough. You should be able to take pieces and roll them into balls – if too dry, add a little milk. If too wet, add more flour.

6. Take pieces of dough “the size of a large marble” according to the National Trust for Scotland (or weigh them – 20g – they’re about the size of a Fererro Rocher, Mr Ambassador). Roll them into a ball, and place on the baking sheet. Press down very slightly, then gently press an almond on top. It should still be more or less a ball, not flat.

7. Bake for around 13-15 minutes, turning half-way to get an even bake. They are ready when they are an even, rich brown colour. Remove from the oven, allow to cool for a moment to firm up, then transfer to a wire rack to cool completely.

(*) That’s golden syrup, not corn syrup. You need this for flavour. As a substitute you could use honey or the Swedish-style “light syrup” which has a similar consistency and flavour. Maple syrup is not great here as it is much runnier so you will need to adjust the amounts…

(**) Either buy almonds that have been blanched, or do this at home – bring a pan of water to the boil, add the nuts and simmer for a minute. Drain, allow to cool for a moment, then the skins should slip off when you squeeze them gently.

2 Comments

Filed under Recipe, Scottish Food, Sweet Things

{7} Florentines

I can never resist a good Florentine. There is something about those golden discs of caramel, studded with cherries, citrus, nuts and ginger and dipped in chocolate that is just magical. They might not strictly be a Christmas treat, but I think they lend themselves very well to this time of year.

florentines1
In my younger days, I assumed that Florentines were named after the city of Florence, but it turns out this is only partly true. I should have suspected this to be the case when, years ago, I had a few hours to explore Florence while waiting for a train connection (and hey, it was Florence, I was hardly going to hang out at the station for three hours!). Were there shops groaning under the weight of these biscuits? No. I found one pasticceria selling square Florentines, so I cut my losses and went with one of them. But clearly this was not a biscuit that the citizens of this city were clutching close to their collective bosom.

So what is the truth? Well, this is lost in the mists of time, but the name probably has something to do with the French, and the resemblance of these caramel discs to the gold coins of Florence (incidentally, the British two shilling coin was also known as the florin).

florentines2
There are two ways you can make these cookies. If you drop spoonfuls onto a baking sheet lined with greaseproof paper, they will spread out and you get large, crisp and delicate Florentines (there is enough butter in them to prevent sticking). However, you can drop small teaspoons into the bottom of a non-stick muffin tray – they’ll be slightly thicker but perfectly round so good if you’re giving them as a gift and need to travel with them and want them to look fancy. My pictures are of these “neat” Florentines, and I think they look very pretty.

However…if you’re going to use a muffin tray, please make sure that it is sufficiently non-stick! I assumed non-stick means non-stick. Well, I have two pans. One works like a dream, but the other is anything but non-stick. I found myself trying and ultimately failing to remove one batch from the tray, and had to junk the lot. As the mixture does not need to be baked quickly, you can take your time and do a test version to make sure it works. If it doesn’t, just switch to making the bigger versions using a tray with greaseproof paper. You don’t want all that work to go to waste and they will still taste fantastic!

To finish them off, you can leave them as they are (or “naked Florentines” as I’ve seen them called) but I think you really do need to spread one side with chocolate. If you are a milk or white chocolate fiend, then by all means go for it, but I think it really has to be dark chocolate on these little beauties. I think it works so well with the toasted nuts, ginger and citrus in the biscuits, and why mess with a classic? To make them look impressive, use tempered chocolate for a nice shine and snap, and use a fork to make a wave pattern in the chocolate.

Incidentally, if you think you’ll do a lot of dipping things in chocolate, it really is worth getting a food thermometer. They are not expensive and it means you can get your chocolate to the right temperatures. I’ve tried various methods over the years, but using the thermometer is hands down the easiest and most reliable method I’ve every tried. Never have dull chocolate again!

florentines3
In terms of the ingredients, you can play around with them to get a mixture that you like. You can use slivered almonds instead of flaked, or swap some of the almonds for pistachios, hazelnuts or even a handful of jumbo rolled oats. You can also adjust the proportions of cherries, peel, ginger and sultanas, or even omit some of them altogether, but try to keep to the same overall weight. You can even go for a retro vibe if you can get your hands on some green candied angelica – I remember those flecks of bright green in Florentines from my childhood, but it seems to have vanished from most supermarket shelves these days. If you find some – it’s a sign that you should make Florentines!

To make Florentines (makes around 24)

Dry ingredients

• 90g flaked or slivered almonds
• 90g glacé cherries
• 60g candied peel, chopped
• 20g glace ginger
• 30g sultanas
• 15g plain flour

For the caramel

• 45g butter
• 30g soft brown sugar
• 30g white sugar
• 1 tablespoon double cream
• large pinch of salt

To finish

• 150g dark chocolate

1. Preheat the oven to 180°C (350°F). For large Florentines, line two large baking trays with greaseproof paper rubbed with a little butter. For small Florentines, get a non-stick muffin tray and rub lightly with butter.

2. Prepare the dry ingredients – chop the cherries, peel and ginger as you prefer, then add the almonds, sultanas and flour. Toss so that everything is coated and well-mixed.

3. Make the caramel – in a small saucepan, heat the butter and sugars. Bring to the boil, then take off the heat, add the cream and salt, and stir well. Pour onto the dry ingredients and mix well.

4. Put generous teaspoonfuls of the mixture onto a baking sheet or into a muffin tray. If using a baking sheet, flatten them as much as you can, but leave enough space for them to expand as they bake.

5. Bake the Florentines for 8 minutes, turning around half-way to get an even bake. They will be soft at first, but will harden as they cool.

6. To finish the Florentines, melt the chocolate (for a professional finish, you want to temper it – find out here). Using a teaspoon, spread some chocolate on the underside of each Florentine, then using a fork to make a wave pattern in the chocolate. It might not be obvious at first, but you’ll see it once the chocolate sets.

2 Comments

Filed under Christmas, Recipe, Sweet Things

{4} Piparkakut

Gingerbread biscuits are found across the Nordic countries around Christmas time. There are some different shapes, different spices and some might have nuts or fruit added, but they share a spicy flavour and crisp texture. The Finnish version are piparkakut. I won’t even try to work out if that is the singular or plural name, as the Finnish is fiendishly complex! Instead I will distract you with my “elk in a snowy forest with squirrels under the stars” gingerbread fantasy. Hands down these are my favourite cookie cutters from what is probably an unnecessary large collection to being with!

piparkakut1
These cookies are incredibly more-ish. Because they are so light and crisp, you can happily much on two, or three, or four of them, and really not get full at all. In contrast, try eating four British mincemeat pies in one sitting and you’ll be floored for the rest of the day!

I made these using “dark syrup” (tumma siirappi in Finnish). This is a thick, sweet syrup that has almost a chocolate-like flavour, but none of the bitterness of molasses or black treacle. It also seems to be the right stuff as a quick search online shows pictures of syrup containers with gingerbread figures on them! But if you can’t get hold of this stuff, you can happily use golden syrup. Honey would work in a pinch, but it tends to produce slightly different results, so you might not get the same crisp texture as you get with syrup.

I made these once with a special ingredient that I thought would make them extra-fancy. I had dried some peel from Seville oranges, so I thought I would grind it up and add it to the dough for an extra aromatic orange flavour. Well, it worked…except that it worked just a little bit too well. The flavour and aroma were superb, but after a moment a strong medicinal flavour and a numbness took over, rather like sucking on a throat lozenge. Sadly my attempt to be fancy just ruined the whole batch! I did leave them for a couple of weeks in a dark cupboard in the hope that they would improve, but that eye-wateringly extreme orange flavour was still there, lurking in the dark, waiting for me. Never again! Just stick with a normal orange, or perhaps some Clementine or mandarin zest if you want to feel fancy. I’ve still got that jar of dried Seville orange peel hidden in a cupboard, taunting me…

piparkakut2
This recipe is great if you want to make a lot of very intricate cookies that keep their shape after baking. As you can see, the various cutters I used worked really well and I got nice sharp edges. I mean, if you’re going to go to the effort of making an elk, you want people to know that it is an elk, right? I’ve left them plain, but you can easily coat them in dark chocolate, or ice them with intricate patterns.

Finally, a word of caution. You might think a teaspoon of baking soda is not really enough in this recipe. Well, don’t be tempted to up the quantity of baking soda – I’ve tried adding more to provide more rise (assuming this would provide a crisper cookie too) but it easily turns into a soapy aftertaste. Yes, I’ve had a few issues with trying to mess around with this recipe in the past!

Makes around 40-50 cookies

• 110g (80ml) dark syrup or golden syrup
• 100g caster sugar
• 100g butter
• 2 teaspoons ground cinnamon
• 1 teaspoon ground ginger
• 1/2 teaspoon ground cloves
• zest of 1/2 orange
• 1 large egg
• 400g plain flour
• 1 teaspoon baking soda
• 1/4 teaspoon salt
• cold milk, to bind

1. Put the syrup, sugar, butter, spices and orange peel into a saucepan. Warm gently, then bring to the boil. Leave to cool.

2. Beat the cooled sugar mixture with the egg until fluffy. The mixture will be very soft.

3. Mix the flour, baking soda and salt, and stir into the rest of the ingredients. Add more flour if too wet, or add cold milk (a tablespoon at a time) to bring it together. Wrap in cling film and leave to chill overnight in the fridge.

4. The next day, preheat the oven to 150°C (300°F). Line a baking sheet with greaseproof paper.

5. Roll out the dough thinly (around 3-4mm). Cut out the cookies and transfer to the baking sheet. Tip: roll the scraps together and pop in the freezer to chill – it makes the dough easier to work with.

6. Bake for around 10-12 minutes until browned and slightly puffed, turning half way to get an even bake.

Note: It is worth baking one cookie first to test how long you need to bake them. If you are making different sizes, it is best to bake the same sized cookies together. Also be careful if your cookies have thin parts (like the legs on the elk) as they can burn easily.

1 Comment

Filed under Christmas, Recipe, Sweet Things

Scottish Food: Parlies (after a fashion…)

Hoots! Tonight is Burns Night, the official unofficial celebration of all things Scottish in general, and specifically the life and times of the national poet, Robert (Robbie) Burns. Up and down the land, people will enjoy traditional fare consisting of haggis, neeps and tatties (swede and potatoes). Simple stuff, but usually rounded off with a lot of whisky and followed with a poetry recital and some energetic Scottish folk dancing if you’ve managed to moderate the whisky intake.

I’ve been looking around for an interesting Scottish recipe, and from time to time I’ve seen a reference to biscuits called “parlies”. I must admit that parlies are not something that feature in my knowledge of Scottish baking, and it seems that I’m not alone. Most people think about shortbread and Ecclefechan tarts, perhaps with the occasional empire biscuit thrown in there, but parlies don’t feature much on blogs. So when it came to making these mysterious “parlies” I was pretty much guessing how they would turn out.

parlies2
Before I get to the baking, a little history lesson is helpful. The name parlies come from the word “parliament”, and they are also known as Scottish parliament cakes. The story goes that these ginger biscuits were purchased by the members of the original (pre-1707) Scottish Parliament from a tavern on Potterrow behind the University run by a Mrs Flockhart (who was also know as “Luckie Fykie”) , and were enjoyed with a tot of whisky. Parlies themselves were square in shape, and she also sold “snaps” which were round. In fact, you can read more about her in this extract from Traditions of Edinburgh written by Robert Chalmers in 1825. The title pages explain that it concerns itself with “conspicuous characters of the last century” and promises “the old-town ladies of quality”, which I can assume only refers to how they ran their hostelries. But remarkably, this book talks about her, the location of her tavern, and there is even a reference to parlies in there! However, I have not yet found a source that confirms whether these were enjoyed by any particular side of the house or they enjoyed cross-party appeal.

Armed with this knowledge, I knew that I was making some sort of ginger biscuit. I like ginger, so that was a plus. But what I quickly realised is that there is no one single way to make them. Given they seem to be at the very edges of the national baking consciousness, there is no single ideal to bake towards. Eeek! I knew what this meant – I might be facing baking failure, and I might end up in one of those kitchen frenzies when I’m trying recipe after recipe to get something that I deem acceptable. Yes, that happens sometimes!

All recipes I was able to track down used brown sugar, butter, flour, ginger and black treacle in varying quantities. Some used egg, others didn’t. There were also different ways to make them – some involved melting the butter, some involved the creaming method. While I am far from a baking expert, I knew this risked differing results. There was also a dearth of raising agents in the recipes I managed to find, which did make sense as the original parlies first popped up at a time when there was no baking powder, and other raising agents might have been hard to come by.

I bit the bullet and started with a recipe that involved mixing up the dry ingredients, then adding melted butter and an egg to make the dough, but with no raising agent. The dough looked good – it was fairly stiff, and once chilled it could be easily rolled into balls, then flattened and baked. I even added a criss-cross pattern with a fork, which provided a sort of portcullis look on the top of them. While they looked pretty good, and the flavour was decent, the lack of raising agent meant that they were thick and tough – these were not going to melt in the mouth, and I doubt that soaking them in tea or whisky would help soften them. Next!

My second attempt used the creaming method – whipping the butter and sugar, then mixing in the egg before adding the flour, ginger and treacle. This time the mixture seemed lighter and softer, and I assumed that the air I had beaten into it would mean that this batch would come out crisp and light. Well, nope. The spoonful of dough just baked into an unappealling lump of brown. I did try to rescue the dough with a spoonful of golden syrup and a teaspoon of baking soda, but the result looked horrible, and managed to taste worse than it looked. Next!

By my third attempt, I realised that since I had no clue what I was actually aiming for, I should go back to what I know about ginger biscuits. The mixture reminded me of gingernuts, but without any raising agent. I felt that the lack of anything to give them a lift might have been authentic, but it was also grim, and we live in a modern world where we don’t need to eat grim biscuits. I needed something for lift, and decided on baking soda. So my version of parlies are actually gingernuts, but with the sweet golden syrup replaced with the dark, spicy and tangy black treacle, and a bit of chopped cyrstallised ginger for extra spice.

This time, they worked like a dream – just mix all the dry ingredients, work in the butter, then add the treacle. The dough is easy to work and roll into balls, and in the oven, then collapse, take on an attractive random cracked appearance. Once cool, they are light and crisp. Perfect!

parlies1
So there you have it – my take on parlies! They might not be authentic, but I like to think that Mrs Flockhart might have approved (she did sell the round ones too, after all!). And I think they make a passable attempt and the black treacle is a definite nod to the original, and it adds an interesting flavour to them. If you’re not a fan of black treacle, you could use sweeter molasses, or if you like things very sugary, just use golden syrup and call them gingernuts. That still sounds rather Scottish, doesn’t it?

To make parlies (makes 20):

• 110g plain flour
• 1 teaspoon baking soda
• 1 teaspoon ground ginger

• 40g soft brown sugar
• 50g butter
• 1 teaspoon candied ginger, finely chopped
• 2 tablespoons (50g) black treacle or molasses

1. Preheat the oven to 190°C and line a baking sheet with greaseproof paper.

2. Put the flour, baking soda and ground ginger in a bowl. Mix in the sugar, then rub in the butter until it resembles coarse breadcrumbs. Mix in the chopped ginger.

3. Add the treacle and mix to a stiff dough.

4. Divide into 20 pieces (roll into a sausage of 20cm, the cut into 1cm pieces). Roll each piece into a ball, then place on the baking sheet and flatten slightly. They will spread out, so leave plenty space between them. It is easier to bake them in batches.

5. Bake for 10-15 minutes until the cookies have spread out and have a cracked appearance. They will be soft when they come out of the oven, but will go hard once cooled.

5 Comments

Filed under Recipe, Scottish Food, Sweet Things

{9} Brunkager

We are three-quarters of the way through this year’s insane bake-a-thon, so we’re heading north to experience a classic Danish cookie. I love crisp gingerbread biscuits at this time of year, especially when they are packed with spice, and rich with butter and brown sugar. These little morsels are from Denmark and are called brunkager, which literally means “brown cakes” or “brown biscuits”.

Just about every source I have looked at calls them a Danish “classic” and that they are the real “aroma of Christmas”. However, I have not been able to find much about their origin – no interesting story, no quirky history. It must be there somewhere, but I guess I’ve not just found it yet. If anyone has any information on this, please leave a comment!

The flavour is superb – spicy, buttery, nutty and hints of orange. They are wonderful with coffee or tea, and while it is a cliché, they do taste like Christmas. I think these cookies have a real air of class about them – but their secret is that they are a complete breeze to make.

Brunkager0
Normally I tend to just have pictures of the final result. However, today I’ve decided to do something different, and provide a few “action” shots so that you can see he various stages in making brunkager.

The reason that brunkager are so easy is that you melt down your butter and sugar into the most delicious caramel-like syrup, then mix it with spices, candied orange peel and whole almonds. At this stage, it is actually very tasty and no-one would blame you for sneaking a spoonful or two. Of course this is just to test that the balance of spices is right…

Once you’ve got the basic mixture, you add flour, then pour it into a tin to set. Then just let it cool, and it can be cut into slices and baked. One curious thing is that the warm mixture starts off the most luxurious shade of chestnut brown, but it fades to a duller, more grey shade when cold. I though this was a bit disappointing, but it is just a result of the butter setting, and the rich colour comes back during baking. Making the mixture and leaving it to set only takes around 20 minutes, so it can easily be done in the evening, and you can do the baking the next day. So pick your perfect moment to fill the house with their wonderful aroma.

Brunkager1
Once the mixture is set, there is no messing around with cutters or rolling pins. Just remove the slab of dough from the tin and the cut it into four strips. Then cut each of those into thin slices.

Brunkager2 Brunkager3
The trick here is to get a very big, very sharp knife. Then sharpen it some more. Then use some force to get it to cut cleanly through the dough. What you want are nice clean slices of almonds in the cookies, so you should avoid serrated knifes and sawing motions. It can take a bit of practice, but I found the best way was to make sure the dough is cold, and push downwards with some force. There will be a few duff ones that don’t look good – you can gather the scraps, roll them up and bake as  them anyway and they will taste just as good.

Once you’ve done the careful slicing, arrange them on the baking sheet, and as you can see, they really do expand. The raising agent here is potaske (potassium carbonate) which makes them expand outwards, but they don’t rise up, resulting in very crisp cookies with a lovely dark brown colour. Potaske is the traditional ingredient, but you could skip this and use baking soda instead. I haven’t tested this, but a few recipes suggest this, in which case just mix it with the flour before mixing everything together. However, if you do manage to get your hands on a packet of potaske (check online), you can also make Danish honninghjerter (honey hearts) or German Aachner Printen in the authentic way.

Brunkager4 Brunkager5
I’ve seen recipes that use whole nuts, and recipes that use flaked almonds. I like the look of the whole nuts – this does make it a little harder to cut into perfect slices, but I think the contrast of the larger pieces looks nicer. If you fancy more variation, you can use a combination of almonds and pistachios, or just pistachios.

Now, do be prepared for just how much this recipe makes. Each log will make around 30-40 cookies if you slice it thinly, so could end up with around 150 cookies! They’re very light and easy to eat, but don’t be surprised if you end up running out of space on the kitchen worktop!

Brunkager7 Brunkager6
Faced with my mountain of brunkager, even I was not able to eat all of them over a couple of days. I noticed that they start to get a bit soft, but this is easily sorted. You can get the crispness back by popping them in a low oven for about 4-5 minutes. This won’t bake them, but it will dry them out to get the snap back.

If you have a go at these, I also recommend that you bake a test cookie before putting a whole tray in the oven. As they are thin, they can easily burn – they don’t take long to bake, so try with one and it should be done when it has an even, appealing brown colour. Keep in mind that they will be very soft when they come out of the oven, but will harden when cold, so colour rather than texture is what to look out for.

To make Brunkager (makes around 150)

250g butter
125g golden syrup
• 125g soft brown sugar
• 125g muscovado sugar
• 3 teaspoons ground cinnamon
• 2 teaspoons ground ginger
• 1 teaspoon ground cardamom
• 1 teaspoon ground cloves
• 150g almonds
• 10g candied orange peel, very finely chopped
• zest of one orange
• 2 teaspoons potaske (potassium carbonate)
• 1 1/2 tablespoons lukewarm water
• 500g plain flour

1. Put the butter, syrup and sugar into a saucepan. Heat gently until everything has melted and the mixture is smooth, but do not let it boil.

2. Pour the sugar/butter mixture into a bowl and add the spices, almonds, candied peel and orange zest. Leave to cool until lukewarm.

3. In a small bowl, dissolve the potash in the water – add a little more water if needed (be careful – it will discolour wooden worktops if spilled!). Mix into the sugar/butter mixture. Finally stir in the flour and mix until smooth (it will still be liquid, not solid).

4. Pour the mixture into a tray lined with greaseproof paper and even out the top. Leave to cool, then chill overnight in the fridge. The mixture will change form a glossy chestnut colour to a dull dark grey-brown colour.

5. When ready to bake, pre-heat the oven to 175°C (350°F) and line a baking sheet with greaseproof paper.

6. Remove the mixture from the tin – it should come out in one slab. Slice into 4 pieces, then use a sharp knife to cut into slices (3-4mm). Arrange them on the baking sheet, leaving some space for them to expand. Bake for 5-8 minutes, turning the tray half-way to get an even colour.

7. Leave the baked brunkager on the baking tray for a minute to harden, then transfer to wire rack to cool completely.

Leave a comment

Filed under Christmas, Recipe, Sweet Things

Date Bars

I have recently been on a bit of a quest to start finding healthier snacks to take to work. Our café has been selling date and nut bars at a handsome premium, so I thought that I could easily make them myself. I mean, ground up dates and nuts, how hard can it really be? So yes…I’ve basically made what you probably already know  as Lärabars, but bear with me – I’ve actually done a bit of research here, and it turns out that these healthy sweet treats have a bit more history to them that you might think.

One of my most interesting little baking books is Cakes From Around The World by Julie Duff. One of the recipes that has piqued my curiosity is for Egyptian date cakes. These consist of nothing more than dates and almonds, ground with a dash of lemon juice, and then pressed flat between two sheets of rice paper. Julie muses that you can imagine cakes like this being made in ancient times, and having finally tried making date/nut bars, I have to agree.

These date bars are made me think of traditional festive sugar plums. I was always under the impression that sugar plums were some sort of candied treat, finally rolled in sparking crystals, but when I had a go at making them a few years ago, it turned out that they were actually rather like energy balls – little balls of dried fruit and nuts, dusted in icing sugar. It is actually quite interesting to look at that recipe with modern eyes – we see something that might pass for healthy (putting the debate about the amount of sugar in dried fruit to one side) whereas Victorians would have viewed them as luxurious treats, packed with all manner of expensive and exotic ingredients from far away lands. How times have changed.

So when I came to actually making date and nut bars, I didn’t feel that I was just having a go at making something that is a modern idea, but something that actually goes back a long, long way.

gingerdatebars

I used a simple ratio of one cup of dates, chopped, and one cup of mixed whole cashews and almonds. In my case the dates were fairly dry, so I soaked them in cold water for five minutes, but if you’re using very juicy dates, such as medjool, then you can probably skip this step. I also added some ground spices that I hoped would provide a bit of a gingerbread effect – ground cinnamon, ginger and mixed spice. I say mixed spice, but as I was feeling lazy, I used the first thing I could find, which happened to be a pot of Garam Masala. While I’m all for using whole spices and grinding them where I can, I think in these bars it is good to use pre-ground, as you’ll struggle to get as fine a powder as you do from a shop-bought mix. You want the flavour to disperse evenly, not little bits of woody cinnamon!

gingerdatebars2

Once I’d ground the dates to a paste and worked in the nuts, I pretty quickly realised that I had ended up with something that was very sticky and was never going to come together. Luckily, I had a bag of ground almonds to hand, and I kept adding a handful at a time until it worked. It’s hard to say how much you’re need, just keep added a little at a time until the lot seems to come together.

I’m pretty pleased with the final result – kind of fruity and kind of nutty, with a real gingerbread flavour. They are also firmer than I would have expected, and after a few days in the fridge, they defiantly had a slight biscuity/cakey texture. I doubt that I would be able to pass these off as a genuine baked good, but as an easy and fairly innocent treat (just nuts and dates! no butter! no added oil! no refined sugar!) I think they’re pretty darned good.

To make Date Bars

• 1 cup chopped pitted dates
• 1/2 cup whole almonds
• 1/2 cup cashew nuts
• 1 teaspoon mixed spice
• 1/2 teaspoon ground ginger
• 1/2 teaspoon ground cinnamon
• extra ground almonds

1. Put the chopped dates into a bowl and cover with water. Rest for 5 minutes and drain.

2. In the meantime, grind the nuts. You want a fairly fine powder, but a few larger bits are not a problem.

3. Put the dates into a food processor and work into a smooth paste. Add the spices and the nuts, and mix well.

4. Remove the mixture from the food processor, and add as much of the ground almonds as needed until it comes together.

5. Roll the mixture into a square, wrap in cling film, and leave to rest in the fridge for an hour.

6. Cut into pieces and store in the fridge in an airtight container.

Worth making? I am completely impressed with how easy this recipe is and just how good they taste. A much better alternative to chocolate biscuits mid-morning!

19 Comments

Filed under Recipe, Sweet Things

Zippy Ginger Beer

You might have seen my post a few days ago about oleo saccharum. I promised an idea of what to make with it, and here it is!

For the oleo saccharum novice (like me!) ginger is one of the best starting points. The fresh root is plump and juicy, so when peeled, finely sliced and mixed with sugar, all that fiery ginger flavour is sucked out, leaving a delicious syrup. Very little effort and no cooking involved, and the perfect base for a refreshing summery jug of ginger beer to enjoy on the lawn, perusing all those flowers that you’ve spent months and months nurturing.

gingerade1

Alright, I know that this sort of ginger beer is not the stuff that you leave to ferment for days, only for it to explode violently in your kitchen. This is more like ginger lemonade, but it’s a lot easier to make, as well as being just a little bit safer!

Now, there is actually also a bonus to handling your ginger in this way. Not only is it much easier to peel, slice and mix the ginger with sugar rather than cooking it into a syrup, but apparently the stuff in raw ginger that makes it spicy is different to the stuff that makes cooked ginger feel hot, so you’re actually getting something that is much closer to the flavour of fresh ginger. Once you’ve got your syrup, you can also keep the ginger, let it dry slightly in a low oven, then roll in granulated sugar to top cakes, gingerbread etc. That, or just chuck it into your ginger beer later on…

When it comes to actually making your ginger beer, is a complete doddle. Start with some citrus juice in a jug. Lemon is classic, but I think lime adds a bit more of a tropical twist, and grapefruit would makes for an unusual and sophisticated take on a summer cooler. You do need to add some sort of citrus – I tested the syrup with some soda water, and found the flavour both cloying and flat. Add the lime, and it really transforms it. Anyway, add some of the ginger syrup to the citrus juice (start with too little, you can always add more later), top up with water (still or sparkling), add some ice and serve to thirsty guests!

And the picture below? Just some of the teasel that I’ve been growing from seed in my garden. Pretty, yes?

gingerade2

{If you are a plant spotter and trying to work out what I have growing in my garden – there is teasel, daisies, delphiniums, campion and Welsh poppies and red and pink roses on the back wall}

To make ginger beer:

• 100g peeled fresh ginger
150g white sugar
2 limes or 1 large lemon, juice only
1 litre soda or sparkling mineral water

1. Shred the ginger as finely as you can – you want to expose maximum surface area. Mix with the sugar in a bowl, cover, and leave for 24 hours (stirring from time to time). The mixture should look syrupy when ready. Strain if you want to.

2. Add the lime or lemon juice to a jug, plus 3 tablespoons of the ginger syrup. Top up with water, mix to combine, and taste – you might want to add more ginger syrup.

3. Enjoy on ice, in the garden!

Worth making? This is a great recipe – really easy, and a lovely refreshing taste. Sure, it is sweetened with sugar, but at least you can enjoy it in the knowledge that there are not artificial nasties in there.

3 Comments

Filed under Drinks

Oleo Saccharum

After my experiments with brewing ginger beer, I’m going to keep the drinks theme going here.

In my many hours of browsing food websites (I live in London – I spend a lot of time sitting in buses checking out blogs on my phone!), I recently came across a recipe for something called oleo saccharum. If you’re wondering what that means, then you share the exact same thought that popped into my head when I heard about it. It roughly means “sugary oil”. Sounds unappealing, but bear with me.

The idea is a way to extract an intensely flavoured syrup from citrus peel, and so it is perfect for mixing up drinks and cocktails. You simply take a bunch of citrus peel, trim off any bitter pith, then pop in a bag with some sugar. Seal the bag, rub the sugar into the peel to get things going, and let everything sit until the sugar dissolves and turns into a richly flavoured and very aromatic syrup.

Well, that’s the theory. And while most people seem to make oleo saccharum from citrus peel, there is no reason you can’t get a little creative. If it’s aromatic and could go in a drink, you can mix it with sugar and wait. If you’ve ever left strawberries to macerate in a little sugar in a bowl, you get that sweet, pure syrup after a while – well, that’s basically it! The key thing here is that there is no cooking involved, so you don’t risk the volatile aromatic elements of your ingredients being lost. Just mix your ingredients and allow time to do the rest.

So I had a go at making three types – a lime version as a nod to the traditional, plus ginger and rose. Three very different ingredients, resulting in three aromatic syrups.

oleosaccharum

Of the three, ginger was definitely the easiest and gives the best yield. I had a large, juicy bulb of ginger, so it was pretty evident that this was going to provide a lot of flavour. Peel it, slice it and chop it – don’t be tempted to grate it, as you’ll lose some of that all-important ginger juice. As there is a lot of moisture in there, the sugar really does a good job in sucking out all the ginger flavour, so you get a decent amount of syrup. As a bonus, the remaining ginger is sweet and perfect to add to a fruit salad or sprinkle on top of desserts, cakes etc.

gingeroleosaccharum

The version with lime was pretty successful. What you do need to accept is that you will need to add a lot of lime peel to get a decent amount of oleo saccharum, but after that, things happen pretty easily. Of the three versions, I think this is the one that benefits most from being put into the bag with the sugar, and having an extended period of, ahm, “caressing” to allow the rough sugar crystals to work their magic on the zest, extracting those precious aromatic oils.

The result was an intensly-perfumed syrup with a strong, fresh lime aroma and a little bitter twist, ever so slightly reminiscent of marmalade. I think this is a good option for a cocktail where you want something more sophisticated than just plan sour and a basic lime flavour – give an extra twist to a caiperinha, or make an old-fashioned with just whisky and orange oleo saccharum. If you’re keen to get a food yield, I would opt for oranges or lemons (easier to peel, and less dry) or go for the more exotic flavour of grapefruit.

limeoleosaccharum

Last but not least was the version made with rose. This really was a spur of the moment decision, but I am lucky enough to have some beautiful pink and red roses in the garden with a heavy scent. A few were just past their best, so I took the chance and tried it out.

Of the three, this was definitely the trickiest. I had imagined that the rose petals would contain sufficient water to make this a doddle, but it seems that there was not actually that much moisture in them. Rubbing the sugar and petals in the bag did seem to break them drown and draw out the colour and flavour, but it seemed very dry, so I had to add a few drops of filtered water to make sure the sugar went from a thick, sticky mass to a syrup. This was really a case of drop-by-drop.

Sadly, the result did not look like the pretty colour of the pink roses from my garden, rather it was a dirty reddish-brown hue. Not what I was looking for! Then then I remembered that you need to add lemon juice, and just one drop transformed this oleo saccharum to a soft pink. Perfect!

roseoleosaccharum

While a little more demanding to make, I think the flavour of the rose oleo saccharum was really quite remarkable. Rose extract or rose water can often be very flat and synthetic, to the point of being overpowering, but made this way, the flavour really does seem to have a light freshness to it. This is not simple and floral, but subtle, complex and with the slightest hint of plant (in a good way). I think could be quite exceptional in a glass of sparkling wine or as the basis for a rose sherbet, where the bubbles will bring those complex rose aromas to the surface to tickle your nose.

I hope you’ve found this interesting. I’m keen to try this approach with other ingredients – an easy way to make simply, fresh syrups from soft fruits, but don’t limit yourself. Make the ultimate mint syrup…cucumber syrup…lots of possibilities!

To make oleo saccharum:

The following are a guide only. If you find the mixture is not liquid enough and the sugar has not dissolved, add a little filtered water and leave to rest for another 30 minutes.

Ginger oleo saccharum

• 100g peeled ginger, finely shredded
• 150g white caster sugar

1. Mix well. Leave in a covered bowl or bag for 24 hours. Strain.

Lime oleo saccharum

• 6 large limes (as fresh as possible)
• 100g white caster sugar

1. Cut the peel from the limes in strips. Trim off any white pith.

2. Mix well. Leave in a covered bowl or bag for 24 hours. If there is any sugar left, add a little lime juice until dissolved. Strain.

Rose oleo saccharum

• 4 red roses
• 50g caster sugar
• filtered water
• 1-2 drops lemon juice

1. Pick the petals from the roses. Check for bugs, rinse gentle and pat dry with a very clean cloth.

2. Place petals and sugar into a plastic bag. Squeeze out the air and rub the sugar into the petals. Leave the rest for 24 hours.

3. Check the oleo saccharum. If not sufficiently syrup-like, add a few drops of water.

4. Add a few drops of lemon juice and swirl until the syrup changes from murky to bright pink.

5 Comments

Filed under Drinks

Hot Ginger

From time to time, I get a request in my inbox suggesting I have a go at something, and from time to time, that suggestion is really rather tempting. This was an invitation from the folk at Johnnie Walker Red Label whisky to have a go at making my own ginger mixer.

The brief was pretty broad: A big, bold whisky such as Johnnie Walker Red Label demands a mixer to match. So I was to go forth, and make a ginger beer (the real stuff, brewed with a little yeast for lots of natural fizz) and try to craft the flavour to work with a bottle of Johnnie. So…how on earth was this going to work?

ginger_beer

First off, I need to fess up that I’ve never made ginger beer before. All I knew before starting was that you need a lot of fresh ginger to get a robust flavour, and there is the ever-present danger that the brewing mixture can get a little too frisky and cause glass bottles to explode, so it is essential to start your brew in plastic bottles, and then only store in glass when everything has settled down. Even then, you need to open the top from time to time to let all that gas escape, which is usually accompanied by what looks like a wisp of white smoke.

So, imagine me, in the kitchen, going mano a mano with a ginger beer kit. It was pretty cool actually – a bottle of Johnnie plus a selection of different types of fresh ginger. Sweet picked ginger, familiar Chinese ginger, fiery galangal and…eh…one that I forget the name of, but I didn’t like it. The idea was to major on the ginger, then use whatever additional flavours I wanted to round out the mixer.

Now, I’m all for the throw-a-bit-of-everything-into-something-and-hope-for-the-best approach when it comes to deploying spices, but I felt the need to adopt a more sophisticated approach. I was a little concerned that if I threw too many spices in there, the result would be more like a loaf of gingerbread laced with whisky. Pretty nice, but probably not what you might think of as a “bold mixer”. Then I had a flash of inspiration – something Caribbean, with notions of juicy limes, hot ginger and fiery pepper. This seemed like a good place to start.

All well and good, but I felt that I had to think a little about the ultimate pairing. No point in making a mixer that didn’t go with that all-important measure of Johnnie Red. Off I went into the living room to retrieve a Glencairn glass, and I poured myself a tot of whisky. I mulled over the flavours that I was getting, then added a tiny dash of water to open up the flavour (not loads, and definitely not on ice – I know on the rocks is a classic, but I prefer to sip my whisky in a way that allows me to taste it properly). There was a clear mellow sweetness coupled with a slight hint of pepper. I had been thinking of using black pepper to provide a bit of zing to my mixer, but it wasn’t quite right. As you can imagine, I was sitting on the sofa, glass in front of me, and then comparing it to an array of spices. Cinnamon, cloves, cardamom, mace, nigella and saffron were all rejected as just not being right. Tonka beans smelled delicious (think tobacco, marzipan and vanilla) but they would have been the flavour equivalent of driving a truck through the whisky, all impact and no subtlety. Then came the red pepper. Almost overlooked, but that warm, aromatic heat seemed to complement the whisky perfectly. Plus, Johnnie Red and red pepper, surely a bit of a good luck sign?

ginger_beer_pepper

The actual brewing process was great fun – shred loads of ginger, mix it up with lime juice and watch it turn from pale yellow to soft pink. Then I added a good amount of crushed red pepper, and mixed in a bottle with sugar, water and a little yeast. And…that was it. Now a case of watching and waiting. I got quite a thrill when I could watch my little creation fizzing away as the yeast got jiggy in the bottle.

whiskyginger1

As I had enough time to do this, I let the mixture ferment for 48 hours. By that stage, it was fizzy, but still sweet enough to make for a pleasant drink when chilled. The pepper was there, not slap-in-the-face obvious, but more a deeper warmth when you drank it. When mixed up on ice with a generous shot of Johnnie Red and a slice of lime, I was pretty pleased with how it tasted. More complexity than pure ginger, but not with so many different flavours that it was confused as to what it was trying to be – this was ginger and red pepper, pure and simple, with a twist of lime.

So what happens next? Well, my little bottle of magic was last seen cocooned in bubble wrap as it was whisked off by a courier to be judged by Bompas and Parr (the jellymongers – whatever you’ve dreamed of in jelly form, those men can do it) as well as Ross Purnell, London Brand Ambassador of Johnnie Walker Red Label. Fingers crossed that red pepper will do the trick…

whiskyginger2

Overall, I’m pretty pleased with how this turned out, and I tested it on a few willing victims to check that I had actually done a decent job. However, there were two characters who had major objections. Those objections came from our cats, Tommy and Persy, who initially scarpered every time I opened the brew to let the gas escape. The loud hisssssssss  was not to their liking! By the end of the second day, they had gotten used to this, and instead just cast over a series of withering looks whenever I did this. Here you can see typical “before” and “after” looks, with faces ranging from disdain to indifference…

persy tommy

Now, the big question…will I make this again? Well, the flavour was great when the drink was at its peak, and it was fun to make, but given the random nature of the British weather, I’m not sure I’ll be brewing ginger beer on the off-chance that it might be a nice weekend. I also found this was a fickle drink. A few days later, I found the flavour had gone really flat – clearly the yeast was still fermenting away, and the amount of sugar had dropped.

So I will be making more spiced ginger mixers in the future, but I’ll go for a different method. In fact, I’ve already got a recipe up my sleeve. How will I make it? Well…you’ll have to wait for my next post, but at least it is cat-friendly. Happy guessing!

8 Comments

Filed under Drinks