Monthly Archives: October 2011

Halloween II: Treacle Scones

Like anything Halloween-themed, there needs to be a sequel!

So today, I’ve been thinking about Halloween traditions – what are yours? Dressing up as a cat, a skeleton, a sexy shepherdess (yes, I have seen “Little Ho Peep” offered in a central London costume store…’nuff said!) or a vampire? Maybe you like to smile and ask for sweets, or prefer to run around and threaten strangers with a good pelting of eggs if they don’t dish out the sugary stuff?

Well, here is a little flavour of what we traditionally got up to in Scotland. First, and at the risk of sounding like a bad Blackadder sketch, we didn’t carve pumpkins, we carved turnips. Yes, turnip lanterns. And you know what? I really like them. They look much more like odd little goblins. Pumpkins look cute, but turnips actually look much more fitting for Halloween.

In fact, these may be the ancestors of the carved pumpkin. This was apparently a Celtic tradition to ward off evil spirits in late autumn. When those hardy Celts from Ireland and Scotland ended up in America, you can imagine that this tradition was easily applied to pumpkins, and a new tradition (and Halloween as most of us know it) was born. Surprisingly, they throw out the most amazing golden light, so you can see why people thought there was something magical about doing this.

Next, the idea of “trick or treat” was quite novel to me. Up north, we called it “guising” and the idea was children would dress up in a disguise. Guisers would go door to door and perform a party piece – sing a song or tell jokes – and you would get some nuts or pieces of fruit (oranges or apples – very healthy!). Inevitably, the attraction of sweets without the need to earn it has seen trick-or-treat take off…

And finally, we used to have treacle scones! I’m going to stick my neck out here and guess that unless you are from Scotland, you’ve never heard of this before, but of course it’s pretty easy to to guess what this involes…or at least most of this will be clear. You take a scone, cut it in half, spread each half with treacle…

…then you tie it to a string to eat it! Alright, so this final step is one for the brave, the willing and the foolish. And as you can imagine, it gets pretty messy very quickly. The sticky scone will swing back and forth, hitting you in the face and making sure you are well-covered in treacle.

You can make this even more fun by tying a string across the room, and then hanging the individual scones on other pieces of string from the main rope – the effect of this is that any swinging effect is amplified, making it more fun and increasing messiness by around 150% (note: no actual reasearch into messiness levels has been undertaken). It is, however, rather advisable to keep a damp cloth to hand, and make sure you do this either above a wooden or tile floor, or put down lots of newspapers. Treacle and cream carpets tend not to go too well with each other.

Just a note if you do decide to give this a try – tie up the scones first, then put on some treacle just before the games begin. It turns out to be rather difficult to tie up a sticky scone…

When I revisited this tradition, I did a little thinking about what to put on them. Was pure treacle the best thing to use? Well, I tried it straight up – the proper black-as-tar stuff that comes in the traditional Lyles tin.

I have to admit, it is pretty strong and actually it was not all that much fun. So I did a little experimentation, and worked out that you actually want to have a mixture of one part treacle to one or two parts lovely golden syrup. This gives you all the spiciness and complexity from the treacle (it’s surprisingly like liquorice when you mix it), but the taste is milder and is likely to prove more popular with kids. If you’re feeling very ambitious and want something that is a little less like a syrup and more like a caramel, add a little melted butter and a pinch of salt. But I assure you, it all end up in a giant sticky mess whatever you do!

That, and many a Scottish granny would frown on such frivolity when good old-fashioned treacle would do!

Happy Halloween!

To make treacle scones (makes 6 large or 12 small scones):

• 275g self-raising flour
• 75g butter
• 1 teaspoon baking powder
• 1 egg, beaten
• 125ml milk

Preheat the oven to 180°C (350°F).

Rub together the flour, baking powder and butter until it resembles rough breadcrumbs.

Mix the egg and milk, and add to the flour mixture. Stir until just combined – be careful not to over-mix. It will be quite soft and wet.

Turn the dough onto a well-floured surface and roll out to around 2 cm thick. Use a cutter to form the scones. Place on a well-floured baking sheet a few inches apart and brush the tops with a little milk.

Bake for around 15 minutes until the scones are risen and golden.

Serve the scones with butter, jam and honey, or with a side of treacle or 50/50 treacle mixed with golden syrup.

Worth making? This is a super basic scone recipe. But go on – there is a part of you that really wants to try eating them, covered in syrup, hanging from a string. You know you do.

8 Comments

Filed under Recipe, Scottish Food, Sweet Things

Halloween: Spicy Pumpkin Soup

The leaves are turning riotous shades of red and gold, and there are pumpkins to be seen everywhere! The witching season is nearly upon us…and who can resist making a pumpkin lantern? Not me anyway. This little fellow is now perched on the windowsill to spook passing children who are hoping to extort sweets from strangers.

But while pumpkin lanterns look frankly awesome in the dark, you are inevitably left with lots and lots of pumpkin to use up. And, of course, it would be a shame to waste it.

In carving this bad boy, I ended up with a large bowl of shredded pumpkin flesh, thanks to my carving technique. I cut the top, scooped out the seeds, and then used a spoon to scrape back the flesh. The less flesh left inside the pumpkin, the brighter the orange glow from the pumpkin when you put a candle in there, and of course, that’s what we want to see!

This approach, however, means that any recipe that suggests slow-roasting chunks of pumpkin flesh is pretty much out of the question. This left me with two basic choices: pie or soup. Given that I’ve just survived making one of the most sugar-packed sweets on the planet, I opted to make a big pot of something savoury.

Pumpkin soup and I have had a slightly odd relationship over the years. My early attempts were not great. I tended to throw everything in a pan and let it simmer. The resulting soup was often bland, watery and lacked much colour. That something so insipid could come from something as vivid, orange and downright fun as a pumpkin seemed desperately unfair.

Since those early attempts, I have refined my approach, and I reckon I have nailed it. First thing is to fry some onions for a long time over a gentle heat so that they caramelise nicely. Then add lots and lots of spices. You can add pretty much whatever you like, but I find that cumin, curry powder and some paprika are great, plus a good dash of turmeric to add a bit of earthiness and some colour. The pumpkin flesh is then added to the onions and fried for around five minutes, so it starts to cook but doesn’t just go watery. It is at this stage that you see just how much water the pumpkin actually contains already, so when you do come to add some stock, you see why you don’t need so much of it. I also add a potato to the simmering broth for a little extra richness of texture. Finish it off with a nice big dash of double cream and it’s a perfect autumn warmer – a thick, rich, spicy soup.

For me, pumpkin soup needs to be silky-smooth, so it has to be pureed to within an inch of its life, and then passed through a sieve. However, it is also nice to have a bit of texture to provide some contrast. So how to do this when you’ve just gone to great lengths to ensure the soup is essentially texture-free? Well, there are two easy ways to do it, and not mutually exclusive. Some black pepper croutons are great in this soup, as are some pumpkin seeds that have been lightly toasted in a little oil and some spices. This all helps to make the dish richer and more spicy, with a welcome crunch in the soup.

When it comes to serving this soup, you can score some easy points on presentation by drizzling over a tablespoon of double cream, and the a spoonful of olive oil. Slightly Jackson Pollock, assuming that Jackson Pollock ever made pumpkin soup. But if he did, I have no doubt it might have looked something like this.


Happy pumpkin carving!

To make pumpkin soup (serves 6-8):

For the soup:

• 4 tablespoon olive oil
• 2 onions, peeled and chopped
• 2 teaspoons ground cumin
• 1 teaspoon curry powder
• 1 teaspoon ground turmeric

• 1 teaspoon paprika
• flesh of one large pumpkin
• 1 litre vegetable stock

• 1 potato, peeled and diced
• 4 tablespoon double cream
• water, as needed
• salt and pepper, to taste

For the croutons:

• 2 handfuls cubes of bread (baguette or sourdough)
• freshly ground black pepper
• large pinch salt
• 3 tablespoons olive oil

Put the olive oil and chopped onions in a large pan. Cook over a gentle heat until the onions are caramelised and lightly browned but not burned (around 5 minutes).

Add the spices and cook for around 30 seconds. Add the pumpkin flesh and cook on a medium heat for around 5 minutes, stirring from time to time.

Add the vegetable stock and the potato, bring to the boil, and simmer for around 30 minutes until the pumpkin flesh and the potato are very soft. Add any water (if needed) and add salt and pepper to taste.

In the meantime, make the croutons: put everything into a bowl, stir well, then transfer to a baking tray and bake in the oven at 200°C (400°F) until golden.

Once the soup is ready, put into a blender and blitz until smooth. Pass through a sieve, stir in the cream, then reheat briefly before serving. Finish each bowl of soup with a swirl of cream, a swirl of olive oil and a few croutons.

Worth making? When you’re faced with the aftermath of pumpkin carving, this is a great way to use up the pumpkin flesh. The slight warmth from the paprika and the spices make it a great lunch or supper dish as the weather starts to get colder.

3 Comments

Filed under Uncategorized

Scottish Food: Macaroon Bars

The elegant arcades of Paris are dotted with pâtisseries selling dainty macarons in vibrant colours and all manner of exotic flavours. All very sophisticated and famous the world over.

Well, today I present one of Scotland’s national sweets: the macaroon bar. It’s about a million miles from the French macaron. They both contain sugar and the names are a little bit similar, but that’s about as far as it goes.

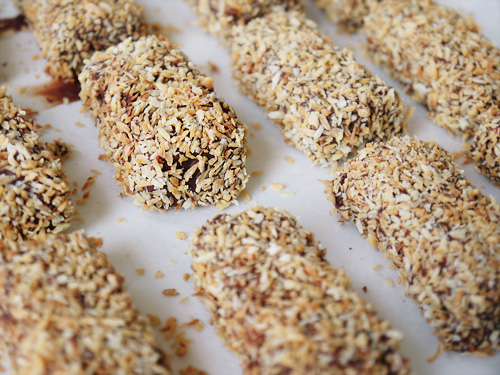
The Scottish macaroon bar is something of tooth-aching sweetness. It has a snowy-white intensely sugary interior that has been dipped in chocolate and then rolled in toasted coconut. This is probably as bad as sweets can get (and a dentist’s worst nightmare) but it has a firm place on the heart of a nation that, well, loves just about anything that is very, very, very sweet.

You might also wonder where the name comes from – is this in any way linked to the French macaron? The answer is…I don’t know. But here in Britain, coconut macaroons are quite common, so I think it is the addition of the coconut that gives rise to the name. Just a hunch.

Now, you might be looking at these things and thinking “wow, that looks an awful lot like a peppermint cream/pattie then you are sort of right. The filling is like fondant, but it hides a surprise. Whereas true fondant centres involve boiling sugary syrups to the right temperature, then working the syrup on cool marble surfaces with spatulas and kneading them to encourage the formation of the right type of sugar crystals, macaroon bars take a shortcut. And that shortcut (and I promise I am not making this up) is to use cooled mashed potato.

That’s right. Potato!

It seems surprising, but you mix one part potato to four to five parts icing (confectioner’s) sugar, and hey presto – a smooth filling that is easy to work and just as sweet as the more complex version. What this does mean, of course, is that if you are making this with kids on a rainy afternoon, it’s very easy to do and much safer than leaving a toddler to work a tray of scalding sugar syrup. Of course, it won’t do their teeth any good, but this is of course not something that you would be making on a daily basis.

The profess of making them takes a little time, but it’s actually quite easy. You start with the potato, which looks like it won’t ever take the best part of a kilogram of sugar. But with the first addition, it turns from dry-looking mashed potato to a very sticky syrup. Looks odd, but keep going and it becomes firm and turns snowy-white. Then you chill it in the freezer, so that once you come to dip the pieces in chocolate, it sets quite quickly. But something I learned by macaroon bar number two was that you either need to work with a friend (one dipping, one rolling) or use one hand for dipping, and keep the other free for the rolling. Otherwise you end up with fingers covered in chocolate, coated in coconut, and one very, very big mess in the kitchen.

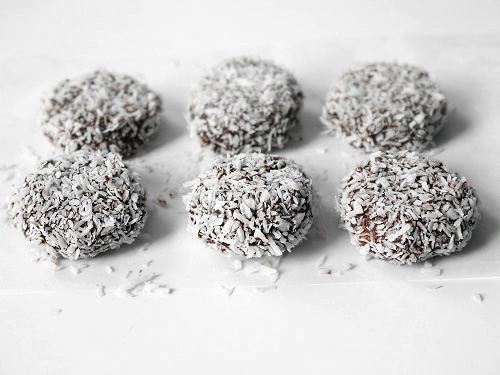
The bar shape is classic, but once I’d cut the fontant into strips, I ended up with a few scraps. Clearly worried that I didn’t have enough highly sugary sweets already, and as I still had ample chocolate left, I rolled the fondant into balls, flattened them slightly, and dipped them in chocolate and rolled them in untoasted coconut. I think that they look rather pretty. Who knows, they could even take off as the must-have petits fours for smart dinner parties!

To make macaroon bars (makes 18-20):

• 1 large potato (100g after boiling)
 • 400-500g icing sugar
• 2-3 drops vanilla extract
 • 300g dark chocolate
 • 100g dessicated coconut

Boil the potato until soft. Drain, measure out 100g, then mash until there are no lumps, and leave until cold.

Put the cold mashed potato, vanilla extract and 100g of icing sugar in a bowl. Mix well – the potato might seem very dry, but it will change into a very thick, sticky paste. Keep adding the icing sugar, 100g at a time, mixing well after each addition, until you have a stiff white fondant.

Line a tray with greaseproof paper, put the fondant in the tray, and press flat. Cover with cling film and leave in the freezer for an hour.

In the meantime, toast the coconut in the oven – spread thinly on a large baking sheet and cook in the oven at 150°C (300°F) for around 5 minutes until the coconut is just golden. Watch it carefully – it can burn very easily. Remove from the oven and allow to cool.

Remove the fondant from the freezer. Cut into bars (mine were finger length and just wider than finger width).

Melt the chocolate in a bowl above a pan of barely simmering water. Once the chocolate is melted and smooth, dip each piece of the sugar paste into the chocolate, then roll in the coconut. Transfer to a sheet of greasproof paper and allow to set.

Worth making? This is quite a fun and easy recipe to try. It’s super-sweet, so not something you would make often, but worth having a go at!

23 Comments

Filed under Recipe, Scottish Food, Sweet Things

On Location: Franco Manca (Brixton, London)

You might have seen my recent post on Brixton Cornercopia in Brixton Village.

Well, today it’s a hop, skip and a jump across the road to the neighbouring Brixton Market, which contains what is, in my humble view, one of the jewels in the crown of the rapidly changing South London foodie scene. It’s Franco Manca, which most people around this part of town know as the “sourdough pizza place”.

The basics: it’s tucked away in a corner of the market (so seek it out and don’t give up) and is tiny. There is often a queue – which should be taken as a good sign – so don’t be surprised to find yourself up close and personal with other customers at a teeny tiny table.

But we’re here for the great pizza, so everyone seems to be happy to rub along together…and you never know, you might make new friends! At weekends, any idea of just popping in will be greeted with a mighty (if quick-moving) queue, but on a weekday you normally stand a pretty good chance of grabbing a table. Aim for one indoors and enjoy the heat of the pizza oven as the nights get cold and dark. It’s all a bit chaotic, but it just works, as whenever I’ve been, then staff have been super-friendly.

So the star: the pizza. The bases are what makes the place famous, made from sourdough that has been slow-raised for about 20 hours. So just think about this – someone was planning to make my pizza almost a whole day before I even knew that I would be eating it. The resulting base is very tasty, softer than the usual crisp bases that I crave but with a nice chewiness and a puffy edge. The choice of pizzas is kept mercifully short and sweet – there are six standard pizzas, which change with the season, and then two or three specials. And not a bit of pineapple in sight. So yes, you can choose from nine pizzas max. But frankly, that is not an issue – there is a good mixture of veggie, meaty and cheesy, so you won’t be feeling restricted.

The place is all in all a little mad, so just relax and go with the flow. I was famished and luckily my order appeared pretty swiftly (which, in my experience, is usually the case). A piping hot sourdough pizza appeared, flecked with black spots on the puffy crust, and topped with all manner of goodies. On this occasion, I opted for a pizza bianca with buffalo mozzarella, gorgonzola, spinach and caramelised onions, but plumped for a twist with a dash of tomato sauce on the base (so…eh…just a normal pizza really…). It was just heaven. The cheeses were creamy, the sauce was tangy, the onions sweet and juicy, and that base…tasty and just that little bit chewy. I scoffed it in the blink of an eye, but I reckon I could easily have polished off a second. It was that good.

What did strike me about Franco Manca is that this is very much an established joint. People know it and love it. While, no doubt, it really is an exciting time to go down to Brixton and see what is happening, clearly it’s also changing fast – you are basically guaranteed to find something new down there every week – but I do think it will be interesting to see what happens as time goes by. Some places will do well, some might look to move out to other premises, others will vanish as quickly as they came.  But I think one thing is for sure – Franco Manca has been down in Brixton as long as I can remember, and it’s done well for a reason – it’s excellent. And you know what? I reckon it will still be there for a very, very long time.

So…would I go back? Do you really have to ask? If I move down here, we could be having weekly clandestine liaisons. I’d be sneaking in to get take-away too. And all that would be a very good thing indeed.

Franco Manca, Unit 4, Market Row, Brixton Market, London SW9 8LD. Tel: 0207 783 3021. Tube: Brixton.

LondonEats locations map here.

7 Comments

Filed under London, On Location

Perada

I recently made a batch of pear jelly and I’ve been amazed how popular it has been. I was also incredibly excited when I saw that it had even inspired people to make it and do their own posts, like on Things {We} Make. I love to look at blogs and use them as a source of inspiration, and it’s great to think that people may be looking at what I get up to for the same reason.

When I saw their version of pear jelly, I did get a little bold and hinted to them that I had another pear recipe in the offing. Well, finally, here it is – perada!

So first of all, a bit of context. What is perada?

If you’ve got a soft spot for Spanish food, then you’re probably familiar with membrillo, the rich red quince paste that is famously paired with manchego cheese. Perada is something similar, although less familiar (at least to me). I came across this idea a while ago and it was mentally filed away in the “to try at some point” part of my brain.

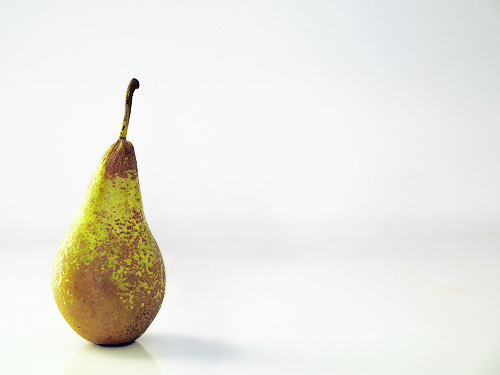
Well, since I made the pear jelly, I received yet another bag of windfall pears. A slightly different variety, which my limited garden knowledge had identified as Williams. While it would be interesting to have pear jelly made with different varieties of pear so that I can then express a preference when called upon to do so, there is also an overwhelming need to be practical. With the best will in the world, there is a limit to just how much jam and jelly a household can consume over a year, so I did two things. Firstly, I left some of the pears wrapped in newspaper to ripen for a week (a tip from Lynn at Queen of the Castle – thanks!). Second, I dug out the old recipe and use the rest to make – surprise! – a batch of perada.

The interesting thing is that there does not seem to be too much on this item on the beloved web. A couple of sources refer to it as being Iberian in origin. Beyond that, there is not much to find, so it is clearly playing second fiddle to the more famous membrillo. So let’s see if we can do a little to change that, shall we?

The method is quite easy – you boil the pears, peel them while warm, then mash them up and pass through a sieve. I have to admit, I was pretty dubious that this would work, and feared all manner of stringy bits and pips in the resulting puree, but it worked like an absolute dream. So if you’re tempted to get into all the fuss of de-coring the pears, you don’t have to.

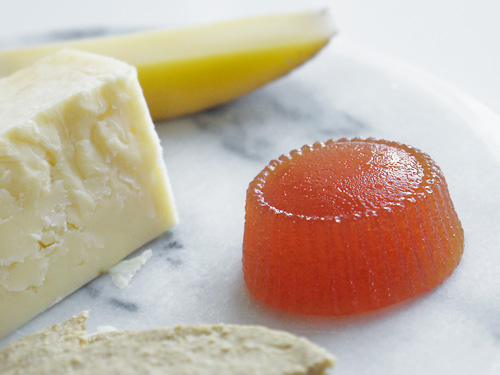
As with my pear jelly, the colour was a bit of a surprise. The pear puree came out as a pale yellow colour, and I was expecting something similar from the resulting perada. But no. As you can see below, once the sugar was added and the whole lot allowed to boil up, it turned a rich amber colour.

Now, you may remember that on previous occasions I seemed to rant a little against the use of pectin. Well, it’s not that I’m actually against it – it is just that I tend to use high-pectin fruits, or I just add lemons, which also add a nice tang. However, with this recipe, I wanted to keep the cooking time to a minimum so as to benefit from maximum fruity pear flavour. I was also keen to have perada that would set in funky moulds I was using, and that could be sliced easily into delicate slivers to perch atop pieces of cheese.

With the perada mixture made, it was time to store it. I filled one normal ramekin, four miniature moulds to adorn a cheeseboard, and I also filled three miniature jam pots to store for Christmas. To say that I was surprised at how little I got out of the process was something of an understatement! But highly predictable given that you need to let the mixture cook, and cook, and cook until it reduces down.

To make my miniature portions of perada, I got a little bit cunning, and as you can see from the picture below, they look like a proper old-fashioned jelly or blancmange. Well, there is a little trick to this. I used a silicone cupcake mould, then turned it inside-out. This results in a little ring of dimples at the top of the perada, which I think looks rather cute.

You can also see that once it has been sliced, the true colour is apparent – more of an amber colour than red, which I think does look rather jaunty indeed on a piece of cheese.

Lacking any manchego in the house, I paired it with a very mature Cornish cheddar, and was frankly delighted with the combination. The perada is sweet, but the cheese was very strong and tangy, and the two together was just a little piece of joy. Given that both pears and cheddar are very typically British, it is a combination that sounds odd but does work.

Once you have gone to all the effort of making perada, you might wonder what to do with it all. The natural home for it is as part of a cheeseboard, but there is of course a natural limit to just how much cheese you can eat. But perada is adaptable – cut into pieces and coat in sugar to make little pâtes de fruits, or use chunks of it in cakes or pastries.

Alternatively, be sure to do as I did, and put some perada into little jam jars – this allows you to store it and use it from time to time, enjoying the fruits of your labour over the winter months.

To make perada:

• 8 pears (leave the skin on)
• 300g white sugar
• 130ml water
• juice of 1/2 lemon
• 4 strips lemon peel, optional (*)
• 3 tablespoons liquid pectin, optional(**)

Rinse the pears, place in a saucepan and cover with cold water. Bring to the boil, then leave to simmer on a gentle heat until soft. They are ready when a sharp knife can be easily inserted (20-30 minutes).

Drain the pears. Once cool enough to handle, peel the pears and discard the skin.

Put the pears into a sieve above a bowl, and use the back of a spoon to push them through. You will end up with a bowl of pear puree and all the stringy bits and pips in the sieve.

Measure the pear puree, and add 3/4 by volume of sugar to the mixture (i.e. for every 1 cup of pear puree, add 3/4 cup sugar).

Put the pear puree, sugar, water, lemon juice and lemon peel strips into a saucepan. Bring to the boil, cook for a minute (stirring as needed) and then reduce to a simmer. Stir in the liquid pectin (if using) and then cook for around an hour until the mixture is thick and leaves little “trails” on the bottom of the pan that take a second or two to cover over. Worry less about the cooking time, and more about when the perada reaches the right thickenss. You can also test it by dropping a small amount onto a very cold plate – if it goes firm after a minutes, the perada is ready.

Remove the lemon peel. Pour the cooked perada into moulds or sterile jam jars(***).

(*) Adding the lemon peel gives the perada a slight lemon aroma. Optional, but a nice touch.

(**) You can use the perada as a paste, or add the pectin to ensure that it sets firmly and can be cut. The pectin is essential if you want to make all these fancy shapes or cut into pieces.

(***) If using moulds, use a tiny amount of neutral oil to rub the inside so that the perada slips out. And I really mean a tiny amount – it should look invisible.

Worth making? This is an interesting but very simple recipe. It takes a little time to make, but it a good idea for when you’re mooching around the house at the weekend. Well worth trying.

16 Comments

Filed under Uncategorized

Pistachio and Honey Baklava

At the weekend, there was a very special celebration lunch. It was in honour of one of my friends, who was awarded an OBE, and we were round at her house to enjoy good food and great company. We also got to see the official video of the big day at Buckingham Palace. It was so funny to watch – incredibly grand and exciting, and nice to be able to share in the event.

This is my contribution to the lunch – a tray of pistachio baklava with an aromatic honey syrup.

This is based on my normal nut baklava recipe, but I wanted to make it a little more special. So I made the filling with mostly pistachios, and made the sticky syrup with a good measure of honey. Rather than just using pure honey (which could be somewhat overpowering) I replaced some of the sugar in the syrup with wildflower honey, and it came out just right in terms of the honeyness-to-nutiness ration.

Now, for a fancy event it needed to look fancy too. So I jazzed it up by presenting on my lovely metal Arabian-style plate (a bargain at the St Gilles flea market in Brussels this summer) and scattered the baklava with sliced pistachios and some dried pomegranate. Yes, dried pomegranate. This was news to me! Not something I had ever come across before, but the hostess was using them in another part of the meal, and I thought a few of the sweet-tart seeds would make a nice complement to the sweetness of the honey syrup.

We went hunting for the famed dried pomegranate up and down Stoke Newington High Street, but to no avail. Exhausted from all that pavement pounding, we sound some refreshment at the lovely new coffee house Fred & Fran and got chatting to one of the baristas. We mentioned the dried pomegranate, and he shouted down to the chef – had she heard of it? Nope, news to her too. So we shuffled off, bought a fresh pomegranate, removed the fleshy seeds and ended up drying them in the oven at a very low temperature. Needs must and all that!

So I hope you enjoy this recipe – I can’t really say how authentic it is, but it is very simple to make and it seemed to be pretty popular served with a scoop of milk gelato.

To make pistachio and honey baklava (makes around 24 pieces):

For the sugar syrup:

• 75ml water
• 125g white sugar
• 50g honey
• 1 teaspoon of lemon juice
• 1 tablespoon of orange blossom water
• 1 tablespoon of rose water(*)

In a saucepan, heat the water, sugar, honey and lemon juice until it comes to the boil and cook for a minute. Now add the orange blossom and rose waters, boil for a few seconds, and remove from the heat. Allow to cool before using on the baklava.

For the baklava:

• 150g pistachios
• 50g almonds
• 100g soft light brown sugar
• 1 teaspoon ground cinnamon
• 1 tablespoon orange blossom water
• 1 tablespoon rose water(*)
• 12 sheets of filo pastry
• 75g unsalted butter, melted

Preheat the oven to 200°C.

Grind the nuts. We want them to be medium-fine – if they are ground too finely, the resulting filling will be very dense. Combine with the sugar and cinnamon, then add the orange blossom and rose waters and mix well. Set aside.

In a dish (I used one 21 x 28cm), brush the base with a little melted butter, then add a sheet of filo. Brush with butter, then add another sheet. Brush with butter, and continue until you have six sheets of filo in the dish. Add the filling, and spread out. Be gentle so you don’t break the pastry. Now add the rest of the pastry, in each case adding a layer, brushing with melted butter, then adding the next. Finish by brushing the sixth sheet with butter.

Cut the baklava into pieces – long rectangles, diamonds, squares, or whatever whimsical shapes take your fancy. Do this carefully with a sharp knife and make sure to go all the way through to the base. You might want to leave a border of “scrap” baklava where the pastry is a bit untidy at the edges. This means the final result is neater, and as the cook, you get to enjoy this “angel’s share”.

Bake the baklava for 15-20 minutes until crisp and golden. When done, remove from the oven, allow it to sit for a minute, then pour the cooled syrup over the hot baklava. Be sure to get the syrup in between each cut. If you see syrup forming pools in some areas, don’t worry – it will all be absorbed.

Allow the baklava to cool fully before serving. Decorate with chopped pistachios and dried pomegranate seeds(**).

(*) By this, I mean the lightly aromatic rose water. If you have the much more intense rose extract, then use just a few drops and not a whole tablespoon!

(**) To dry pomegranate seeds – remove the red seeds from the white pith, and spread on a non-stick baking tray. Leave in the oven at 60°C (140°F) for several hours until the seeds are dry. They will remain slightly sticky but should keep their colour and not turn brown.

Worth making? This version of baklava is very fragrant, and there is just enough honey to make this seem like a very decadent treat. It is also very simple to make, and can be prepared ahead of time.

10 Comments

Filed under Recipe, Sweet Things

Birthday Macarons

I would love to be able to say that I made these macarons, but I didn’t.

Nope, in fact, I suppose that really I am just doing this to make you just a tiny bit jealous…I received this lovely gift for my birthday recently – a rather amazing (and delicious) box of macarons from famous Belgian chocolatier Pierre Marcolini.

These require nothing more demanding than to be enjoyed with a cup of green tea.

The flavours are great, and really link back to the world of the chocolate maker – fruity (cassis, strawberry, vanilla, salted caramel, speculoos, one intesely dark chocolate, one chocolate and almond and finally, one citrus macaron that had been wholly dipped in chocolate. All in all, pretty sensational!

4 Comments

Filed under Sweet Things

Spiced Plum Compote

A few days ago, it was baking hot outside – 30° here in London – but as we all knew, it was not going to last. We had hot days and warm evenings, but the mornings were crisp and cool. We knew we would be shivering under coats and scarves in a couple of weeks, and the seasonal produce has been providing a pretty clear steer as to what is coming.

And now it is indeed autumn! Leaves are turning and people are turning to cosy pubs with log fires. At this time of year, there are also plums everywhere, so time to enjoy them before they are gone.

I had a lovely bag of purple-blue Marjory plums sitting in the kitchen, but I’ve been so busy in the last week with work and travel that they were not being eaten. Slightly past their best to enjoy as they are, I decided to make a compote with them. It’s the perfect way to use fruit – very easy to make and still allows the flavour of the fruit to shine through. And making compote is just as magical as making jam – the golden flesh and dark skins of the plums were transformed into a deep ruby compote. Try it with Victoria plums and it turns a vibrant red. Mirabelles will turn into deep amber. Just like the colour of the leaves!

In a nod to the long-expected-and-now-here autumn weather, I made this recipe even more seasonal by using a good dash of my famous German Lebkuchen spice mix to add touches of cinnamon, cloves, aniseed and ginger.

Compote is simplicity itself. Fruit, sprinkling of sugar, a little water and leave to cook for simmer for thirty minutes. Job done. In my version, I just de-stoned and sliced it into quarters. I like the strips of skin which curl up and seem to become candied in the compote, but if you like a smoother compote with fewer “bits” you can of course chop the fruit into smaller pieces.

Finally, I planned to keep the compote for a few days to eat on yoghurt for breakfast, so I added one of the pits from a plum stone to the compote to give a hint of almond flavour. They are small but strong, so be warned – just the one will do it!

Compote on yoghurt is delicious and a classic pairing, but of course do not limit something so delicious to breakfast. It is great on pancakes or ice cream, but it makes a truly excellent  addition to chocolate – try a cake with a decent side of spicy plum compote and tell me that does not serve as the perfect antidote to cool days and chilly evenings. This also makes a lovely quick and easy jam for the impatient to spoon onto warm scones. No messing around with pectin, setting points or sterile jars. It doesn’t last as long as proper jam, but chances are that it is not going to last long enough for that to ever be an issue!

To make plum compote:

• large plums (Victoria, Greengage, Marjorie)*
• sugar (10g per plum)
• water (10ml per plum)
• ground spice, to taste

Rinse the plums and remove the stones. Cut into pieces (small or large, according to preference). Add the sugar, water, spice and kernel from one plum stone. Bring to the boil, then reduce to a simmer for 30 minutes, or until the fruit has collapsed.

Mash the fruit slightly with a fork, then either serve as a sauce or store in a jam jar in the fridge for 2-3 days.

(*) For damsons, use 10g sugar per 3-4 plums, and for mirabelles, use 10g of sugar per 5-6 plums. Err on the side of caution, you can always add a little more sugar. And beware – do not use sloes for this recipe!

Worth making? This is the flavour of autumn! It is full of flavour, tangy yet sweet, and rounded off by the heady, rich aromas of spices that provide the hint of warmth when it’s chilly outside.

15 Comments

Filed under Recipe, Sweet Things

On Location: Brixton Cornercopia (Brixton, London)

Maybe you’re totally on trend, or maybe it has passed you by, but there is not doubting that the food scene Daaahn Saaaf is kicking off, and Brixton Village is well worth visiting for foodie delights.

The Village is located in Granville Arcade, a series of covered pedestrian streets. A couple of years ago there were just one or two cafés in the middle of shops selling anything and everything, alongside a rather forlorn corner where there were always a few empty lots.

Fast forward a couple of years, and those empty spaces have been transformed into bakers, coffee shops, sweet shops, ice cream parlours and there are places selling great Thai or Italian, alongside the famous Franco Manca sourdough pizza joint.

I was down in this part of town as the London heatwave was peaking and the whole vibe was like being in the winding streets of a smart continental town, as everywhere had tables outside (well outside-inside!) and the night air was still warm. It’s all got a slight retro air (there is a vague sense of a 1950s street party about all this) but is also seems like great fun. People are eating and drinking and really enjoying what is being served up. There is a genuine feeling of something exciting happening here, and it’s great to be a part of it and to see it developing.

I’ve been here quite a few times, but I had been promised “somewhere new” for dinner by friends. In fact, I didn’t want to know – I liked the idea of the surprise. As long as it was veggie, I was willing to take a punt and to try something new. In the end, we were heading to Brixton Cornercopia. It’s a cornucopia of delights, located on a corner. Hence the name!

Now this place is tiny but very charming. And of course, the bijou proportions don’t matter when the charm spills out the door and onto the tables outside and the whole place is bright and fun – vases of flower, gingham tablecloths, pots and jars of local produce and a prancing satyr on the menu. Cornercopia is also big on produce from local growers, and my friends tell me that you can from time to time pass the door to see a sign saying “Sorry we’re closed – making jam today“. If you’re brave, this goes as far as the wine – Cornish white (!) and beer from a local micro-brewery. Aside from that, you can enjoy local fruit and veggies too.

Enough gushing. How was the food?

Well, they do what I think might be my new favourite way of going to a restaurant, where they have three things on the menu for each course, and one of them was veggie (other than desserts, of course!). Takes all the stress out of choosing. But we started off by tucking into great slabs of sourdough bread (I know you shouldn’t fill up on bread but it was so darn tasty!) and got in a bottle of Cornish wine, which was billed as “England’s answer to Sancerre”. And you know what? It was good! Never had it before, but I would go for it again quite happily.

The starter was a very simply heirloom tomato salad with a crisp crumb. One of the tastiest things you can eat – tomatoes plus a little oil, salt and pepper. Beautiful colours and fantastic flavour.

The main was a very substantial platter of roasted beetroot, roasted onions, hazelnuts, watercress and a creamy blue cheese mousse. These are all some of my favourite flavours, and it was just delicious. They’ve managed to product some fantastic vegetarian food that looks good, tastes good and is very, very substantial. I shouldn’t have eaten it all. I should have stopped half way through. But it was so easy just to pick at a little more beet, a dash of mousse, well, maybe a little more of the roasted onion…

With hunger satisfied, the show started.

No, not some strange cabaret that is laid on in some restaurants that can be amazing but often tends to tread the strange line between weird and embarrassing. For one of our group was convinced he knew the hostess. So he asked her. Reaction was muted as they tried to work out where she could be familiar from. A local cafe? The market? The lido? We concluded that they must just have seen each other around….

…then 10 minutes later, our friend was still convinced, so decided to give her another grilling. And yes, before we knew it, we were treating that strange line between weird and embarrassing after all. The thing is, I am quite keen to go back there, so I hope that there isn’t a little black mark next to my name…ah well, we will see!

After all this, it was time for a dessert. Chocolate slab with orange and pistachio, yoghurt panna cotta or a selection of British cheeses? Stuffed as we were, it was only right to try at least one of them, and the chocolate it was to be. Let’s just go for what is clearly the richest, heaviest and most decadent option, shall we?

This was sensational. The chocolate was rich and dark, avoiding being too sweet, and had a pleasant orange flavour and generous number of bright green pistachio nuts. I also appreciated that it was not served straight from the fridge – makes such a difference, as the depth of flavour really comes across so much better.

So…would I go back? it will not be a surprise to hear the answer is a resounding yes. Nice place, great food, good vibe, friendly staff. Ticks all the boxes, and located in a fun area to boot. Highly recommended if you find yourself in this part of town.

Brixton Cornercopia, No. 65, 4th Avenue, Brixton Village Market, Coldharbour Lane, London, SW9 8PS. Tel: 07919 542 233. Tube: Brixton.

LondonEats locations map here.

3 Comments

Filed under London, On Location, Uncategorized

Pirishkes

This is a recipe for Jewish honey-poppy biscuits that I saw recently on the Saveur website. It was simply a case of “oh, those look nice, I’ll try them”.

I love poppy seeds (stick ’em in a cake and I’m right in there) and I happen to have a rather large stock of honey, so some seasonal cookies that combined the two seemed to be a particularly timely idea.

The original recipe is here (in good old cups and other odd measurements!) but I’ve halved it and converted the quantities into grams, which is my preferred way of cooking. But what I realised about thirty seconds after starting was that I actually had no idea what I was making. Never made them before, never seen them, never eaten them. So rather then my sometimes slap-dash approach to recipes that I know well, I had to follow this one with forensic precision. Well, almost forensic precision. I halved the amount of salt, and doubled up on the poppy seeds.

The resulting cookies have a very traditional old-fashioned flavour to them. They are like a rich shortbread, with the poppy seeds lending the biscuits an earthy flavour and a pleasant “pop” as you eat them. You could happily leave them as rich crisp poppy biscuits, but I was also keen to add the honey syrup. May as well go the whole hog.

Now, when it comes to the syrup, I really didn’t know what would happen. I assume that it would end up a little like baklava, with all the honey syrup being absorbed by the biscuits. Well, I arranged the cookies in a try, poured over the honey syrup, and it sort of flowed over the biscuits and seeped between the gaps. After the suggested ten minutes, the biscuits were still very crisp and just a bit sticky. Maybe this was right, I don’t know. But left overnight, the biscuits did indeed soak up most of the honey, and stayed firm with just a little honey squelching out of them. And like this, they were very delicious indeed. Honey and the popping of poppy seeds.

To make pirishkes (makes around 25 pieces):

• 225g plain flour
• 40g poppy seeds
• 1 teaspoon baking powder
• 1/4 teaspoon salt, finely ground
• 55g icing sugar
• 55g butter, softened
• 1/2 teaspoon vanilla extract
• 1 egg
• 170g honey
• 40ml water

Preheat the oven to 175°C (350°F). Line a two deep baking trays with greaseproof paper.

In a bowl, mix the flour, poppy seeds, baking powder and salt.

In another bowl, beat the sugar, butter and vanilla extract until pale and fluffy. You can do it by hand, but it’s easier with an electric beater.

Add the egg, mix well, then stir in the flour mixture until you have a soft dough. It will seem quite dry, so use your hands to bring it all together.

Divide the dough into two portions – roll each part out to 1/4 inch (just over 1/2 cm) thick. Chill in the fridge for 20 minutes, then cut into diamond shapes.

Transfer the cookies to the baking sheets, and bake for 12-15 minutes until just turning golden at the edges. In the meantime, put the water and honey in a saucepan and bring to the boil.

Once the cookies are ready, transfer them onto one sheet while still hot (the diamond shapes should fit together quite tightly), and pour over the hot honey. Leave to rest for at least 10 minutes before serving, but they’re still pretty good the day after.

Worth making? These are very unusual little biscuits, but if you are a fan of baklava and similarly sweet-and-sticky biscuits, then I think you will like these. If you want to vary things, it would also be a nice change to swap the vanilla extract for lemon or orange zest.

8 Comments

Filed under Recipe, Sweet Things