Tag Archives: confectionery

{2} Sparkling Quince Candy

In all the years that I’ve been tackling various Christmas delights, what has struck me is how few of them are actually suitable for vegans. Sure, a lot of them could be adjusted to make them suitable, but few of them are, from the out, completely plant-based. Perhaps the nearest traditional recipe I’ve tried has been sugarplums, albeit it you would need to swap out the honey for some other syrup. My festive sweet chestnut wagashi from 2012 were indeed completely vegan, but as they were more the sort of thing you might expect in Japan than from a German Christmas market, I’m not entirely sure that they would really count.

Well, it’s time to change that. The hero of the hour is that most frustrating of fruits, the quince, which appears in various countries as part of their festive fare. They always look so enticing, large, smooth and golden. Indeed, they are reputed to be the real “golden apples” that Hercules was challenged to steal from the Garden of the Hesperides (although others suggest they were actually oranges), and quinces were also thought to be sacred to the goddess Venus, making them a symbol of love and fertility.

4quincesbluebowl
All well and good, but if you’ve every tried to cook with quince (at least the ones that grow in chillier Northern climes), you’ll appreciate that they don’t ripen into sweet, juicy fruit, but remain hard and rather astringent while raw. They might look tempting, but bite into one and you’ll soon wish you hadn’t!

This was very clear to me during autumn – two streets from my house, someone has a large quince tree in front of their house. Every few days, a quince would appear on the ground with some teeth marks. One by one, each of the quinces met the same fate. Clearly several passing opportunists had tried their luck, each being disappointed in turn. No, in this country, we need to cook quinces to change them into something fragrant and delicious.

Indeed, it is the cooking that makes the magic happen. This is not like cooking apples or pears (to which quinces bear similar appearance). Cooking quince down with some sugar and lemon juice transforms the hard pale yellow flesh into something completely different. Rich in colour, ranging from soft pink to deep garnet red, a delicious sweet with a rich pear-and-honey flavour!

quincecandy3quincecandy4
In reality, today’s post is really just a jazzed-up version of simple quince paste, with the sparkling element coming from being rolled in granulated sugar. All in all, it’s similar to Spanish membrillo served alongside manchego cheese. Of course, quince paste is not something that is limited to Spain. Similar things pop up all over the place, such as British quince cheese, France’s pâte de coing (which features as one of the Thirteen Desserts of Christmas (Les Treize Desserts de Noël) traditionally enjoyed after a festive meal in Provence) or Croatian kotonjata that is enjoyed at this time of year.

They all follow a similar recipe, but vary the amount of sugar, which results in different levels of sweetness and textures that range from firm and chewy to soft and melting. They are also suitable as a vegan treat, as they contain nothing more than quince, sugar and lemon juice, plus a little water to get things going, relying on the naturally high pectin levels in quince to get a good set (no gelatine here). The only thing you are asked to give to make quince candy is time, time and more time!

quincecandy2
I would describe this sweet as similar to Turkish Delight, so if you love that, then you’ll enjoy this. It has that same sweet, slightly chewy texture, albeit it has the graininess of quince rather than the smoothness of Turkish Delight. It’s worth noting that as you puree the quince, rather than just using the juice, you don’t get a completely smooth jelly. However, the main difference from Turkish Delight is that it is a lot, lot easier to make. There is no messing around with cornflour mixtures until everything turns to gloopy goo…just cook the quince until soft, puree it, then add sugar and cook the lot until done. Basta!

quincecandy5
I actually made this over two evenings, which is probably the easiest way to do it given how busy we all are at this time of year. The first evening, let the prepared quince cook down. This is the easy bit, and you can leave it on the hob to simmer while you’re doing something else (making cookies or watching a film…). This is the point where you’re also delighted that the quince flesh has turned to a soft pink colour, and you imagine that this will be the colour of the finished candy.

The second evening is a bit more involved. Once the sugar and lemon juice are in the mixture, the lot needs to reduce. Initially this is fine, and you don’t need to stir it very often at all, but as it cooks down, you’ve got a much higher sugar ratio in there, and towards the end, you have the sheer delight of stirring the boiling, bubbling mixture over a very hot stove. Lucky that it is so chilly outside! At this stage, I was amazed by the colour change – gone was the soft, gentle pink, and instead I had an intensely deep, dark red colour. Really quite amazing – this was just the result of the cooking process, where the heat of cooking causes a red pigment called anthocyanin to appear (or maybe it was there all along – I’m no scientist!). The final shade and its intensity is a result of the quince variety and where it was grown. If you make this, you could get the same garnet colour, or it might look quite different. So I guess what I’m saying is that there are no guarantees, so live a little and see what colour you end up with.

quincecandy6
A few final little tips – once you’ve made the giant block of quince candy and you have cut it up, you are advised to leave it uncovered in a warm and dry place. This will help the candy dry out slightly. What you want is a surface that is sticky but not wet, so you can coat it in sugar, but the sugar won’t then dissolve and form a syrup that ends up clinging to everything (your worktop, your hair, your Rudolph jumper…).

It is also worth making sure you use the lowest heat possible for this recipe. It is very easy to burn, and the flavour of caramel might be delightful with salt, but it can ruin the fruity flavour of quince. Taking the slow approach will also allow you to control the final texture. My candy had a very firm but chewy texture, which I like, but you may prefer something softer.

So…after all that work…how was it? Frankly, I was terribly impressed with myself. This looked really great – each piece was very regular – and the flavour was  fantastic. It has that familiar honey-pear flavour and aromatic quality that you associate with quince, but as the mixture has been cooked for a long, long time, it is much more intense than membrillo you might have with cheese. I think getting a few of these after dinner or as a gift would be very much in keeping with the festive season. If you’re feeling creative, you could try to put the hot quince paste into small silicone moulds, or even just use a cutter to get different shapes before rolling in sugar.

Finally, I should just add that this recipe does make a lot of pieces of candy. I had about 80, all around the size of a walnut, so you might want to try a smaller batch unless you’re a real quince lover!

quincecandy1

 To make Quince Candy (around 80 pieces, depending on size)

• 4 large quinces
• juice of one lemon
• 300ml water
• granulated white sugar (plus extra for rolling)

Step 1: Prepare the quince pulp

1. Peel and de-core the quinces. Cut the flesh into chunks (I ended up with about 1.145kg of quince flesh from my four large quinces), discarding the peel and pips. Add the water and lemon juice, cover the pot and simmer until the quince is very tender and has a pink colour (at least 1 hour).

2. Mash the quince mixture so it looks like pulp and then pass through a sieve to remove any “stringy bits”. This might take a while, but keep at it and almost everything should go through the sieve. Discard anything that remains in the sieve, and you’ve got your quince puree!

Step 2: Make the Quince Candy

3. Measure the quince pulp by volume and put into a saucepan. For every 500ml of pulp, add 400ml of granulated sugar (i.e. 4:5 ratio of sugar to quince).

4. Prepare a non-stick baking tray ( at least 20 x 20cm/8 x 8 inches). Rub very lightly with a few dots of a neutral oil to prevent sticking.

5. Heat the mixture until the sugar dissolves. Cook over a gentle heat until the mixture darkens in colour and you can scrape the bottom of the pan – it should leave a trail for a few moments and not fall off a spoon. You can also test a few drops of the mixture on a cold plate – if it sets firmly, it’s ready. Initially, you can stir the mixture only every 15-20 minutes, but as the mixture reduces, you will need to stand over the pot and stir continuously (i.e. non-stop, otherwise it will burn!).

6. Once the quince mixture is ready, pour into the prepared tray and shake lightly to even the surface. Cover loosely with greaseproof paper and leave overnight to set and cool.

7. The next day, turn the quince candy slab out of the tin. Cut into pieces, and spread on a sheet of greaseproof paper and leave in a warm, dry place to dry out slightly. After a couple of days, roll each piece in more granulated sugar to finish.

5 Comments

Filed under Christmas, Recipe, Sweet Things

Beijinhos de Coco (Brazilian Coconut Kisses)

A few days ago I tried making Brazilian brigadeiros and have been really surprised at just how popular they are – I think they’ve had more comments than just about any other of my posts! As the weather has been rotten here, I found myself looking again at the cuisine of Brazil for some inspiration, and came across another sweet treat, very similar to brigadeiros, but made with coconut rather than cocoa. Again it is a simple matter of cooking up some condensed milk with a little butter plus your desired flavour, then cooking the lot until thick.

I’m rather impressed with how these turned out – they have a really excellent coconut flavour and a nice chewiness, rather like a firmer and chocolate-free Bounty bar. They are traditionally rolled in more coconut and finished with a whole clove. This might seem a little odd, but the hint of spice that this adds is surprisingly good (just remember to remove the cloves when you eat them!). If cloves aren’t your thing, you could try dipping them in dark chocolate for a more sophisticated treat.

BeijinhodeCoco

As with making chocolate brigaderos, I recommend that you don’t make these too far ahead of time. They can dry out, and you want them to be smooth and chewy. It is also worth saying that the longer you cook the mixture, the firmer the final sweets, so if you want them to be softer and more creamy, cook for less time, for very firm and more toffee-like, cook a little longer.

To make Beijinhos de Coco (make 25):

• 1 tin sweetened condensed milk (400g)
• 30g desiccated coconut (unsweetened)
• 30g (2 tablespoons) butter
• extra desiccated coconut, to roll
• whole cloves

1. Very lightly butter the bottom of a dish and place to one side.

2. In a small saucepan, melt the butter. Mix in the coconut and condensed milk. Keep stirring over a gentle heat until the mixture looks thick and comes away from the sides of the pan (around 10 minutes). Pour the mixture into the buttered dish, cover with cling film, and leave to cool completely.

3. Take walnut-sized pieces of the mixture and roll into balls between your hands. Roll in more coconut, press a clove into the top of each beijinho, and put into miniature cake cases.

Worth making? If you like coconut, these are a delicious and easy sweet to make at home. Recommended!

22 Comments

Filed under Recipe, Sweet Things

La vie en rose

Bring something for a tea party. We’re going for a romantic theme…

That was the brief, so what, oh what could I bring? Well, something that struck me as rather suitable would have been the rose creams that I recently sampled at Charbonnel et Walker in Mayfair just before the Jubilee. However, I didn’t have the time for a visit to central London, so it was going to have to be something home-made. So I thought: what the heck, I’ll just make rose creams. And…if they don’t work, it’s going to be a Victoria sponge…

My very unscientific research tells me that a lot of folk think of rose-flavoured sweets as rather old-fashioned. I think this is perhaps due, in part, to floral flavours usually being very strong, more like perfume, and often rather artificial. If you had Parma Violets as a child, you’ll understand. A rose has a fragile perfume, so if you are going to use it to flavour something, you want the retain its delicate character. While rose is undeniably very traditional, the flavour can also seem quite contemporary, at least to Western tastes. Rose water features in a lot of Middle Eastern desserts like baklava or lokum, so when used with a light touch, it can be quite heady and aromatic. It’s all about getting the right balance between the light, fresh notes of rose oil, but avoiding a flavouring that is too floral. Oh, and apparently rose creams are a favourite of HM The Queen.

We say we eat with our eyes too, and I think the colour of anything that contains rose has a lot to do with how it is received. A piece of Turkish delight that is bright pink suggests that it’s going to be rather strong in the flavour department, but if colourless, you’re not expecting the flavour to be too strong. So that was something that I took on board – my little creations were not going to be lurid neon pink!

However, when it came to making these sweets, I was faced with a bit of a quandary. What should the filling actually be made of? It is rather obvious that my rose creams were going to be very sweet. Lots of sugar would be unavoidable. However, there are still some variations.

An easy option is to combine icing sugar and egg whites. Personally, I try not to use uncooked egg white when possible, so that was a bit of a non-starter for me. Other recipes use double cream instead. This was more palatable for a picky chef, but I was also keen to have centres that were silky-smooth. I tested the icing sugar and cream mixture, but there was a perceptible graininess.

This process of elimination brought me face to face with one of my cooking demons. Fear of fondant. I was going to have to work with hot sugar syrup. Eek! I accept that some foods require a bit of science to understand them, but fondant is, for me, a huge step up. The thing with fondant is that you work the sugar syrup so that it forms very tiny crystals, so the resulting paste is very smooth when you bite into it, with no hint of graininess and thus a perfect melting texture. My fear comes from past attempts that ended up with a nasty, gritty mess, but this time I was determined to make sure that it worked.

First off, I tried adapting this recipe from Saveur for peppermint patties. I would just swap the peppermint oil for a little rose extract. However, I found the addition of cream and butter made the filling too rich, and the use of dairy meant that the base was not sufficiently “clean” for the rose flavour to work. Peppermint oil would probably have worked better here after all.

So I went back to the basic fondant recipe – sugar, water, glucose and a dash of cream of tartar. This time, it worked like a dream. The fondant turned out brilliantly white and once the rose was added, the flavour was just right. It could be subtle as there were no other flavours in there to compete with. For a moment, I wondered if I should add any pink colour at all – in the end, I added only the tiniest amount, but I think you could actually skip this quite happily, and keep them white for a more modern look.

With the fondant successfully made, I did what so many people do when they overcome a fear and made it again, just to be sure that the recipe did indeed work. I’m happy to report that it did. It’s amazing what happens when you finally learn that when glucose appears on an ingredients list, it is essential and not just an optional extra. That, and a candy thermometer makes life so much easier!

Finally, to dip or not to dip? I decided to dip these fondants in chocolate (2/3 dark, 1/3 milk). I felt the dark chocolate would work better with the rose flavour, but that pure milk would be a little to much – that sweetness needed something bitter to balance it.

Once the chocolates were made, I headed to the tea party. I turned up, presented my chocolates, and I think they were all gone in about five minutes. Nice to see hours of work in the kitchen appreciated like that.

And if you’re humming the tune, here is what I think is the best version of “La Vie en Rose” by Grace Jones (minus the hula-hoop).

To make rose creams (makes 20):

For the filling:

• 300g white sugar
• 1 teaspoon liquid glucose
• 2 pinches cream of tartar
• 75ml water
• 1/4 teaspoon rose extract
• 2-3 drops pink food colouring

To coat the chocolates:

• 200g chocolate (I used a 2:1 mixture of dark and milk)

1. Put the sugar, glucose, cream of tartar and water into a saucepan. Bring to the boil without stirring, and cook until the mixture reaches the soft ball stage (112°C / 235°F).

2. Pour the syrup sugar liquid onto a cold marble slab, and start to work with a spatula until the mixture becomes opaque. Be careful – this stuff starts of very, very hot! Eventually it will become firm and crumbly. When this happens, use your hands to work the fondant into a smooth paste. If it gets too dry, add a couple of drops of water.

4. Once the fondant is smooth, add the rose extract and food colouring (if using), and work until combined. Wrap tightly in cling film, and leave in a cool place (not the fridge) to cool completely.

5. To finish the chocolates, shape the fondant into pieces. Make them a little smaller than you expect, as they are larger once coated in chocolate. Let the fondant sit on a sheet of greaseproof paper while you melt the chocolate. To see how to temper chocolate (to get a shiny finish) see here or here.

6. To dip the fondant in the chocolate, balance a piece on a fork. Dip into the chocolate, then lift out. Tap on the side of the bowl, run the bottom of the fork over the rim of the bowl to remove excess chocolate, then place back on the sheet of greaseproof paper to set.

Worth making? Certainly! Very few ingredients, but a great result! Once you manage to make the fondant, the process is actually quite easy, so worth having a go at, and of course, you can change them with all manner of flavours.

7 Comments

Filed under Recipe, Sweet Things

Scottish Food: Macaroon Bars

The elegant arcades of Paris are dotted with pâtisseries selling dainty macarons in vibrant colours and all manner of exotic flavours. All very sophisticated and famous the world over.

Well, today I present one of Scotland’s national sweets: the macaroon bar. It’s about a million miles from the French macaron. They both contain sugar and the names are a little bit similar, but that’s about as far as it goes.

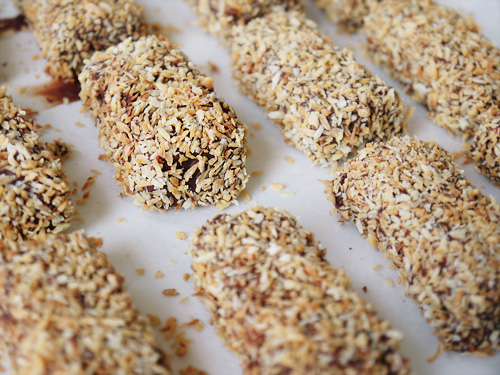
The Scottish macaroon bar is something of tooth-aching sweetness. It has a snowy-white intensely sugary interior that has been dipped in chocolate and then rolled in toasted coconut. This is probably as bad as sweets can get (and a dentist’s worst nightmare) but it has a firm place on the heart of a nation that, well, loves just about anything that is very, very, very sweet.

You might also wonder where the name comes from – is this in any way linked to the French macaron? The answer is…I don’t know. But here in Britain, coconut macaroons are quite common, so I think it is the addition of the coconut that gives rise to the name. Just a hunch.

Now, you might be looking at these things and thinking “wow, that looks an awful lot like a peppermint cream/pattie then you are sort of right. The filling is like fondant, but it hides a surprise. Whereas true fondant centres involve boiling sugary syrups to the right temperature, then working the syrup on cool marble surfaces with spatulas and kneading them to encourage the formation of the right type of sugar crystals, macaroon bars take a shortcut. And that shortcut (and I promise I am not making this up) is to use cooled mashed potato.

That’s right. Potato!

It seems surprising, but you mix one part potato to four to five parts icing (confectioner’s) sugar, and hey presto – a smooth filling that is easy to work and just as sweet as the more complex version. What this does mean, of course, is that if you are making this with kids on a rainy afternoon, it’s very easy to do and much safer than leaving a toddler to work a tray of scalding sugar syrup. Of course, it won’t do their teeth any good, but this is of course not something that you would be making on a daily basis.

The profess of making them takes a little time, but it’s actually quite easy. You start with the potato, which looks like it won’t ever take the best part of a kilogram of sugar. But with the first addition, it turns from dry-looking mashed potato to a very sticky syrup. Looks odd, but keep going and it becomes firm and turns snowy-white. Then you chill it in the freezer, so that once you come to dip the pieces in chocolate, it sets quite quickly. But something I learned by macaroon bar number two was that you either need to work with a friend (one dipping, one rolling) or use one hand for dipping, and keep the other free for the rolling. Otherwise you end up with fingers covered in chocolate, coated in coconut, and one very, very big mess in the kitchen.

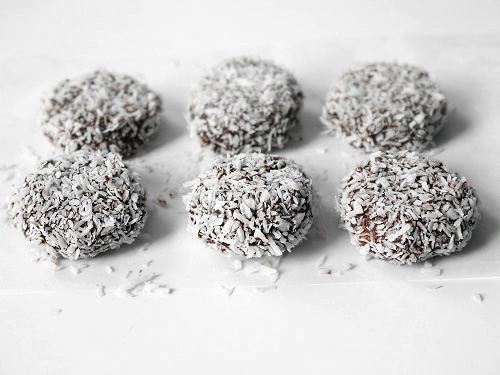
The bar shape is classic, but once I’d cut the fontant into strips, I ended up with a few scraps. Clearly worried that I didn’t have enough highly sugary sweets already, and as I still had ample chocolate left, I rolled the fondant into balls, flattened them slightly, and dipped them in chocolate and rolled them in untoasted coconut. I think that they look rather pretty. Who knows, they could even take off as the must-have petits fours for smart dinner parties!

To make macaroon bars (makes 18-20):

• 1 large potato (100g after boiling)
 • 400-500g icing sugar
• 2-3 drops vanilla extract
 • 300g dark chocolate
 • 100g dessicated coconut

Boil the potato until soft. Drain, measure out 100g, then mash until there are no lumps, and leave until cold.

Put the cold mashed potato, vanilla extract and 100g of icing sugar in a bowl. Mix well – the potato might seem very dry, but it will change into a very thick, sticky paste. Keep adding the icing sugar, 100g at a time, mixing well after each addition, until you have a stiff white fondant.

Line a tray with greaseproof paper, put the fondant in the tray, and press flat. Cover with cling film and leave in the freezer for an hour.

In the meantime, toast the coconut in the oven – spread thinly on a large baking sheet and cook in the oven at 150°C (300°F) for around 5 minutes until the coconut is just golden. Watch it carefully – it can burn very easily. Remove from the oven and allow to cool.

Remove the fondant from the freezer. Cut into bars (mine were finger length and just wider than finger width).

Melt the chocolate in a bowl above a pan of barely simmering water. Once the chocolate is melted and smooth, dip each piece of the sugar paste into the chocolate, then roll in the coconut. Transfer to a sheet of greasproof paper and allow to set.

Worth making? This is quite a fun and easy recipe to try. It’s super-sweet, so not something you would make often, but worth having a go at!

23 Comments

Filed under Recipe, Scottish Food, Sweet Things