Today is something of a fond farewell to autumn, for I’m off on holiday today, and when I get back, we should be in the early days of winter. Or put another way, I’ll be spending a couple of weeks in South Africa enjoying late spring in a particularly attractive part of the world. All in all, I’m pretty thrilled about that! Table Mountain, Kirstenbosch Botanical Gardens, wine, beaches…what a perfect November!
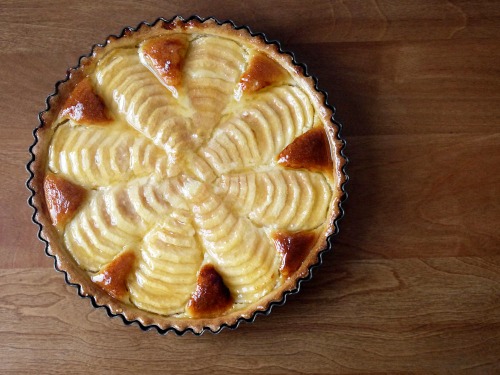
Anyway, before that, a little autumnal treat from this side of the globe. I mentioned a few days ago that I’ve been really into pears this year. I’ve made pear jam, I’ve made pear crumble, I’ve made pear liqueur (again) and I used pears in a four-tiered birthday cake. I’ve made pear paste for cheese, and thrown them in salads with blue cheese and walnuts. All in all, a complete pear affair, but I think this little tart has really topped it all. It is one of those classic combinations of sweet, fragrant almond frangipane with pears, the lot glazed in apricot jam and looking oh-so-tempting as an after dinner treat. And the great thing is that it looks fancy but – shhhhhhhh – it’s really rather easy!
This tart looks fairly complex, but it actually a complete doddle to make. You really only need some decent sweet shortcrust pastry (use my recipe, use your own, or even just cheat and buy it – I get that some people have lives and need to do other things alongside impressing friends). The filling is just a case of mixing everything until smooth, and the only “tricky bit” is arranging the pear slices on top.
Now, in fairness, arranging those pear slices was a little trickier than I first thought. The trick is to cut the pear with a very sharp knife to get good, clean slices, then push everything so that it slides out into that fan shape. Then slide the knife under the pear fan, and carefully transfer onto the tart. It took me a couple of attempts to get it right, but nothing that you would not get the hang of very easily.
I have made a couple of little tweaks which depart slightly from the “classic” pear and almond tart, but I think that they really work. First, I spread a thin layer of pear and vanilla jam on the base. Thin, not great big spoonfuls of the stuff. It helps to add a little extra fruitness and sweetness at the bottom of the tart. I also mixed the jam with a couple of spoons of quince liqueur to add a little extra aromatic touch. If you’ve never tried it, I cannot tell you how good it is. Incredibly easy to make at home, and after a few weeks or months of resting, the result is a clear, golden liqueur that has a delicious apple-and-honey flavour. Second, I happened to have a bit of that pear liqueur left, so I added it to the apricot jam I used to glaze the tart, adding just an extra hint of fresh pear and spice to finish it off. A perfect little slice of autumn!
To make Pear and Almond Tart:
For the pastry
• 180g plain flour
• 65g unsalted butter, cold
• 65g icing sugar
• 2 egg yolks
• cold water
For the almond frangipane
• 100g ground almonds
• 50g caster sugar
• 70g unsalted butter
• 1 egg
• 1 egg white
• almond extract
For the pears
• almond frangipane (above)
• 2 tablespoons pear or apricot jam
• 3-4 ripe pears (depending on size)
• lemon juice
For the glaze
• 4 tablespoons apricot jam, sieved
• 1 tablespoon pear liqueur or brandy
1. Make the pastry – mix the flour and icing sugar, then work in the cold butter until the mixture resembles breadcrumbs. Add the egg yolks and cold water (a tablespoon at a time) until the mixture comes together. Wrap in cling film and chill for 30 minutes. Roll out and use to line a 20 cm (8 inch) loose-bottomed flan dish. Place in the fridge while you make the filling.
2. Preheat the oven to 180°C (360°F) and put a flat metal tray in the oven. This will help ensure the base cooks properly later on.
3. Make the filling – beat the butter until creamy, then add the sugar, almonds, egg and egg white, plus a few drops of almond extract. Watch out – the almond flavour stuff can be strong, so err on the side of caution!
4. Remove the tart shell from the fridge. Spread with the jam, then add the filling and smooth.
5. Prepare the pears – peel, core and cut in half. Rub each with a little lemon juice to prevent browning. Place each pear on a board, cut side down, and slice. Push from the thin end so that the pieces fan out. Slide a knife underneath, then transfer to the tart. Brush each with a little lemon juice so that the cut sides of pear do not discolour. Repeat until you have a giant pear star on your tart.
6. Bake the tart for 50-60 minutes until the filling has a good colour. It if looks like it is browning too quickly, cover loosely with tin foil and turn the temperature down a little.
7. Once the tart is cooked, remove from the oven and make the glaze by mixing the apricot jam with the brandy/pear liqueur. Brush over the warm tart and leave to cool.
Worth making? This looks fancy, but is actually fairly easy to make, and tastes great. I made it for a party, and it was the first tart to go completely, with people coming back for seconds, so I dare say that this is a pretty good recipe!


