Tag Archives: tart

Pear and Almond Tart

Today is something of a fond farewell to autumn, for I’m off on holiday today, and when I get back, we should be in the early days of winter. Or put another way, I’ll be spending a couple of weeks in South Africa enjoying late spring in a particularly attractive part of the world. All in all, I’m pretty thrilled about that! Table Mountain, Kirstenbosch Botanical Gardens, wine, beaches…what a perfect November!

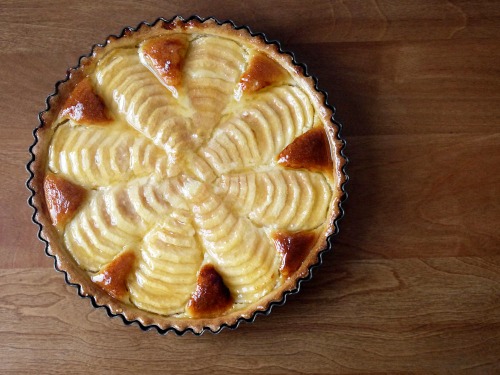
Anyway, before that, a little autumnal treat from this side of the globe. I mentioned a few days ago that I’ve been really into pears this year. I’ve made pear jam, I’ve made pear crumble, I’ve made pear liqueur (again) and I used pears in a four-tiered birthday cake. I’ve made pear paste for cheese, and thrown them in salads with blue cheese and walnuts. All in all, a complete pear affair, but I think this little tart has really topped it all. It is one of those classic combinations of sweet, fragrant almond frangipane with pears, the lot glazed in apricot jam and looking oh-so-tempting as an after dinner treat. And the great thing is that it looks fancy but – shhhhhhhh – it’s really rather easy!

pearalmondtart

This tart looks fairly complex, but it actually a complete doddle to make. You really only need some decent sweet shortcrust pastry (use my recipe, use your own, or even just cheat and buy it – I get that some people have lives and need to do other things alongside impressing friends). The filling is just a case of mixing everything until smooth, and the only “tricky bit” is arranging the pear slices on top.

Now, in fairness, arranging those pear slices was a little trickier than I first thought. The trick is to cut the pear with a very sharp knife to get good, clean slices, then push everything so that it slides out into that fan shape. Then slide the knife under the pear fan, and carefully transfer onto the tart. It took me a couple of attempts to get it right, but nothing that you would not get the hang of very easily.

I have made a couple of little tweaks which depart slightly from the “classic” pear and almond tart, but I think that they really work. First, I spread a thin layer of pear and vanilla jam on the base. Thin, not great big spoonfuls of the stuff. It helps to add a little extra fruitness and sweetness at the bottom of the tart. I also mixed the jam with a couple of spoons of quince liqueur to add a little extra aromatic touch. If you’ve never tried it, I cannot tell you how good it is. Incredibly easy to make at home, and after a few weeks or months of resting, the result is a clear, golden liqueur that has a delicious apple-and-honey flavour. Second, I happened to have a bit of that pear liqueur left, so I added it to the apricot jam I used to glaze the tart, adding just an extra hint of fresh pear and spice to finish it off. A perfect little slice of autumn!

To make Pear and Almond Tart:

For the pastry

• 180g plain flour
• 65g unsalted butter, cold
• 65g icing sugar
• 2 egg yolks
• cold water

For the almond frangipane

• 100g ground almonds
• 50g caster sugar
• 70g unsalted butter
• 1 egg
• 1 egg white
• almond extract

For the pears

• almond frangipane (above)
• 2 tablespoons pear or apricot jam
• 3-4 ripe pears (depending on size)
• lemon juice

For the glaze

• 4 tablespoons apricot jam, sieved
• 1 tablespoon pear liqueur or brandy

1. Make the pastry – mix the flour and icing sugar, then work in the cold butter until the mixture resembles breadcrumbs. Add the egg yolks and cold water (a tablespoon at a time) until the mixture comes together. Wrap in cling film and chill for 30 minutes. Roll out and use to line a 20 cm (8 inch) loose-bottomed flan dish. Place in the fridge while you make the filling.

2. Preheat the oven to 180°C (360°F) and put a flat metal tray in the oven. This will help ensure the base cooks properly later on.

3. Make the filling – beat the butter until creamy, then add the sugar, almonds, egg and egg white, plus a few drops of almond extract. Watch out – the almond flavour stuff can be strong, so err on the side of caution!

4. Remove the tart shell from the fridge. Spread with the jam, then add the filling and smooth.

5. Prepare the pears – peel, core and cut in half. Rub each with a little lemon juice to prevent browning. Place each pear on a board, cut side down, and slice. Push from the thin end so that the pieces fan out. Slide a knife underneath, then transfer to the tart. Brush each with a little lemon juice so that the cut sides of pear do not discolour. Repeat until you have a giant pear star on your tart.

6. Bake the tart for 50-60 minutes until the filling has a good colour. It if looks like it is browning too quickly, cover loosely with tin foil and turn the temperature down a little.

7. Once the tart is cooked, remove from the oven and make the glaze by mixing the apricot jam with the brandy/pear liqueur. Brush over the warm tart and leave to cool.

Worth making? This looks fancy, but is actually fairly easy to make, and tastes great. I made it for a party, and it was the first tart to go completely, with people coming back for seconds, so I dare say that this is a pretty good recipe!

29 Comments

Filed under Recipe, Sweet Things

{12} Festive Ecclefechan Butter Tarts

Merry Christmas to everyone! Here is the final instalment of my 2013 festive baking marathon. I had intended to get them all done by Christmas Eve, but the social whirl, preparing for Christmas day and need to spend a fair amount of time in the garden tidying up after storm damage meant that I didn’t quite hit that target. However, we are still in the limbo period between Christmas and New Year, so at least this offers an easy little recipe to have a go at when you’ve had your fill of Disney films and chocolates.

Last year I made some mince pies to round of the baking madness, so this year I’ve done a bit of a variation on a theme. However, I understand that mincemeat can be a bit of an acquired taste, so instead I’ve made some miniature versions of a Scottish classic, the Ecclefechan Butter Tart, which also have lots of fruit and nuts in them, but rather than the spices, they are enriched with a thick mixture of butter, brown sugar and egg. This is all mixed together and baked, so it puffs up a little on the surface, while inside it is soft, moist and sticky. Ideal as an easy alternative if you have guests coming who just can’t get into mincemeat tarts.

eccelfechantarts1

While it is tradition to use dried fruits like currants and sultanas, plus glacé cherries, walnuts and citrus peel, you can play around quite a bit with the filling. For example, brown sugar is traditional in the filling (giving a slight toffee note), you can easily use white sugar if you want a lighter filling so that other ingredients are not overpowered. Rather than lots of currants and sultanas, you could opt instead for mostly candied orange peel for a more citrussy affair (perhaps a little like that other Scottish delight, the Edinburgh Tart). By that stage, you’re probably getting rather far from a true Ecclefechan tart (and it would be a shame to have to forgo the highly amusing name when presenting to guests), but go with what you like.

I think it is important to get the pastry as thin as you can. I rolled it out, then pressed it in a buttered muffin tray to get it very thin. When you make them with these proportions, you might think there is not that much filling and feel they look a bit mean. All well and good, but the filling is very rich, so if you make them too big, you’ll probably struggle to eat even one of them. Just keep this in mind if you are tempted to double the quantities!

eccelfechantarts3

When serving these tarts, they are great at room temperature, but I’m sure you could warm them slightly. I’ve left mine plan, but you can finish with a little water icing, or a sprinkling of icing sugar for a more festive look.

You might also recognise this tart from a previous post. Yes, I’ve made this before as a large tart to be served by the slice, so if you want something grander for a party, then that’s also an option.

eccelfechantarts2

So…there we have it! The Twelve Festive Bakes of Christmas for 2013! I hope you’re enjoyed these recipes and they’ve given you a little bit of inspiration.

To make miniature Ecclefechan Butter Tarts (makes 12):

For the pastry:

• 150g plain flour
• 50g butter, cold, cut into cubes
• 25g icing sugar
• 1 egg yolk
• cold water

1. In a bowl, rub the butter into the flour. Once the mixture resembles breadcrumbs, add the sugar and mix well.

2. Add the egg yolk and just enough cold water so the mixture comes together (1-2 tablespoons of water is probably enough). Cover the pastry in cling film and leave to rest in the fridge for at least 30 minutes.

3. Grease a non-stick muffin tray with butter. Roll out the pastry very thinly and use a circular cutter to make discs to put in the tray holes. Use your fingers to press down the pastry, pushing it up the sides to make it as thin as possible. Spike the bottoms with a fork, and pop the tray into the fridge to chill while you make the filling.

For the filling:

• 65g butter, melted and cooled
• 100g soft brown sugar
• 1 egg, beaten
• 1/2 tablespoon white wine vinegar
• 25g walnuts, chopped
• 100g dried mixed fruit (currants and sultanas)
• 25g chopped candied peel
• 25g glacé cherries, chopped

1. Preheat the oven to 190°C (375°F).

2. In a bowl, combine the sugar, butter and eggs. Stir in the vinegar, walnuts, dried fruit and cherries. Divide among the 12 pastry cases.

3. Bake the tarts for 12-15 minutes until the pastry is golden and the filling is slightly puffy and lightly browned in the centre (turn the tarts during baking).

Worth making? Absolutely. This is a very simple, yet rich, alternative to mincemeat pies at this time of year, so idea for those that don’t like (or want a change from) all that spice.

10 Comments

Filed under Christmas, Recipe, Sweet Things

Rhubarb & Custard Tarts

I was in the centre on the City last week, and there was a noticeable spring-like feeling in the air as I walked past St Paul’s Cathedral. Still rather fresh, but the smells of plants awakening from their winter slumber was certainly there. The flowers were not yet peeking out from the bushes and trees, but catkins and pussywillow have appeared. That was soon eliminated by the return of snow, but hey, for a brief few days, spring had sprung!

Our recent snowstorms have only been a little hiccup, and we are on the march towards warmer days. The impending bonanza of spring is also heralded by the arrival of something very special in your local fruit shop – lots and lots of neon pink Yorkshire rhubarb!

I’ve used this to make some very simple rhubarb tarts which bring together two classic flavours to make a British favourite. A sweet pastry shell, filled with pastry cream flavoured with a dash of vanilla, and then topped off with roasted rhubarb. Yes, it really is this lurid shade of pink!

rhubarb_tarts_2

How to get the look? As I say, by roasting! The trick to getting the bright colour is by cooking the chopped rhubarb with sugar in the oven. This is, in my view, about the best way of preparing rhubarb for a tart. It keeps the shape of the stems of rhubarb, but also preserves their amazing colour. The result is almost luminous, and combines sweetness with the lip-smacking sharpness that is the hallmark of rhubarb. You also have result which is sweet, sticky and syrupy, rather than watery which can happen if you opt to poach the rhubarb.

roastedrhubarb1

roastedrhubarb2

On little tip – when you come to use the rhubarb for the tarts, you only need the fruit, not the syrup. However, the syrup is also delicious – keep it and use it as a glaze, in yoghurt, or in your favourite cocktail (perhaps with Prosecco and gin to make a Yorkshire Pink Gin Fizz?).

rhubarb_tarts_4

rhubarb_tarts_1

rhubarb_tarts_3

The recipe below makes four to six tarts, depending on the size of your moulds (you’ll probably have too much pastry left, but I’ll be posting a little trick to use it up shortly). I feel I should caution you that these tarts are not exactly light – the pastry, rhubarb and custard filling means that like all good British puds, they are rather substantial, but there is no reason you could not adapt this to make bite-sized morsels too.

To make rhubarb and custard tartlets (makes 4-6, depending on size):

For the rhubarb:

• 700g pink rhubarb
• 150g white sugar

For the pastry:

• 175g plain flour
• 65g caster sugar
• pinch of salt
• 65g unsalted butter
• 1 egg, beaten
• cold water

For the filling:

• 250ml whole milk
• 2 eggs
• 1 egg yolk
• 90g caster sugar
• 30g cornflour
• 75g butter

To roast the rhubarb:

1. Preheat the oven to 160°C.

2. Wash and trim the rhubarb. Cut into piece of 1-2cm. Mix with the  sugar and put into a glass or ceramic ovenproof dish. Loosely cover the dish with foil but make sure it does not touch the rhubarb (rhubarb + foil = trouble)! Bake for 30 minutes, or until the sugar has dissolved and the rhubarb is pink and soft. Remove from the oven and allow to cool (ideally, leave overnight in the fridge – the colour will intensify).

To make the pastry:

3. Mix the flour, salt and sugar in a bowl. Work the butter in with your hands, then add the egg yolk and sufficient cold water (a teaspoon at a time) to make a soft dough. Wrap in cling film and chill for at least an hour.

4. Remove the pastry from the fridge. Roll out thinly and use to line some tartlet moulds. Fill with greaseproof paper and baking beads. Bake blind for around 20 minutes, then remove the greaseproof paper and baking beads. Bake for a further 10 minutes until golden. Leave to cool.

To make the pastry cream:

5. Put the milk into a saucepan. Bring to the boil then put to one side.

6. In a separate bowl, whisk together the eggs, egg yolk, sugar, cornflour and vanilla extract. Add the milk and whisk until combined. Pour through a sieve into a clean saucepan and place over a medium heat.

7. Stir the mixture constantly until thickened (about 4-5 minutes – and really do stir it, otherwise it gets lumpy!). When very thick, remove from the heat. Add the butter and fold it into the pastry cream mixture. It might look oily, but it will come together.

8. Pour the mixture into a large dish and cover with cling film. Press the film onto the surface of the pastry cream to prevent a skin forming. Leave until completely cold.

To assemble the tartlets

9. Fill each tartlet shell with pastry cream. Top each tart with rhubarb (try to avoid getting too much syrup onto the tarts, or the pastry will get soggy).

19 Comments

Filed under Afternoon Tea, Recipe, Sweet Things

Diamond Jubilee: Edinburgh Tart

For most of us, the Queen has always been the Queen. Always there, changing only very slowly. Stability. Certainty. Continuity.

However, while it may at times seem hard to believe, the Queen has not always been the Queen. Back in 1947, she was newly-married and know as HRH The Duchess of Edinburgh. So today’s Jubilee-related foodie frolic honours this earlier part of the Queen’s life. This is a sweet treat called the Edinburgh Tart.

The obvious question is what is an Edinburgh tart? I’ll admit that it’s not one of the most famous pieces of Scottish baking (that title clearly belongs to our national biscuit shortbread). This tart has a puff pastry shell and is filled with a custard-like filling made with butter and sugar, candied peel, sultanas and eggs. It’s similar to certain other Scottish tarts like Border Tart or the Ecclefechan Tart, but with more of a citrus, sunny demeanor (of which more later).

I was thinking for a while how I would be able to make a foodie link to Edinburgh, and it came down to this tart and the less refined Edinburgh rock. Edinburgh rock is like “normal” seaside rock, but made with cream of tartar, so that it becomes very soft and crumbly…which is rather odd, when you consider that Edinburgh is built on the very hard stone of an extinct volcano…anyway, I though that the tart looked simpler and would be a lot more sophisticated.

This tart has two links to Edinburgh. The most obvious is that it shares its name with Scotland’s royal capital. The second is via one of the Queen’s royal ancestors. The story goes that this tart was first baked in honour of Mary, Queen of Scots, upon her arrival in Scotland for the first time. Given that she was arriving from warm France to freezing Scotland in the 1500s, I suspect that she was in need of as much cheering up as she could get. The luxury of the ingredients would probably have tasted incredibly decadent to the middle ages palate. Faced with bowls of lukewarm porridge, I’m sure the Edinburgh tart would really have looked rather appealing.

My own verdict? I think this is a lovely tart, with a rich, citrus flavour, and it’s a shame it’s not more widely known. It reminded me a little of Portuguese custard tarts (the flaky pastry, I think). It makes a nice large tart, but I think it would also work well if you were making individual tarts.

To make an Edinburgh Tart:

• 75g sugar
• 75g butter
• 1 tablespoon marmalade
• 75g chopped candied peel

• 50g sultanas
• 2 eggs, beaten
• 1 tablespoon whisky
• pinch of salt
• 1 sheet rolled puff pastry (yes – I’m lazy!)

Preheat the oven to 230°C. Lightly butter a loose-bottomed flan dish (23cm diameter).

Put the butter and sugar into a saucepan. Heat gently until the butter melts. Add a generous tablespoon of marmalade, the candied peel and sultanas, and stir until well-combined. Allow to cool until just warm, then add a tablespoon of whisky, the eggs and salt. Stir well.

Roll out the pastry and use to line the flan dish. Prick the base with a fork. Add the filling, spread it out, and bake for around 15-20 minutes until the pastry is puffed and the filling is golden. Watch the tart while it is baking – the base might start to puff up with steam – if this happens, quickly open the door, pierce with a skewer, and the pastry should sink back down.

Once cooked, remove from the oven, allow to cool complete and serve with cream or ice cream.

Worth making? Simple, quick and very tasty! This tart is straightforward (if, like me, you just buy the pastry and don’t make it) and looks spectacular, has lots of flavour but is not too sweet.

3 Comments

Filed under Uncategorized

Tarte aux Mirabelles

I recently became the proud owner of a pile of mirabelle plums. They looked so cute – a rich golden colour, tinged with crimson, and the size of cherries.

They are the sort of fruit that you can pop into your mouth one after another, absolutely delicious and so sweet. The sort of fruit that is also lovely in a tart!

After eating a couple of them, an odd thought struck me too – as sweet and sunny as they were, this was also another sign that summer is drawing to an end. Sure, we’ve been drenched recently, and at work we have gathered around the window a couple of times to debate if it is raining or sleeting. But then, the next day, the weather improves and we enjoy a couple of warm September days.

While the weather is busy flip-flopping, and I am debating whether it’s a day for just a shirt or full winter jacket plus scarf, there is no doubt that the new produce in the shops does mark the steady march towards Autumn. You know that before long, the mornings will be getting cooler, the evenings longer and darker, and those occasional downpours will go from the exception to the norm.

I do actually very much like Autumn – there are few things that can beat a walk in the woods with the leaves turning, especially the damp forest smell of wet leaves in cool sunlight. So as we move into this season, here is a little tart to celebrate the last of the summer goodies.

This really is a very simple version of the classic French dessert. There are a few different versions, ranging from something akin to a clafoutis (just drown the plums in custard and bake), to pastry shells with varying amounts of fruit and custard, to simple galettes with sliced plums arranged on puff pastry and permitted to shine without much additional fuss other than a light sprinkling of sugar.

This version involves a pastry shell, but I have used a high proportion of butter and a little baking powder, which makes it very light and crumbly, more like a shortbread than a pastry. This balances the filling – sweet, juicy mirabelles, enrobed in a custard-like filling of cream, sugar and eggs. To complement the plums, I added the lightest hint of vanilla extract and almond extract. Completely optional, but they add a nice background note. If you do add them, use with restraint – too much will overpower the fruit.

Of course, mirabelles are not a very common fruit in Britain, so the chances to make this tart will be rather limited. However, fret not. I would be willing to bet that this would also work very well with cherries. But no promises – I’ve yet to try that variation.

This recipe relies on the fruit to provide sweetness – if you prefer your desserts to be on a scale than induces a sugar rush, then by all means tweak the quantities in the custard filling. Also do taste the fruit – it the plums are not so sweet, then add more sugar. Spices may also work rather well – a touch of cinnamon or cloves, each of which goes wonderfully with plums.

To finish the tart, you can either leave it as it is or dust very lightly with icing sugar. This works really well, as where the plums as peeking out of the filling, the sugar dissolves, showing off the bright orange colour of the fruit.

Ah yes, oranges and golden browns. These are shades that we will be getting very familiar with over the coming weeks. Autumn is almost here, so time to dig out the scarves, winter jackets and gloves, and start enjoying long walks in the forest. And look forward to a slice of tart when you’re back indoors.

To make a tarte aux mirabelles:

For the pastry:

• 150g butter, cold
• 250g plain flour

• 1 teaspoon baking powder
• 75g icing sugar

Cut the butter into cubes. In a large bowl, rub the butter into the flour and baking powder until the mixture resembles breadcrumbs. Mix in the icing sugar. Keep working until the mixture forms a soft dough – if necessary, add teaspoons of ice-cold water to help the mixture bind.

Wrap the pastry in cling film and leave to chill for 30 minutes.

Roll out the chilled dough and use to line a 20cm (8 inch) loose-bottomed flan dish. As the pastry is very buttery, you might find you end up cutting it into pieces, then patching it together in the tin and pressing together with your hands. Try to get the pastry to just over 1/2 cm (1/4 inch) thick – you probably won’t need all of it.

Prick the base with a fork, and bake in the oven at 180°C for 10 minutes.

For the filling:

• 500g mirabelles, washed and de-stoned (*)
• 100ml double cream
• 25g ground almonds
• 100g soft brown sugar
• 1 egg, beaten
• 25g butter, melted and cooled
• few drops of vanilla extract
• few drops almond extract

Arrange the de-stoned mirabelles in the pastry shell.

In a bowl, mix the remaining ingredients until the mixture is smooth. Pour over the fruit. Bake for a further 30 minutes at 180°C (350°F) until golden on top.

(*) To de-stone: either cut in half and remove the stones, or use a cherry pitter to remove the stones. Or alternatively, leave the stones in and warn your guest to eat with caution!

Worth making? I won’t lie – de-stoning mirabelle plums is not much fun, but this is actually a relatively simple tart to make, and one which does look great when served. The whole plums peeking out of the filling also look very impressive.

13 Comments

Filed under Recipe, Sweet Things

London Currant Tart

A while ago, I did a post about Scotland’s famous Ecclefechan Butter Tart. Today, I’ve done a bit of a variation on a theme. In place of the mixed dried fruit and nuts, it’s just currants, currants, currants, all enrobed in butter, sugar and eggs for a slightly custard-like touch.

However, never the one to resist making little tweaks, I did make a few more changes.

Firstly, I soaked the currants before using them. As they are already quite sweet, but seems just a tad too dry. I was just looking to make them more juicy, and six large spoons of brandy did the trick. I left the currants to soak for a couple of hours to make sure that they absorbed all the brandy and were appropriately plump.

Next, I also added the zest of half a lemon – I got the feeling that the filling could be a little too rich with just the raisins and the custardy filling. Luckily, this was the right call – just enough zestiness to lift the tart, but not so much as to overpower the currant flavour.

The resulting tart is quite different to the Ecclefechan Butter Tart. This is mainly due to the fact there is a lot more fruit in this version, so the butter mixture just holds everything together, rather than become thick, sweet and caramel-like. In fact, I thought it tasted a little bit festive, and it reminded me of that other Scottish favourite, Black Bun, which is a New Year speciality. It’s quite a grown-up flavour, and I defy anyone to unveil something with this amount of dried fruit in front of a small child and not provoke screaming. Just to warn you!

Now, the name. Would love to claim that this is some sort of recipe with an ancient pedigree from this great metropolis, but it’s just an attempt to be playful (given that, eh, it’s based on a recipe from the Scottish town of Ecclefechan…). So, as far as I know, this is the first time this sort of tart has been made. Hence I’ve called this the London Currant Tart.

Let’s see if that catches on.

To make a London Currant Tart:

For the pastry:

• 100g plain flour
• 50g butter, cold, cut into cubes
• 25g caster sugar
• 1 egg yolk
• cold water

In a bowl, rub the butter into the flour. Once the mixture resembles breadcrumbs, add the sugar and mix well. Add the egg yolk and just enough cold water so the mixture comes together (1-2 tablespoons of water is probably enough).

Cover the pastry in cling film and leave to rest in the fridge for at least 30 minutes. Use to line a 20cm loose-bottomed flan dish (the pastry will be quite thin), and prick with a fork. Place the tart shell in the fridge while making the filling.

For the filling:

• 500g currants
• 6 tablespoons (100ml) brandy

• 125g butter, melted and cooled

• 200g white caster sugar
• 2 eggs, beaten
• 1 tablespoon white wine vinegar
• zest of 1/2 lemon

In a bowl, mix the currants and brandy. Leave to stand until the brandy has been absorbed.

Preheat the oven to 190°C (375°F).

In a bowl, combine the sugar, butter and eggs. Stir in the vinegar, then fold in the currants and lemon zest. Pour into the pastry shell.

Bake the tart for 25-30 minutes until the pastry is golden and the filling is slightly puffy and lightly browned in the centre (turn the tart during baking).

Serve cold, either as is or with a light dusting of icing sugar for a dressier look.

Worth making? Obviously this is a tart for those who like currants, but if you do, it’s delicious! But it can be tweaked to use sultanas or possibly cranberries, and you can tweak the flavour by adding orange zest or a dash of spice. This would also make nice little individual tarts, the likes of which you might expect to grace a fashionable tea party down Kensington or Chelsea way.

2 Comments

Filed under Recipe, Sweet Things

Maple-Glazed Pear Tart

Today’s post is a very simple but delicious dessert I whipped up recently while staying with friends in Brussels. And boy, do I mean simple.

For regular readers, this might look rather similar to something I posted last year using some luscious crimson Victoria plums. And you would be right! But this time, I replaced the plums with pears, and glazed it with maple syrup rather than honey. I went for maple syrup for no other reason than it was to hand, in a one-litre bottle. Yup, people really do buy it in those quantities, even in Europe.

So just how simple is this? Well, think about it element by element.

The pastry? Rich butter puff pastry…but we got that from a shop, and it was handily already rolled out into a thin disc. Result!

The filling? Ripe pears, just peeled, sliced and artfully arranged on the pastry.

And to finish? A mixture of butter, maple syrup and mixed spice(*), melted together and brushed over the tart. Then it was a light sprinkling with sugar, bake, and that’s it. All in all, this took about 15 minutes to make.

That would be, 15 minutes to make not including time for me to stab my hand with a sharp knife while chatting. I had just finished slicing the pears and arranging them on the tart, and then I genuinely have no idea how this happened. All I know is that it was quick, painful and dramatic. There was a shocked gasp from the next room. Are you alright? I was indeed alright, but the sympathy soon evaporated as the others realised that the tart was quite unaffected by all this, and I was dispatched to a kitchen stool with a glass of wine, instructing someone else to finish the tart. Lesson learned!

To serve, I would not produce this straight from the oven. Rather, either enjoy it while just warm, or at room temperature, with a generous dollop of whipped cream or vanilla ice cream.

Simple, but delicious and just a little bit classy.

(*) We used a Belgian spice mixture called speculaaskruiden (spek-oo-lass-krow-den) in Dutch or épices à spéculoos in French. It’s a mixture of cinnamon, nutmeg, cloves, ginger, cardamom and white pepper. However, mixed spice or even Christmas Lebkuchengewürz can be used instead.

To make maple-glazed pear tart:

• 1 packet ready-rolled puff pastry (all butter) (approx. 200g)
• 5-6 ripe pears
• 25g butter
• 3 tablespoons maple syrup (or honey)
• pinch of mixed spice
• 1 tablespoon caster sugar, to sprinkle

Preheat the oven to 200°C (400°F).

Place the pastry on a baking sheet. Use your fingers to crimp the edges.

Peel the pears. Cut into quarters, remove the seeds and core, plus any stalk fibres, then cut into slices. Arrange the slices in an overlapping and artistic pattern on the pastry, pushing them slightly into the pastry.

To make the glaze, put the butter, maple syrup and mixed spice in a saucepan. Heat until just melted, then brush it over the pears. Sprinkle with a little caster sugar.

Bake the tart for around 20 minutes until the pastry is golden at the edges and the pears are just browning (you might need longer, depending on your oven).

Worth making? This is one of the quickest, simplest desserts you can make, and it’s easy to do with things in the cupboard, fridge and the fruit bowl. It’s also easy to change depending on what you’ve got to hand.


6 Comments

Filed under Recipe, Sweet Things, Uncategorized

Marvposteier (Norwegian Almond Tarts)

Hey hey, it’s almost the 17th May – and that’s Norwegian National Day. It’s on this day that the people of Norway like to let you know that they are very, very proud of being Norwegian, rather than Swedish or Danish. So that means lots of flags, parades, drinking and food.

So if you’re in the mood to celebrate, here are two options. If you’re inclined to the savoury, try making lefse (potato flatbreads), but if you prefer sweet, then try marvposteier. These are little almond cakes in a pastry case and topped off with a cross. Something like this:

This was my first time making them, so I am not sure that I can hold myself out as any sort of authority (given…I’m not remotely Norwegian), but they were pretty straightforward. They remind me a little of macaroon tarts, which have a similar almond filling, but with a bit of jam in the bottom. I wonder if they might be related?…

The process is easy, so you actually end up with a pretty impressive result for minimal effort. It’s just a basic butter pastry, filled with an almond paste, and then if you’ve got the nerve and patience, finished with pastry crosses. In my opinion, it’s worth adding the crosses.

I was happy with how these looked and tasted. The filling is just sugar, egg white and almonds (which I enhanced with a couple of drops of almond extract), so after baking they  are pleasantly soft and marzipan-like. All in all – kjempegod (as they might say in Oslo).

So to the Norwegians out there – hope you’re having a great day!

To make Marvposteier (around 25):

For the pastry:

• 250g plain flour
• 200g butter
• 50g (3 tablespoons) caster sugar
• 1 egg yolk
• 3 tablespoons cold water

For the filling:

• 200g ground almonds
• 250g icing sugar
• 4 egg whites, lightly beaten (about 130g)
• 1/4 teaspoon almond essence (optional)

Start with the pastry: put the flour, sugar and butter in a bowl. Rub together until it resembles breadcrumbs. Add the egg and a spoonful of water. Use your hands to mix, adding more water if needed until you have a soft, smooth dough. Wrap in cling film and chill for 30 minutes.

Preheat the oven to 200°C (400°F). Grease a couple of muffin pans with some butter.

Roll the pastry out very thinly. Cut out circles with a cutter, and use to line the muffin pans(*). Keep any scraps of pastry.

Next, make the filling. Put the almonds, icing sugar, egg whites and almond essence (if using) in a bowl and mix will into a smooth paste. Fill each tart with a teaspoon of the filling, then shake the muffin pans lightly so the filling evens out.

Roll out the scraps of pastry and cut into thin strips. Use the strips to form an X on top of each tart, and make sure you press the ends into the pastry cases. Brush the X with a little egg white (use your fingers for this) (**)

Bake for 15-20 minutes until golden. Remove from the oven, allow to cool for 5 minutes, then transfer to a wire rack until completely cooled.

(*) You want these pastry “shells” to be about 1.5cm (2/3 inch) deep.

(**) Handy hint – rather than use another egg here, just check the bowl you used to beat the egg whites – there should be just enough left in the bottom to glaze the X on each tart.

Wroth making? These tarts were really rather easy to make and still very tasty. The can also easily be made in a gluten-free version by replacing the plain flour with a gluten-free alternative. You can also customise them by using other ground nuts (such as hazelnuts) or adding a little jam to the bottom of each tart before covering with the filling.

3 Comments

Filed under Recipe, Sweet Things

Hark, the Royal Wedding! Maids of Honour Tarts

You might remember in the dark days of last winter, the announcement came from the Palace that there would be a royal wedding in 2011. Reactions were…muted.

Fast forward to Spring, and actually, the country seems to be completely cock-a-hoop about the whole thing. And the excitement is not contained to these fair isles, it seems the American media are really only just about able to contain how thrilled they are. We’ve seen Kate launching a lifeboat in Wales, Kate flipping a pancake in Ireland…yes, we (more accurately, the media) just can’t get enough of it. Kate shops, Kate crosses the road, buy Kate’s ring, wear her dress, and from late 2011, see her wax figure at Madame Tussauds. If you’ve got questions, there is a very helpful FAQ website here.

We were all supposed to throw street parties. We all thought “nope, won’t be doing that”. And then the shops were full of bunting and Union Flags for a bit of waving by the masses on the big day, and actually, we’ll probably all be doing it after all. The British, it seems, really do quite like a royal wedding after all. And best of luck to them!

To keep in with the mood of the nation, there obviously needs to be a little culinary nod to HRH Prince William and his future wife, and what could be more fitting that Maids of Honour tarts?

These certainly have a royal pedigree, but as with a lot of cakes that have a story to tell, there are a few versions floating about. Here are some of my more interesting findings:

Theory one: the maids of honour attending one of Henry VIII‘s Queens (possibly Catherine of Aragon) would nibble on these custardy, lemony treats (and the lemon link does fit with Catherine’s Iberian origins). So far, so nice. However, there is a darker element. The King, upon seeing how much the ladies enjoyed them, tasted one for himself, found it to be very good indeed, and so had to ensure that no-one else could learn the secret. How was this to be achieved? The unfortunate cook was locked up when he or she was not preparing pastry or zesting lemons. It’s probably a good thing we have moved from an absolute to a constitutional monarchy.

Theory two: these cakes were enjoyed by the maids of honour of Queen Elizabeth I when they were at Richmond Palace. The richness of these cakes (and remember – back in the day, lemons, sugar and butter were luxuries) made them famous and they were small objects of desire for fashionable members of the royal court.

Theory three: Henry VIII called these cakes “Maids of Honour” when he offered one to a future Queen, Anne Boleyn.

So we have learned…that we’re not exactly sure where they came from, but the Richmond link is strong, even to this day, and it seems to be a safe bet that they were around in the times of the Tudors. At this point, I confess that I am a huge fan of the recent TV series. Historically accurate? Maybe not, but a jolly good watch every weekend.


Now, at this stage, I realise two things. The links to the Tudors is probably not the parallel the I want to make with Wills and Kate (to whom I wish the best of luck). I’ve also failed to tell you what these cakes are actually like.

The cases can be made of shortcrust butter pastry of puff pastry. I used shortcrust here, but for the Big Day I will try them again but with puff pastry. The filling is a mixture of eggs, cream cheese, almonds and lemon zest plus a few aromatic “extras”. The filling sets when they are baked, so they are a little bit like mini-lemon baked cheesecakes. Some versions also add a little dash of something else under the filling – either lemon curd (to make them extra-citrussy) or some jam. I liked this idea, so I made some with lemon curd and some with seedless raspberry jam (typically British), but you could also use marmalade, apricot jam, strawberry jam or whatever else takes your fancy.

Now, the practical but – how exactly to flavour the filling? Lemon is a constant in all recipes, but as we are looking to make Maids of Honour for a Royal Wedding, I looked back to what would only have been available only to a royal kitchen back in Tudor times, and I went for broke: a pinch of saffron, citrus zest, orange zest, ground almonds, almond extract, orange blossom water, a pinch of cinnamon and a dash of nutmeg. Clearly not the sort of things your average peasant would have been able to get hold of. For for a queen indeed.

If you’re looking to make these, they are well worth the effort and make a nice treat for a picnic or tea. However, use saffron only if you like the flavour. I know it can be an acquired taste, so if you prefer, just play it safe and stick with the lemon and spices, which will still give a wonderful flavour and delicate aroma.

To make Maids of Honour (makes 10):

For the pastry:

• 125g plain flour
• 80g unsalted butter, cold and cut into cubes
• pinch of salt
• 2 teaspoons caster sugar
• iced water

Put the flour, butter, salt and sugar in a bowl. Use your fingers and work until the mixture resembles breadcrumbs. Add enough iced water until the dough comes together (no more than 1-2 tablespoons). Wrap the dough in cling film and leave to rest in the fridge for 30 minutes.

For the filling:

• 50ml milk
• very tiny pinch of saffron strands (optional)
• 150g cream cheese
• 40g ground almonds
• 50g caster sugar
• 1 teaspoon orange blossom water
• 1/2 teaspoon almond extract
• zest of 1/2 lemon
• zest of 1/4 orange
• pinch of cinnamon
• pinch of nutmeg
• 50g butter, at room temperature

If using saffron: put the milk in a saucepan and heat until almost boiling. Turn off the heat, add the saffron strands and allow to sit for 10 minutes until the milk is infused with the saffron colour and aroma. Put the cooled milk and the rest of the ingredients in a bowl, and mix with a balloon which until smooth.

If not using saffron: put all the ingredients in a bowl, and mix with a balloon which until smooth.

To prepare the tarts:

Preheat the oven to 200°C (400°F). Grease a cupcake tray with butter.

Roll out the dough as thin as you can – you might find it easier to work the dough with your hands so that it is pliable and does not crumble. Cut our rounds of pastry, put into the to 2-3mm thin, and cut out rounds to line a cupcake tray. Use fingers to press the dough as thin as you can (we want a high filling-to-pastry ratio).

Add one scant teaspoon of jam or curd to the bottom of each case (not too much – or the jam will boil and leak out when baking). Fill each tart two-thirds with the filling mixture – it will puff up slightly during baking.

Bake the tarts for 20 minutes until the filling is puffed and the pastry is golden. You may need to turn the baking tray around half-way to ensure they colour evenly.

Once cooked, remove from the oven, and serve with a light dusting of icing sugar (which would also have been an extravagance in Tudor times).

Worth making? These are very simple but elegant little tarts, which are relatively straightforward to make, and taste great. The filling can be customised depending on exactly what you like in the way of flavours and spices. Will Kate eat them on the big day? We don’t know that yet, but might just be the perfect thing to impress guests are you’re gathered around the television on Friday.

8 Comments

Filed under Recipe, Sweet Things

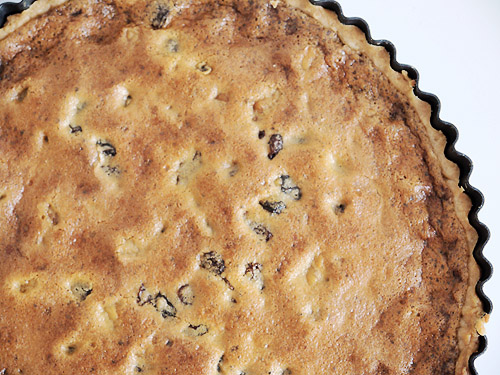
Scottish food: the famous Ecclefechan Butter Tart

You thought I was done with the Scottish food? Guess again! It’s the Ecclefechan Butter Tart!


This is similar to one of the first sweet tarts I ever learned to make, called “Border Tart”. This was a simple pastry shell, filled with dried fruits, cherries and nuts, all in a soft mixture of sugar, eggs and ground almonds. Taking it up a notch, today’s recipe is the slightly fancier Ecclefechan Butter Tart, which originates in the Scottish Borders town of Ecclefechan. The difference between this and the Border Tart is (and from this point, I am probably just making parts of it up) seems to the loss of the almonds, a lot of butter, and a deeper filling in the Ecclefechan Tart. They might also have different fruit…


In fact, I know they have different fruit in them. Mixed dried fruit used to contain sultanas, raisins and – if you were lucky – a few small pieces of bright scarlet glacé cherry. The bag I picked up had two sorts of sultanas (normal! golden!) plus raisins, apricots, peel and dried cranberries. I’m sure granny wouldn’t approve. But no cherry, so I added a goodly amount of them too. It was interesting to see that the ones I found were “natural” and a deep reddish-purple. Probably better for you, but part of me misses the neon red cherries from back in the day.

This recipe came to prominence a couple of years ago, as these tarts were presented as an alternative to mince pies at Christmas. Leaving to one side why anyone would want to replace the mince pie (hey, we only eat them for one month of the year, hardly over-exposed!), I can see why this would be appealing – you have a buttery pastry, a filling of mixed dried fruits and chopped nuts, enrobed in brown sugar, but without any spices. And the texture? Ah, that’s where the magic happens. The best way to describe it is like the filling in similar to a pecan pie, but with lots of fruit instead of just the nuts. Most of the filling becomes a thick, rich, buttery caramel, while the surface becomes slightly puffed-up and lightly browned, contrasting with the dark inside.

As if all this were not enough, there is also one “mystery ingredient” to provoke a no, really? moment – a tablespoon of vinegar. I really have no idea what this does, but it works in this tart, so don’t skip this step. Just be sure to limit yourself to one spoonful, and use a wine vinegar or balsamic vinegar – industrial vinegar is just that little bit too sharp for me, and I don’t think it would work too well here.

I hope you’ve enjoyed this little gastronomic tour through Scottish cuisine – how often do you make traditional foods?


To make an Ecclefechan Butter Tart:

For the pastry:

• 100g plain flour
• 50g butter, cold, cut into cubes
• 25g caster sugar
• 1 egg yolk

In a bowl, rub the butter into the flour. Once the mixture resembles breadcrumbs, add the sugar and mix well. Add the egg yolk and just enough cold water so the mixture comes together (1-2 tablespoons of water is probably enough). Cover the pastry in cling film and leave to rest in the fridge for at least 30 minutes. Use to line a 20cm loose-bottomed flan dish, and prick with a fork. Place the tart shell in the fridge while making the filling.

For the filling:

• 125g butter, melted and cooled
• 200g soft brown sugar
• 2 eggs, beaten
• 1 tablespoon white wine vinegar
• 50g walnuts, chopped
• 250g dried mixed fruit
• 50g glacé cherries

Preheat the oven to 190°C (375°F).

In a bowl, combine the sugar, butter and eggs. Stir in the vinegar, walnuts, dried fruit and cherries. Pour into the pastry shell.

Bake the tart for 25-30 minutes until the pastry is golden and the filling is slightly puffy and lightly browned in the centre (turn the tart during baking).

Worth making? Wow. This tart is superb. Lots of dried fruit might make you think of Christmas, the buttery filling is more like a pecan pie. It’s rich and sweet and a great afternoon treat, either as one large tart or individual little pies. I made it to take to afternoon tea with a housebound friend, and like to think that it helped with recuperation!

16 Comments

Filed under Recipe, Scottish Food, Sweet Things