Tag Archives: jam

{7} Hausfreunde

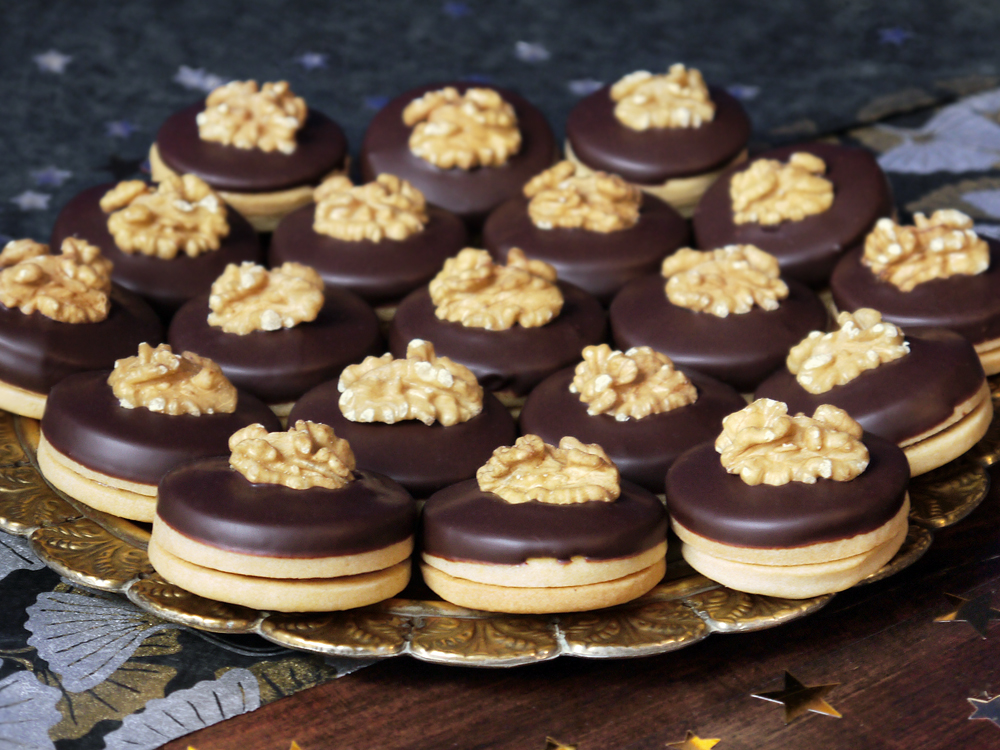
It is nearly Christmas, so we really need to have something with chocolate. On today’s cookie platter we have Hausfreunde, which are little German cookies made of shortbread, filled with apricot jam and marzipan, and topped with dark chocolate and walnuts.


I also find the name to be is utterly charming. Or I did. I translated it as “friend of the house” or “family friend”, but thought it might be good to double-check in case my German is rusty. According to the website of the Langenscheidt dictionary (which I spent hours leafing through in paper form when learning German all those years ago, and hence now have no need for Google Translate) it can also mean “lover”. So I was sitting there thinking that these were adorable, and the name reflected that they are wholesome and traditional and familiar at the most magical time of the year. Certainly I found the flavour to be very traditional, if anything on the less sweet side, and that felt like a nod back to times past. But now I am left wondering if they are a nod to forbidden fruit, and a platter of these little guys is more about irresistible temptation? I may, perhaps, be over-thinking this.

They certainly look impressive, and you might think they are difficult to make. Certainly there are a number of steps, but each is individually fairly easy and the recipe lends itself to being made over a couple of days.

But, of course, I did decide to make life a little harder than it has to be. This is mainly because in London we’re kind of not really going anywhere indoors at the moment, and I’ve had my fill of multiple trips to the local funfair in the freezing cold. Yes, once again socialising means lots of standing outside in the cold, or being harassed to hold yet another online game of bingo for a bunch of 6 year olds on Zoom. You can see why pottering (hiding?) in the kitchen is so appealing.

So what did I do? It was the marzipan. I could have used the perfectly good and high-quality marzipan I already had in the baking cupboard. But no, I decided to have a go at making it myself. I’d already done it with my Goan Marzipan sweets, so when on a roll keep rolling.

For these cookies, I used this recipe from Anna Olsen, and it is pretty straightforward. You make a syrup of white sugar and acacia honey, then pour the hot mixture onto almonds and mix it well. The flavour is good, so it is nice to know that it is very easy if you want to make marzipan with other nuts: pistachio, hazelnut and walnut are all options to explore. I get the creeping feeling we’ll get a lot of time to practice things in the kitchen come the new year…


The flavour of these cookies really is excellent. The combination of shortbread, apricot, marzipan and chocolate really is a winner. They have that “central European Christmas” flavour vibe and I’m here for it. I started out wondering whether such a labour of love was worth the effort, but I was pleased to discover that it was. They are surprisingly not particularly sweet and seem all the more sophisticated for it.

Now, are there any tips I can share with avid bakers keen to embark on a grand project? Really, it is just about the chocolate. It is best if you temper the chocolate so that it looks shiny and has a pleasing crack when you bite into the cookies. The easiest way I have found is to put chocolate in a bowl, and microwave for 30 seconds. Stir. Another 30 seconds. Stir. Another 30 seconds. Now the chocolate should be starting to melt. Now microwave in 10 second bursts, stirring after each. The key is you want to just melt it but to keep the temperature as low as possible. Basically chocolate in bars has been tempered, and it will return to that state if you melt it only slightly. But if you’re keen to get more scientific, then BBC Good Food will explain all!

Speaking of chocolate, I’ve suggested melting 300g (about two bars) of dark chocolate for dipping. This seems (and is) a lot, and you won’t use anywhere near all of it. But it makes it much easier for the dipping stage. Once I’m done, I just spread it onto a sheet of greaseproof paper and let it set. Then just break it up and use it in another recipe (unless someone else in the house finds it first and eats it).

So, Liebe Leute – we’ve passed the half-way mark in the 2021 edition of the Twelve Bakes of Christmas. I hope you’re enjoying them, and that they may even have provided a little inspiration. And I promise there is more chocolate to come!

To make Hausfreunde (makes 24)

For the dough

• 225g flour
• 25g cornflour
• 75g icing sugar
• 165g butter
• zest of 1/2 lemon

• 1 1/2 teaspoons vanilla extraxt
• 1 medium egg, beaten

For the marzipan

• 125g ground almonds
• 1/2 teaspoon almond extract
• 100g caster sugar
• 45g acacia honey
• 1 tablespoon water

To assemble

• 200g apricot jam

To finish

• 300g dark chocolate
• 24 walnut halves, lightly toasted

Make the cookies

1. Put the flour, cornflour and icing sugar in a bowl. Mix well and set aside.

2. In another large bowl, beat the butter until light and fluffy. Stir in the lemon zest and vanilla. Add in the dry ingredients. Stir in the beaten egg until you have a soft dough – if it is sticky add a little more flour.

3. Wrap the dough and chill for an hour, or overnight.

4. Time to bake. Preheat the oven to 180°C (355°F) and line a baking sheet with greaseproof paper.

5. Roll the dough out to around 1/2 cm (1/4 inch) and cut out circles (5m diameter). Keep going until you have 48 discs. You will need to bake them in batches.

6. Transfer the cookies the baking sheet. Bake for around 10-12 minutes, turning half-way for an even colour. The cookies should be lightly golden when done. Leave to cool.

Make the marzipan

7. In a heatproof bowl, mix the ground almonds and almond extract.

8. Put the sugar, honey and water into a pan, and heat until the sugar dissolves. As soon as it comes to a rolling boil, pour the syrup onto the almonds and work to a paste with a silicone spatula. When smooth, wrap in greaseproof paper and leave to cool at room temperature.

Assemble the cookies.

9. Match the cookies in pairs by size (there is always some variation in size no matter how careful you are).

10. Warm the jam in a saucepan. Sieve if you want (you don’t have to), then add a teaspoon of apricot jam to each base (keep some jam back for the tops of the cookies). Gently place the partner cookie on top, and leave for a moment so the jam can set.

11. Marzipan time! Knead your marzipan (if it is very stiff, you can add a few drops of water to soften it). Sprinkle a worktop with icing sugar, and roll the marzipan out to around 4mm. Cut out marzipan circles using the same cutter as you did for the cookies (5cm diameter). Brush the top of each cookie with the remaining jam, then place a disc of marzipan on top. Press down gently.

Time to dip in chocolate!

12. Melt and temper your chocolate (BBC Good Food will explain all).

13. Dip the top of each cookie into the chocolate so that the marzipan is covered, but the sides of the cookies are left exposed. Let any excess drip off, then flip back the right way up. Immediately place a walnut half on top of the cookie. Repeat until all cookies are done. Leave to set.

1 Comment

Filed under Christmas, Recipe, Sweet Things, Uncategorized

{11} Italian Rainbow Cookies

My previous festive baking post offered simplicity, so it was only inevitable that today we’d go back to complexity. And as it is New Year’s Eve, albeit the low-cal and less exciting version, it is only fitting that we do something that is colourful and has a bit of panache to it.

Earlier in this year’s baking extravaganza I posted some cookies from the Philippines and mused that I had not made many recipes from outside of the gingerbread-spice world of Western Europe. Then I got a suggestion from a helpful reader, Jamie, who suggested I have a go at Italian Rainbow Cookies. In spite of the name, they are a staple of American Christmas baking, particularly amoung the Italian-American community, so would tick the box of stepping beyond Europe for holiday inspiration. So…I did just that. I did actually have another recipe in mind for the No 11 slot this year, but for better or worse it has been bumped. Maybe it will make the cut for the 2021 edition?

Truth be told, I’ve seen these before, but I’ve been put off from making them as they look complicated. However what with lockdowns and the like, I’ve got plenty of time on my hands (i.e. my excuse has gone), so we were all set for some lurid rainbow cookies. All fabulous seven layers of them. And here is what I made!


I’m beyond thrilled with how they worked out. Seeing them all laid out neatly like this I have the vague feeling that I’ve made some sort of edible interactive Tetris set. I originally arranged them in neat lines all in the same way but it looked too orderly. Hence the more random arrangement. It’s chaos within order.

These little guys are also called Seven-Layer Cookies, and it’s easy to see why. There are three layers of almond-flavoured sponge, sandwiched together with jam, and then the top and bottom have a layer of dark chocolate. They are made as one giant sheet, then cut into individual bite-sized cubes.

I find them both cute and oddly extravagant. But are they Italian? Are they a rainbow? And are they really cookies? The last two are easy. You could go with any colour you wanted, but the red/white/green tricolore seems to be pretty ubiquitous. The tricky thing is to get more of a rainbow, you need more layers, which makes them more complex, and the size would become impractical. I also think it is wise to go with colours that could be natural as opposed to blues and purples. So they’re not a real rainbow, but I think the three colours do work well together.

Are they cookies? Well, not in the sense of something that is made from dough that has been rolled out and shaped or cut. But neither are they cookies made from balls of dough, or drops of batter. While the term “cookie” is pretty flexible, these guys are really are more like little cakes. The closest I can think of are petit fours, those fancy little bite-sized French cakes you might get with afternoon tea or after a special dinner.

So, they’re at least Italian, right? This is where things get more mixed. Some think they’re not Italian at all, while others think they must have at least a tenuous link to the old country. Other sources suggest the recipe was developed within the Jewish community that lived alongside Italians in American cities. Whatever the true origin, they have acquired the “Italian” moniker and they seem to be a key part of an Italian nonna’s festive baking repertoire, and given that it’s probably best not to argue.

But where to start with baking them? Jaime pointed me in the direction of the Smitten Kitchen recipe from Deb Perelman. I’ve followed some of Deb’s recipes in the past, and been pleased with the results. In a pretty crowded online recipe world, and with what seem like dozens of YouTube videos of those nonnas making these things, I decided to go with a recipe that I was pretty confident would work. She also writes with candour about how she found the process and offers tips for getting it right, which is something I always like to see. A tricky recipe being described as “easy” or “a breeze” does no service to the reader and it underplays the work of the baker too.

I planned to do this over two days, as they baked cake part needs to chill for at least 8 hours with a weight on it. I think the idea is that this helps to ensure the cookies are perfectly flat, the layers bond to each other, and I think it helps with the texture too. I figured I could do all the baking and assembly one day, then do the chocolate and the chopping the next. I recommend doing it in this way as it helps keep you sane. The kitchen does end up covered in a fair few bowls coated in many different colours.

But was the whole process a breeze? I did have one major wobble. Once I’d done the baking, assembling and chilling, I removed the tray from the fridge to start doing the chocolate layers. I trimmed the sides, partly to neaten it all up, and partly to have some offcuts to eat. With a nice sharp knife it was a dream to cut. Then I was frankly horrified upon doing a sneaky taste – the cakes seems dry and hard. I panicked. Had they been over-baked? Had I wasted my time? In fact, they were just cold. As they came up to temperature, they softened and that delicious jammy almond flavour emerged. So yeah, just note that this happens!

The chocolate layer was the bit that worried me. You need to do the top and the bottom. Now, I can temper chocolate, but it takes time and patience. Plus it is about 1 degree (centigrade) outside, so our old London brick house is freezing which makes it all the more tricky to get chocolate to a precise temperature – not too hot, not too cold. This was a problem that the Smitten Kitchen recipe had too. Well, it turns out the answer was actually mercifully simple – you just add a little unsalted butter to the melted chocolate. No tempering, and this also means the chocolate has a bit of “give” so that it becomes easier to cut.


And what’s the verdict? Well this comes in two parts. How much work were they, and how do they taste.

In terms of effort, they are a lot less work than I thought. I probably spent one hour doing all the baking, and that was alongside keeping an eye on my son, who also tried to help (and promptly made a mess). Then maybe 20 minutes assembling it all before leaving to chill overnight. The chocolate was the job for the second day. Splitting it up in this way makes it quite easy. Manageable mess, and you don’t end up going doolally from it all. Italian Rainbow Cookies are also quite fun to make them if you’re slightly obsessive about precision in your baking. For indeed, my much-treasured Japanese steel metal ruler helped get those sharp lines and equal cuts.

In terms of how they taste, I love them. They have an intense almond flavour and lovely fruitiness from the jam (which I boosted with a little amaretto and some cherry liqueur). This is all balanced by the dark chocolate. I’d even go so far as to say that they taste much better than they look. While I’m all up for a bit of whimsy in the baking, the red/white/green colour scheme is a touch lurid for my tastes. But then, it is iconic, and I wonder if anything else really would do? Plus, where else are you going to find cookies that can symbolise the flags of Italy, Hungary, Ghana and Mali depending on how you place them? They are certainly some of the most striking things I’ve ever made in terms of the looks department.

So there we have it – my efforts in accepting one reader’s challenge. I’ll wrap up by sharing a tip of my own for recipes like this one where you have to divide the batter and the jam into equal portions. Get some electric scales, and weigh your bowls before using them. This makes it really easy to work out by weight how much batter or jam should be in each portion. I happen to know my main mixing bowl is 580g. Believe me, it saves a lot of guessing, eyeballing and general culinary angst. And it does help get even layers when making something like Italian Rainbow Cookies where you want to be precise to show off just how fancy you can get with your baking.

To make Italian Rainbow Cookies (recipe from Smitten Kitchen, with some tweaks)

For the batter

• 4 large eggs, separated
• 200g white caster sugar
• 200g almond paste (see note)
• 285g unsalted butter
• 1 teaspoon almond extract
• 1/2 teaspoon vanilla extract
• 260g plain flour
• 1/2 teaspoon baking powder
• 1/2 teaspoon salt
• red food colouring
• green food colouring

To fill

• 1 x 340g jar apricot jam
• 4 tablespoons water or amaretto and cherry liqueur (I used Luxardo Maraschino)

To finish

• 200g dark chocolate
• 20g unsalted butter

1. Preheat the oven to 175°C (350°F). Prepare 3 sheets of greaseproof paper to fit a 33 x 23cm (13 x 9 inch) baking pan.

2. Put the egg whites into a large bowl. Beat until you have soft peaks, then add 50g of caster sugar, a tablespoon at a time, until it forms stiff peaks – it should look like a meringue.

3. In a separate bowl, grate the almond paste. Work with your hands so that it gets soft, then add the remaining 150g caster sugar and the butter. Beat until pale, fluffy and everything is combined. Add the yolks, almond extract and vanilla extract, and keep beating on high speed. If you can still see a lot of flecks of almond paste, keep beating to get it super-smooth. When done, fold in the flour, baking powder and salt and mix well.

4. Add half the meringue mixture to the other bowl, and fold in to lighten the batter. Then add the rest of the meringue mixture and fold that in.

5. Split the batter between 3 bowls. Add red food colouring to one, and green food colouring to another. Put the green batter into the fridge, and put the white batter to one side. Pour the red batter into the prepared baking tray, and spread as evenly as you can. Don’t worry if the batter does not seem very deep – it is supposed to be just under 1/2 cm (1/4 inch) deep.

6. Bake the red layer for around 10 minutes. It will still look a bit wet on top, but a cocktail stick should come out clean. You don’t want more than the lightest of browning at the edges. Remove from the oven, allow to cool for a couple of minutes, then transfer to a wire cooling rack.

7. Remove the green batter from the fridge to bring it up to temperature. Set aside. Now prepare the baking tray again, and bake the white layer. When that’s done, repeat for the green later.

8. While the cakes are cooling, prepare the jam. Put it into a saucepan, add 4 tablespoons or water or a mixture of amaretto and cherry liqueur, and bring to the boil. Pass through a sieve, and set aside to cool.

9. Once all the layers are completely cool, prepare a shopping board or tray by lining with a sheet of greaseproof paper. Flip the green layer onto the paper. Spread with half the cooled jam mixture, getting it as even as you can. Then flip the white layer onto the green layer, and spread with the rest of the jam. Finally, flip the red layer and place on top. Wrap the whole lot in cling film, place in the fridge, then put a heaving baking tray on top and add a few jars to weigh it all down. Leave to chill overnight.

10. Time to finish it off. Remove the tray from the fridge. Use a clean straight knife to trim the edges. You’ll notice that they seem quite firm and dry – this is normal.

11. Prepare the chocolate. Put 100g chocolate in a bowl, and microwave in 30 second bursts until it is melted. Add 10g of unsalted butter, and mix well. Spread evenly on the red layer, getting it as smooth as you can. Place in the fridge for a few minutes to set.

12. Remove the tray from the fridge, and flip it onto another tray (so now the chocolate is at the bottom, and you have a green sheet of cookie facing you. Melt the rest of the chocolate, then add the rest of the butter. Spread on top, and put it back to the fridge for 5 minutes to set.

13. Use a serrated knife to score lines on top of the chocolate, marking first vertical, then horizontal Go back over the vertical lines to cut through the layer of chocolate. Then switch to a clean straight-edged knife to cut through the cake layers, and swap back to the serrated knife to cut through the bottom lawyer of the chocolate. You should have long strips of rainbow cookies.

14. Take each strip and place on its side do you can see the pattern facing you. Use a small sharp knife to cut into individual pieces in a swift downwards motion. Keep going until all the cookies have been done. Store in an airtight container in the fridge, but allow to come to room temperature before serving.

Note: this recipe calls for almond paste (which is 50/50 almonds and sugar). The brand I used was Odense Mandelmassa that I panic-bought earlier in the year. The stuff you find in British supermarkets called marzipan is usually 75% sugar, 25% almonds. It’s great for decorating, but it’s not right for this as the sugar content is too high.

2 Comments

Filed under Christmas, Recipe, Sweet Things

Lamingtons

In years gone by I had traditionally written about something from Scotland in honour of Burns Night which falls on 25 January. This year I thought I’d do things a little differently. As Australia Day falls on 26 January, how about something Antipodean instead?

If we’re doing Australian, it just has to be lamingtons. This is not a cake that I see very often, even in a city like London with a decent Aussie population, but I do remember seeing them on Neighbours when I was young and being introduced to the concept of the “lamington drive”. This involved making and then selling lots of these little cakes, and it was pretty much the way of raising money for a good cause. From what I knew, they were pieces of sponge, dipped in chocolate icing and coated in coconut.

They were apparently named either for Lord Lamington, who served as Governor of Queensland from 1896 to 1901, or after his wife, the surprisingly named Lady Lamington. You can understand why they used his title when looking for a cake name, as his full name (Charles Wallace Alexander Napier Cochrane-Baillie) didn’t really trip of the tongue.


So I set about making a batch of lamingtons. First question: is there some single authentic recipe for making them? It would seem not. There are various different recipes for the sponge (such as genoise, Victoria or pound cake) and chocolate glaze ideas range from a smooth proper ganache to something sweeter and more obviously icing-like. I ignored suggestions to use pink icing on the basis I never saw the Robinson household or anyone else in Ramsay Street making them that way.

I settled on genoise, but then had to decide if I would try to make a deep cake and cut it into pieces, or would I try to include some jam element? Again, I don’t remember seeing jam on Neighbours but I think the right tangy, fruity jam is a good complement to sweet chocolate icing. I decided to make one large thin sheet of cake, which I would cut in two and sandwich the pieces together with apricot jam. That decision was based on what I had in the cupboard, but I think anything that has some sharpness to it would work well, such as raspberry or blackcurrant jam. Something more muted like strawberry would just add more sweetness but no contrast, but if that’s what you like, then go for it.


Many of the recipes that I did see suggested not using cake which was very fresh – you want the cake to be ever so slightly stale (whatever that means) and apparently this was best done but wrapping the cake in cling film and letting it sit in the fridge overnight. I’m not sure whether this really made a difference, or just ensured that the cake really was properly cooled, but it did cut neatly and cleanly into pieces. Given you will be glazing these guys and rolling them in coconut, neat slicing is not really that important as icing can cover a multitude of sins, but I was happy that the pieces didn’t just start falling apart. I took this as a good sign for when I was going to ice them.


For the glaze, I quickly discounted the idea of a ganache. While I have not been to Australia (yet), it is fair to assume it is a warm place for most of the time, and so it would be rather daft to make a cake with an icing that would melt easily in warm weather. So the icing I came up with is made from a warm mixture of milk, butter, dark chocolate and cocoa powder to which you add the icing sugar, then keep the lot warm over a pan of hot water. This keeps the icing smooth and makes it easier to coat the cakes, but then it will set fairly quickly after you’ve rolled the cakes in coconut. While most recipes use just cocoa powder, I also added some dark chocolate to the icing which seemed to help get a good colour and flavour.

The actual glazing process was quite fun – not something I would want to attempt in a hurry, and the first couple of lamingtons took a bit of time to get right. I found it easiest to gently drop one into the icing, then used a spoon to pour glaze over the cake. Once it is coated, you just slip a fork underneath, then allow the extra icing to drizzle off the cake. Then comes the fun part – you need to quickly transfer the cake onto the desiccated coconut, which you have on a large plate right next to you. Then you have to use your hands to form a coconut mountain around the cake, and press it a bit so the coconut sticks to the glaze. Then you need to flip the lamington over, so that all sizes are covered, and then move it to a wire rack. And all the while, the glaze is a bit soft, so you will probably have to fix the shape a bit with your fingers so it looks presentable. After you have done a few of them, you’ll defiantely develop a “lamington technique”.


And speaking of coconut…I was not sure if I should use plain or sweetened coconut for this recipe, so I bought both types. As this is a traditional recipe, I thought it might be made with the sweeter stuff, but to be sure, I tested them both before using them, and this taste test told me that the sweetened coconut was not right. Yes, it was softer and seemed more tender, but it had a rather peculiar aftertaste that I did not like at all – and then I checked the ingredients, it turned out it was just 65% coconut. All that apparent “tenderness” was coming from propylene glycol. I’m not a Luddite, and looked into what this was – it’s safe for food (which I would hope, since it was in that coconut!) but the impact on the flavour meant it was going nowhere near my lamingtons, but straight in the bin. Back to good old-fashioned unsweetened desiccated coconut we went! If you want to try something a bit different, you could toast the coconut, but that’s as far as I would go. You could use chopped nuts if you’re not a coconut fan, but then I think you’re veering away from what a true lamington is.

Finally, I should say that my recipe basically recommends you have a whole packet of coconut on a plate for dipping, but you won’t use all of it. I just think that you’ll struggle to get a good finish if you try to use less, so don’t be puzzled if you have lots left over after your icing escapades.

And how were they? I was all prepared for them to be a bit naff, but I must confess I really liked them. The cake, the set-but-soft icing, the coconut and the jam come together into a really lovely cake. They also looked great piled up high on a plate, so I will definitely be making these again. And not just for 26 January!

To make Lamingtons (makes 16)

For the sponge:

• 2 large eggs
• 100g white caster sugar
• 1 teaspoon vanilla extract
• 100g plain flour
• 1 teaspoon baking powder
• 60g butter, melted and cooled
• 130g tangy jam (apricot, raspberry, blackcurrant…)

For the icing

• 120ml whole milk
• 30g unsalted butter
• 50g dark chocolate

• 50g cocoa powder
• 1/2 teaspoon vanilla extract
• generous pinch of salt
• 450g icing sugar
• extra milk, to thin the icing

To finish

• 250g desiccated coconut

1. Start wit the sponge. Preheat the oven to 180˚C (350˚F). Line a 20 x 30cm tray with greaseproof paper.

2. Melt the butter in a small saucepan over a low heat. Put to one side to cool. In a bowl, combine the flour and baking powder and mix well. Set aside.

3. Put the eggs, sugar and vanilla into a large bowl. Beat with an electric whisk until pale, thick and fluffy (around 3-4 minutes). Gently fold in the flour mixture using a spatula. Finally add the melted butter and gently fold it into the mixture. Pour the batter into the prepared tin and gently level off the mixture as best you can.

4. Bake the cake for 15-20 minutes until an inserted skewer comes out clean. Remove from the oven and cover with a tea towel. Allow to cool completely, then cover with film and refrigerate overnight.

5. The next day, time to prepare the sponge. Cut the cooled cake sheet in half. Spread one piece with jam, then place the other piece on tip. Leave to rest for an hour so that the jam holds the two layers together.

6. Cut the cake into pieces – trim the edges with a sharp knife to get good, clean edges. Now cut into 4 equal strips, and cut each strip into 4 pieces. They should end up roughly cube shaped.

7. Make the icing. Put the milk, butter, chocolate, cocoa powder, vanilla and salt into a medium saucepan, and heat gently until the butter and chocolate have melted. It will become very thick. Add the icing sugar, and beat vigorously until smooth.

8. Transfer the icing to a bowl, and balance it above a pan of warm water (this will keep the icing warm, and it should set more quickly when coating the lamingtons). Now check the icing consistency – you will need to add more milk to get it to a smooth but thick icing which pours easily – you don’t need much though, I only added a further 3 teaspoons of milk.

9. Tip the coconut onto a large plate.

10. Time to decorate. Drop a piece of the sponge into the icing, then use a spoon to coat it with the glaze. When done, put a fork underneath, lift it up and allow excess icing to drop off. Wipe the base of the cake on the edge of the bowl, then transfer it into the coconut. Coat it in the coconut, then transfer to a wire rack and leave to set (allow 30 minutes).

4 Comments

Filed under Recipe, Sweet Things

{10} Kolachky

I realised that my baking this year has been pretty heavy on nuts and spices, so today’s recipe restores a little balance with some fruity flavours.

Here are some delightful little festive bites called kolachky which are a bit like a pastry and a bit like a cookie. They are reminiscent of miniature Danish pastries, except they are made with a cream cheese dough rather than puff pastry. And they are just the right size to have one, then another, then another….you get the picture!


These cookies are one of those recipes that seems to pop up in lots of places. I’ve seen references to kolachky as coming from various places across Eastern Europe such as Poland, the Czech Republic or Hungary. They appear with different fillings, including fruit, poppyseed and cream cheese. And sometimes they are not shaped like little parcels at all, but they are rounds of pastry with a sweet filling. The round version also seems to be quite a big thing in Texas (but hey, everything’s bigger in Texas), apparently due to Czechs moving there and brining their baking traditions with them.

When I first saw pictures of kolachky I assumed that they would be complicated to make. Happily, they are actually really simple. I have used a cream cheese dough, which just involves whipping butter with cream cheese, then mixing in flour with a bit of baking powder. It starts off very soft, but you chill it and it becomes easy to work with. Then it is just a case of cutting out the squares, adding the filling, and baking them. This means that when they bake, the pastry is buttery, flaky and tender.

When I was rolling and shaping, my inclination was to start with big squares of pastry, as they do look like something that belongs to a breakfast spread. But remember these should be more like cookies, so go with small squares. Your mind will be telling you this isn’t right, but trust me! Otherwise you’re going to end up with truly giant kolachky and you will have a low jam-to-pastry ratio, and that would just not do!


I have seen a few different ways to make the filling for these little pastries. Some suggest a filling made from chopped dried apricots and sugar that you cook until it is thick. If that’s what you want to do, go for it. However, I’ve taken a slightly lazier approach and just used jam. Not only is this quick, but it also means you can easily make a few different flavours. I went for apricot, sour cherry and blueberry to get some flavour and colour variety. As you can see there is such a difference between cherry and blueberry!

In the interests of science, also I tried a little experiment. I used some normal jam, as well as a jar of apricot jam that I had made over the summer which had a little too much pectin in it, and as a consequence it had a very firm set to it. As in, a very firm set.


As expected, the normal jam melted and some ran out during baking. Enough stayed in the pastries for this not to be a problem, so it was fine. However, my very firm jam stayed put perfectly. If you make these, don’t stress about seeking out a specialist jam for this, but if you do happen to have a jar of something that has set rather more firmly than expected, this is a good thing to use it in.

When it came to baking these guys, I didn’t bother with a glaze, egg wash or anything like that. However, I did see one suggesting to sprinkle granulated sugar on the tray first. I thought I would give this a try, as there is no sugar in the dough and so it was unlikely they would end up being too sweet. In fact, it worked great, as the base is a little crisp and caramelised. You can by all means skip this, but I like it.

So there you go – delicious little bite-sized pastries. They will last a few days in a sealed container, but I think they are best when still very fresh, so they would be an excellent thing to make in the evening, then bake then in the morning as part of your Christmas breakfast. Because that’s what we will be doing!

To make Kolachky (makes around 30):

For the pastry:

• 200g butter
• 200g cream cheese
• 250g strong white flour
• 1 teaspoon baking powder
• pinch of salt

For the filling:

• jam, with a good firm set

1. Make the pastry – cream the butter and cream cheese until smooth. Add the other ingredients and mix to a dough. It will be very soft and quite sticky. Wrap in cling film and form into a flat square. Chill in the fridge overnight.

2. The next day, sprinkle a worktop with flour. Cut the dough into two equal rectangles, and put one back in the fridge. Take the other and roll out to a square 30cm x 30cm. Trim the edges and cut into squares of 7cm x 7cm. You will have 16 squares.

3. Add a teaspoonful of jam in the centre of each square. Gently fold one corner into the middle, then put a little water or milk on the opposite corner, and fold it on top and press lightly.

4. Sprinkle the baking sheet with some granulated sugar. Put the  kolachky on top. I did this in batches of 8.

5. Bake the kolachky for around 10-12 minutes until they look puffed and are starting to go golden. Remove from the oven, let them cool for a few minutes, then transfer to a wire rack and dust lightly with icing sugar.

Leave a comment

Filed under Christmas, Recipe, Sweet Things

{10} Joulutorttu

Christmas treats are often all about cakes or cookies, but today’s recipe is one from that forgotten part of the baking world…Christmas pastries!

I’ve been making joulutorttu, which are traditional star plum pastries from Finland (yes, Finnish baking is getting a double-feature this year). If you think that name is a mouthful, they are also called tähtitorttu, which means star pastries. Those names really are enough to make you give up and reach for more mulled wine…

The traditional way to make these pastries is with plum jam or prune filling. I had a look in my cupboards at home, and while I have plenty of jars of jam, I’m lacking anything made with plums. I went for the next best thing – a jar of blueberry jam, which I reasoned was suitably Nordic to be able to pass off as vaguely authentic. I also made some prune filling as a test – I just chopped up some prunes, then cooked them with water, cinnamon, orange juice and some brandy. In the first picture, I’ve used the jam in the top and bottom rows, and the prune filling in the middle row – you can see the different textures.

joulutorttu4

joulutorttu1
There are actually a few different ways to make these little guys. If you are feeling lazy, or are busy, or have pets/small children, then it is quite acceptable to buy a sheet of puff pastry and use that as the basis for the stars. Just be sure to make good, clean cuts so that you get lots of puffing at the edges.

I, of course, opted for a more challenging version. I’ve used a pastry recipe from the Nordic Bakery cookbook. It suggests using a really rich pastry that is made with a decadent amount of butter plus the same amount of quark to bring it all together. I’ve never worked with a pastry like that, so I wanted to give it a go. However, I didn’t have quark to hand, and being too lazy to make the short walk to the main street, I swapped it for some skyr. This is a high-protein and low-fat type of yoghurt which originates in Iceland (and those Icelanders take it very seriously, swearing that the stuff you get in Britain isn’t anywhere near as good as the real thing…well, I like the stuff here just fine, and it worked in my recipe!).

The dough is very soft, and at first I thought it would not work. But I wanted to believe, so I assumed the flour would soak up some of the moisture, and after chilling it overnight, the pastry was indeed perfectly workable. It rolled out easily, and it was straightforward to cut and form into those classic windmill shapes.

Now, the real magic was in the baking. The pastry? Just wonderful. As it has a high butter content (made with equal weights of butter, skyr and flour), it is rich, soft and has a lovely deep golden colour. It is definitely worth the effort of making it yourself. But I do have to warn you – it is a funny dough too. I made my twelve stars from the first rolling of the dough, and they worked perfectly. I then gathered up the scraps and made some more…and boy did they go haywire! It might have been due to the pastry on the first batches being comparatively cool, whereas the later batch was a bit warmer, but they puffed up extravagantly, almost like puff pastry, but they also struggled to bake properly without getting too dark. To avoid this, I recommend working with the dough in two batches, and in each case roll the dough out as square as you are able, so that you minimise any offcuts and can avoid re-rolling the dough.

joulutorttu3

joulutorttu2
Of my two flavour choices, the spiced prune was nice, but I loved the blueberry. I would happily make that flavour again. If you are making a large batch, you can also use various different flavours – plum is traditional, but apple and cinnamon would work well, and I think something sharp like raspberry would be delicious too.

All in all, these Christmas stars from the north were a great success. They are incredibly more-ish. I think I wolfed down three of them in fairly quick succession. They are also at their most delicious while still fresh. They will keep for a couple of days in a tin, but I don’t think you want to delay eating them, and frankly – they taste so good I don’t think you’ll have many hanging around for long.

joulutorttu5

To make Finnish Christmas Star Pastries (makes 12):

For the dough

• 250g butter
• 250g skyr or quark cheese
• 250g strong white flour
• 1 teaspoon baking powder
• pinch of salt

For the filling

• jam or marmalade (or see my prune recipe below)
• 1 egg, beaten
• icing sugar, to finish

1. Make the dough. Mix the butter and quark/skyr. Add the rest of the ingredients and mix until it comes together in a dough – the dough will seem very soft. Wrap in cling film and leave to chill overnight.

2. Preheat the oven to 200°C (400°F). Line a few baking sheets with greaseproof paper.

3. Sprinkle a worktop with flour, then roll out the dough thinly – no more than 5mm. Try to get as square a shape as you can. Cut out squares of 10cm x 10cm. Transfer each to the greaseproof paper, leaving some space between the pieces.

4. Make a small diagonal cut about one-third  towards the centre of the square from each corner, but do not go all the way. Add a spoonful of jam in the centre, then starting at the top, bring the top-right piece into the centre. Repeat on each side to build up the windmill effect. Secure the overlapping dough in the centre with some water and pinch together, then push down and add a dab more jam to cover. Repeat until you have a full tray (I baked them in batches of 4).

5. Brush each pastry with the beaten egg, then bake for around 8 minutes until a rich golden colour, turning after 4 minutes to get an even bake.

6. When done, remove from the oven, and leave to cool for a few minutes on the paper. Transfer to a wire rack to cool, then dust with icing sugar before serving.

To make plum filling: finely chop 100g of prunes. Add 150ml water and a large pinch of cinnamon. Bring to the boil then simmer until the mixture seems thick and almost too dry. Add a tablespoon of brandy and a tablespoon of orange juice. Mix well and leave to cool.

3 Comments

Filed under Uncategorized

Just Jammin’

Yes, I’m finally back! Not quite 10 months since my last past, but that is still one looooong blogging hiatus. And it is all down to me trying to get to grips with parenthood. I’ve discovered that I’m better at this whole lark than I ever thought I would be. But what happened to my time? I somewhat naively imagined that I would have at least some time to indulge my hobbies in between trips to the playground, making wholesome baby food, and becoming an expert of the best children’s programming that Cbeebies has to offer. Well, that was just pie in the sky! In fact, I don’t think I’ve even managed to read a whole novel in the last six months. And no, reading That’s not my bunny/reindeer/cow/dinosaur twice each day doesn’t count.

That said, things are now finally getting back to something that looks a bit more like normal, even if I have had to completely accept that our lives have also changed completely and forever, and that we’re really adjusting to the “new normal”. This also means that I am sometimes able to get back into the kitchen and cook and bake for pleasure, rather than to meet the demands of a hungry little mouth who wants meatballs right now. Of course there is always the threat that a little someone will wake up, so I won’t be tackling projects that require a good four or five hours to complete, so that’s most of the Great British Bake-Off technical challenges off limits for the next couple of years. Hey ho…

Today I thought I would ease back in with something simple and delicious – some lovely raspberry jam that I recently made. It would be wonderful to tell you that the fruit was picked just moments before making the jam from a row of plants at the end of my garden, but I am not that fortunate. The garden revamp is on the cards for next year, and I will be putting in some fruit bushes and trees. In the meantime I did the next best thing for use city folk. We headed to a pick-our-own farm outside London (Crockford Bridge Farm if you’re keen to do the same). And yes, you’ve spotted that I combined fruit picking with a kid-friendly day out.

Luckily for us (if not the local children) most of the schools had gone back after the summer holiday when we got there, so we were able to enjoy bucolic scenes of fields and blue skies all to ourselves. We worked our way through plump blackberries, the last strawberries of summer, more courgettes than I’ve ever seen and rows of enticing ruby raspberries.

raspberries

All of this took me back to childhood summers spent picking raspberries in rural Perthshire. And the irony was not lost on me that I was now paying for the privilege of picking fruit, rather than being paid to pick it!

But it was still a glorious day out, and our two little helpers even managed to resist eating more than one or two berries before we got them weighed and coughed up the cash. And the fact that my lad and his little friend fell fast asleep almost instantly on the way home thanks to all that fresh air? Priceless!

So once I was home with this fruit, I had to think about what I was going to do with it. Some got eaten straight away, but for most of the raspberries, they just had to go into some jam. I had been thinking about this all along, as I had made sure to include a few slightly under-ripe berries to get enough pectin in the jam to ensure a good set.

Raspberry jam is one of my absolute favourites. The flavour is sweet and tart, fruity and fragrant. It is also really so simple to make, so great for a preserving novice, and easy to get a good set without too much trouble. When you get into jams and marmalades, you will obsess about the setting point – is it ready? Do I need to boil it for longer? Did I make a mistake using normal sugar rather than jam sugar? But these are usually non-issues if you are using raspberries!

raspberryjam2
Some recipes suggest mashing up the fruit and letting it sit overnight, but I find that you don’t need to wait that long. Throw the fruit and sugar in a pan, mash it up and let it sit for 20 minutes or so. The sugar will start to dissolve in the fruit and draw out the juice. Then it is a simple case of bringing the lot to a boil, adding some lemon juice at the right moment, and that’s more or less it. Then in no time you can be enjoying colourful, fragrant and deliciously tart raspberry jam on scones, toast or even swirled through natural yoghurt.

raspberryjam1
To make raspberry jam (makes 3 x 450g jars)

• 750g raspberries
• 750g granulated white sugar
small knob of unsalted butter, size of a hazelnut (optional)
• juice of 1 lemon

1. Pick through the berries to make sure there is no spoiled fruit or insects lurking in there. Put the raspberries and sugar in a heavy saucepan. Roughly mash until the fruit and sugar are mixed, then cover and leave to sit for 20 minutes.

 2. Place the pan over a medium heat until it comes to a boil. Add the lemon juice and butter if using(*), and cook on a rolling boil for 5 minutes. After this, start to check for a set (**).

3. When you have a set, remove the jam from the heat and leave to sit for 10 minutes (it will thicken slightly – this helps to ensure the pips are evenly distributed in the jam and don’t sink). Decant the hot jam into sterilised jam jars(***), seal and leave to cool.

(*) Butter in jam? I find this helps to reduce the amount of scum that forms on top of the jam during cooking – and sometimes the scum will vanish completely when the jam is left to cool before being put into jars!

(**) How to check for a set? Use a thermometer and check the jam has reached 106°C (223°F). Or drop some jam on a chilled plate – allow to cool for a moment. Push with your finger – it should wrinkle. If you don’t get a wrinkle, boil the jam for 2 more minutes then test again. I actually do both tests – I use the electronic thermometer, then drop some jam on a plate, because this is what my mum did and I like doing it!

(***) How to sterilise jam jars? Wash in hot, soapy water, and then rinse very well – do not dry them. Now place up-side down on the shelf of a cold oven, and heat to 100°C / 210°F for 20 minutes. Remove from the oven using gloves, allow to cool slightly (they should still be warm) and fill with the hot jam. You can leave the jars in the oven with the heat turned off until you need them, as this keeps the glass warm, and warm glass is much less likely to crack when you add warm jam (science, eh?). Remember to sterilise the lids by washing in hot, soapy water, then rinsing well and then boiling them in a pot of hot water for a few minutes

9 Comments

Filed under Afternoon Tea, Recipe, Sweet Things

Spiced Tomato Jam

It’s a public holiday today in London – but my visions of a warm day at the beach or in the country were knocked on the head by the lashing rain that appeared this morning! Making the most of an unexpected day in the house, I’ve finished sorting through three years worth of administration and vacuumed and generally tidied the house. I know – very rock’n’roll! Then the moment came to reverse all the good work in the kitchen by embarking on a spontaneous culinary exploit.

So, forgetting the rain, today was also the start of what might be tentatively called “festive baking” as I’m making something that I’m looking forward to eating at Christmas – a sharp-but-sweet spicy tomato jam that is a great addition to a cheeseboard. It also means I can use some of our garden produce and enjoy them later in the year – our tomatoes were better this year than we managed last year (2014 yielded just three tomatoes!), but I’ve also got some big plans for next year to really get the most out of our garden. It might be small, but I’m determined to use it to grow useful things out there!

tomatojam1

This is actually somewhere between a sweet jam and a chutney – it sets and is made with a lot of sugar (like jam), and while it has spices, salt and vinegar that you’d expect in a chutney, it doesn’t have onions or sultanas. It is in turns fruity, sharp, tangy and savoury, with little bursts of flavour from the spices I used. It is absolutely delicious with strong cheddar on oatcakes or crackers, and a little goes a long way.

I made this using cherry tomatoes – partly the result of a glut that we’ve got in the garden at the moment, but you could just as easily do this with bigger tomatoes, red, yellow or even green. I cut half of the cherry tomatoes in two, and trimmed the rest into quarters so that there is some variation in size in the finished jam. If you’re using bigger toms, then you’ll need to chop them into smaller pieces, unless you’re the kind of person that enjoys really chunky jam! I also let the tomatoes cook down in a bit of water so that they break down a bit before adding the sugar. If you add the sugar with the tomatoes at the start of cooking, it can stop them breaking down and leave you with large lumps. This doesn’t affect the flavour, and I think is really just a matter of aesthetics.

tomatojam2

A word of warning – this recipe does not make a lot of jam, but that is not really an issue as you only need a little as it is packed with flavour. As it is easy to make, you can play around with different versions – I like nigella and cumin seeds, but you can also try aniseed or ginger and chilli. Using different colours of tomatoes also looks pretty – yellow tomatoes will keep their golden hue, while red tomatoes will produce anything from a deep orange to a ruby colour. I’ve ended up with one small jar that I can eat over the next couple of weeks, plus a large jar that I can keep in a cupboard for the December festivities. Now…let’s see what cheese I’ve got in the fridge to test out this batch?

To make spicy tomato jam (makes 2-3 small pots):

• 600g cherry tomatoes
• 100ml water
• 2 teaspoons nigella seeds
• 1/2 teaspoon cumin seeds
• 4 whole cloves
• pinch freshly-ground black pepper
• 1 teaspoon salt
• 75g soft brown sugar
• 100g white sugar
• 2 teaspoons pectin powder
• 60ml white wine vinegar
• juice of 1/2 lemon

1. Rinse the tomatoes and cut into a mixture of halves and quarters, removing the stalk part from each. Place in a saucepan with the water and cover. Bring to the boil, then simmer gentle for around 20 minutes.

2. In the meantime, dry toast the nigella and cumin seeds – put them in a saucepan and warm over a medium heat until they smell fragrant. Once done, pour them onto a cold plate.

3. Add the rest of the ingredients (apart from the lemon juice) to the tomatoes. Mix and bring to the boil, then reduce the heat and simmer for around 10 minutes. Add the lemon juice, the boil until the setting point is reached(*) before decanting the jam into prepared sterilised jam jars(**).

(*) How to check for a set? Chill a saucer in the fridge. Put a little jam on the cool plate, and return to the fridge for a minute. Push with your finger – if the jam visibly “wrinkles” when you push it, the jam is done. If it stays liquid, then cook longer and check again after a few minutes.

(**) How to sterilise jam jars? Wash in hot, soapy water, and then rinse very well – do not dry them. Now place up-side down on the shelf of a cold oven, and heat to 100°C / 210°F for 20 minutes. Remove from the oven using gloves, allow to cool slightly (they should still be warm) and fill with the hot jam. You can leave the jars in the oven with the heat turned off until you need them, as this keeps the glass warm, and warm glass is much less likely to crack when you add warm jam (science, eh?). Remember to sterilise the lids by washing in hot, soapy water, then rinsing well and then boiling them in a pot of hot water for a few minutes.

25 Comments

Filed under Christmas, Recipe, Savoury

Blood Orange Marmalade

A great way to bring a bit of sunshine into what can be the very grey last days of winter is to get busy with making marmalade. Seville oranges are a British favourite, as they are too bitter to use for most purposes, but they do provide a good, sharp breakfast marmalade to wake you up in the morning. However, not everyone is a fan, so I’ve turned my hand to using other citrus that gives a milder result (more being shaken aware than being slapped?), and it just so happened that I got a load of blood oranges delivered recently in my veg box.

bloodoranges1
I know that jams, preserves and marmalades can seem like a bit of dark art, and that marmalade in particular is often thought of as being rather daunting. I think it’s really just a matter of patience. In fact, marmalade it is the sort of thing that is perfect to make on a quiet weekend when you’re just pottering around at home, as you spend Saturday juicing the fruit and shredding the peel, then boiling everything up and letting it sit. Then on Sunday, you get to do the “fun bit” with the sugar, engaging in what seems like alchemy to turn a pot of watery orange peel into a sweet, tangy and glowing confection.

I always find that there is something rather therapeutic about peeling and slicing all those orange peels, with the wonderful orange aroma filling the kitchen as you prepare and cook the fruit. All that orange oil being spritzed into the air as you handle the peel does leave you feeling rather invigorated!

bloodoranges2
As I was using blood oranges, I was expecting this to really impact on the final marmalade – something rich and red was surely going to be my reward, yes? Some of my oranges had quite dark red skin (a good start) and when I cut into them, I was pleased by the bright red flesh and juice. I was expecting that the resulting marmalade would be a jolly red colour…but in the end, it was a deep shade of orange. A nice colour, just not red. So all in all, just a touch disappointing, but not the end of the world! And of course, the flavour was still fantastic – obviously a strong orange flavour, but without some of that bitterness that you get with Seville oranges, but not the sweet jelly you get when using the very fine peel from sweet oranges. As I had used all of the peel, not just the coloured part, it still had enough of a bitter tinge to balance all the sugar in there.

When making marmalade, you should in theory be able to get a good set using just the peel, sugar and water, and rely on the fruit membranes and pips to give you enough pectin. I’ve made marmalade this way in the past with everything from Seville oranges to grapefruit, but my experience is that you can end up boiling everything for absolutely ages. This can concentrate down the sugar, resulting in a very sweet marmalade, and I think the longer you boil everything, the more of an impact this has on the flavour, and I suspect you probably lose some of the delicate aromatic orange oils (or not – I’m a home cook, not a scientist, so just a theory of mine). So I cheat – I want everything to be done more quickly, and I want a reliable set, so I use half normal granulated sugar and half jam sugar (with pectin). Sure, it makes me a massive cheat, but it works.

bloodorangemarmalade2

bloodorangemarmalade1
While I bemoaned the lack of a vibrant crimson colour in the final marmalade, I was able to ensure the colour was on the dark side. I used about 100g of dark muscovado sugar rather than white sugar. I think using all muscovado sugar would be too overwhelming, but using about 10% does make it a shade or two more intense, and adds a little extra something to the finished marmalade.

This recipe makes about 5-6 normal sized pots. It’s excellent on hot toast with melted butter, but it has lots of other uses. Try folding it into fruit cakes or sponge cakes for a robust orange tang, or add it to gingerbread and melt to use as a glaze. Or get very creative…add to the shaker and mix into your cocktail of choice. Try a spoonful mixed with gin and then add your tonic…

bloodorangemarmalade3
To make Blood Orange Marmalade (makes 6 pots):

• 1kg blood oranges (5-6 oranges)
• 500g jam sugar (with pectin)
• 100g dark muscovado sugar
• 400g white caster sugar
• 100ml lemon juice
• small knob of butter (size of an almond)

Day One

1. Wash the oranges. Cut in half and juice them.

2. Take each of the pieces of peel – trim off the membranes on the inside (keep them!) and cut the peel into fine shreds.

3. Measure the orange juice, and top up to 2 litres with water. Add the shredded peel. Collect that various seeds, membranes, any peel offcuts and anything left in the orange juicer (such as pulp) into a piece of muslin, tied securely, and add to the pot.

4. Put the pot onto a medium heat and cover. Bring to the boil, then simmer for around 2 hours until the peel is very soft. When done, turn off the heat and leave to sit overnight.

Day Two

5. Strain the liquid from the pot (keep the shredded orange peel!). Squeeze as much as you can from the muslin bag – this will extract pectin, and you should notice the liquid coming through the muslin a bit thick. Once you’ve got as much as you can from the bag, discard the mush inside.

6. Measure the liquid – if necessary, top up to 1 litre. If you’ve got more, don’t worry – add it all to the pot.

7. Return the liquid to the pot with the peel and the sugar, and place over a medium heat until the mixture comes to a boil. Add the lemon juice and the knob of butter, then keep on a medium heat until it comes to a rolling boil. Skim off any foam that forms, and start to test regularly for a set(*). It’s hard to say how long this takes – it might be 10 minutes, it might be 40 minutes. Just be sure to keep an eye on the marmalade – burnt marmalade is not nice.

8. When you have a set, remove the marmalade from the heat and leave to sit for 12 minutes (it will thicken slightly – this helps to ensure the strands “float” in the marmalade and don’t sink). Decant the hot marmalade into sterilised jam jars and seal(**).

(*) How to check for a set? Chill a saucer in the fridge. Put a little marmalade on the cool plate, and return to the fridge for a minute. Push with your finger – if the marmalade visibly “wrinkles” when you push it, the marmalade is done. If it stays liquid, then cook longer and check again after a few minutes.

(**) How to sterilise jam jars? Wash in hot, soapy water, and then rinse very well – do not dry them. Now place up-side down on the shelf of a cold oven, and heat to 100°C / 210°F for 20 minutes. Remove from the oven using gloves, allow to cool slightly (they should still be warm) and fill with the hot marmalade. You can leave the jars in the oven with the heat turned off until you need them, as this keeps the glass warm, and warm glass is much less likely to crack when you add warm jam (science, eh?). Remember to sterilise the lids by washing in hot, soapy water, then rinsing well and then boiling them in a pot of hot water for a few minutes.

Worth making?  100% yes! This is easy to make, but the result is delicious, and I think so much better than the manmade that you can buy. You can also customise according to your preferences – you can add spices, fresh ginger or even a dash of whisky or brandy to lend a little extra kick.

10 Comments

Filed under Recipe, Sweet Things

{11} Almond Jam Cookies

You might have noticed that there has been a glut of almond-flavoured goodies this year, so why stop a good thing? This recipe is based on one I saw for “Italian almond cookies” in a book that suggested filling them with flaked almonds or nuts. However, I thought a nice tweak would be to make them with a jam filling, and to use what I had made during the summer and autumn. And, thankfully, this year I made a lot of jam!

almondcookies

I would love to be able to say that there was lots and lots of thought that went into the pairing of jams with these almond biscuits, with careful consideration of what would work with their nutty flavour, but the reality is that I just had a good old rummage around inside the store cupboard.

almondcookies2

I ended up using six different types – plum, raspberry, apricot and pear jams, which were all delicious. However, the real stars of the show were Seville orange marmalade, with the bitter citrus acting as a good partner to the sweet, aromatic almond, and the surprising pink grapefruit marmalade, with that little sharp twist providing a nice counter to the sweetness of the biscuits. I also left shreds of orange and grapefruit peel peeking out over the sides.

almondcookies3

All in all – I’ve very happy with how these turned out. The result was a very jaunty and colourful little selection…just in time for tomorrow’s New Year’s Eve dinner!

To make almond and jam cookies (makes around 30):

• 200g ground almonds
• 200g icing sugar
• 2 medium egg whites
• 1/2 teaspoon almond extract
• jam, marmalade or fruit paste (e.g. membrillo)
• icing sugar or flaked almonds, to roll

1. Put the almonds, icing sugar and almond extract in a bowl. Add half the egg white and mix. Add the rest of the egg white, a little at a time, until you have a smooth but fairly firm dough. If the mixture is too sticky, add an equal weight of almonds and sugar to sort it out. Wrap in cling film and chill for an hour or overnight.

2. Preheat the oven to 150°C (300°F), and line a baking tray with greaseproof paper rubbed with a dot of oil or butter.

3. Roll the dough into a sausage shape and cut into pieces (aim for around 25-30 pieces). If you are a bit obsessed, use a ruler to measure out equally-sized pieces!

4. Roll each piece into a ball, roll in icing sugar (or flaked almonds if you prefer) then place on the baking sheet and flatten slightly. Make an indent in the top and add a little jam or marmalade (be careful not to over-fill).

5. Bake the cookies for around 15 minutes until slightly puffed up and they have a golden colour.

11 Comments

Filed under Christmas, Recipe, Sweet Things

Nordic Inspiration

Today is a bit of a special offer, as I’m going to share not just one but two recipes on an autumnal theme. This all seems very fitting, as my morning walk to the local underground station had definitely changed from being warm or even just cool, and is now decidedly crisp with a little prickle of cold in the air.

I’ve been busy in the kitchen making cinnamon buns. I actually make them quite often, and took a batch to work last week for my birthday. I think they lasted less than three minutes, and I got five requests for the recipe. The lesson? If you’re keen to be a much-loved co-worker, fresh and buttery baked goods will always go down well. However, this time I’ve add a twist to my standard recipe. In addition to the buttery cinnamon filling, I’ve added a rich seam of apple jam running though them, with the seasonal flavours of apple and spice joining forces.

My inspiration came from an event at the Nordic Bakery in London a few days ago. In celebration of Cinnamon Bun Day on 4 October, they are offering five daily specials over the course of this week. I think it’s a great idea to put a twist on the classic, and I find it rather amusing that the Swedish idea of celebrating them for one day has been taken by people from Finland, extended to a week, and thereby made better. Below you can get a bit of an idea of their tasty Finnish wares from a visit to their branch near Piccadilly Circus during summer.

Nordic Bakery 1

The five flavours on offer are lemon and raisin, blueberry, almond and custard, apple jam and finally chocolate buttons. As we’re just heading into day five of five, I’m afraid you’ve missed most of them, but you can still nab the apple jam version on Friday.

I also had a chat with Miisa Mink, the lady behind the Nordic Bakery, and she shared her ideas about selecting flavours. The apple jam ones were a traditional Finnish ingredient and a favourite of her father. My verdict on the five flavours was that the blueberry and chocolate versions were good, but the apple jam was a bit of a star for me (maybe something to do with a strategic selection of the piece that had the largest pieces of jammy fruit peeking out from between the layers of pastry?). You can see some of them below – yes, they’re cut into pieces, but really, who could eat five whole buns and remain standing at the end of it all? I mean, I tried my best, but I did have to admit defeat eventually!

NordicComposite

So, if you’re a cinnamon bun fan and want to try these specialities, head to the Nordic Bakery. Otherwise, do as I did, and draw on them for a bit of inspiration.

Yes, after I had tried those apple jam buns, I decided that I would try to make something similar. My first task was to make the most of a few organic apples that were languishing in my kitchen and starting to look just a little bit forlorn. OK, that is perhaps a bit harsh – they actually looked more like real apples should look, with varying colours, sizes and a few little bumps and bruises.

autumnapples

Unlike some of the other jams that can involve a fair bit of work to prepare the fruit, this one was easy. Peel, core, chop, add sugar and boil. Very easy, and the apples were transformed into something sweet, sticky and delicious with a rather pretty soft pink colour. If you’re only looking for a way to use up apples, then you can just make the jam, and look to flavour it with whatever spices you like – cinnamon and apple is classic, but you could get good results with cardamom, star anise or cloves (just be sure that you get the amount of spice right – with cloves in particular, a little goes a long way!). And there you go…first recipe of the day!

However, the real fun comes when you add the apple jam as a filling into cinnamon buns. I tweaked my standard recipe by omitting the cardamom that usually goes into the dough, and replacing it with nutmeg. I also swapped out the white sugar for soft brown sugar, and instead of the usual sprinkling of white pearl sugar, I gave them a shiny coating of brown sugar glaze. The result? Pinwheels of warm, delicious, apple-infused goodness.

applejamcinnamonbuns1

As you can see, not a bad result! And thanks have to go do Nordic Bakery for giving me the idea to have a go at them at home. I urge you to try them, but if you’re feeling a bit lazy/desperate but still want to get into the celebratory spirit of Cinnamon Bun Day, you can still hot foot it down there and nab the apple jam buns today!

applejamcinnamonbuns2

Full disclosure: I didn’t get paid for writing this post. I just positioned myself next to the table when the five types of bun were revealed and ate A LOT of them during my visit!

To make Apple Jam Cinnamon Buns (makes 12):

For the apple jam:

• 450g peeled apples, finely chopped
• 250g jam sugar (with pectin)
• 1 lemon, juice only

1. Put the apples into a saucepan with some water. Bring to the boil, then simmer until soft.

2. Add the sugar, and simmer gently until it is dissolved. Bring to a rolling boil, then cook on a medium heat for 5 minutes. Add the lemon juice, then test from time to time for a set. You want a slightly soft set – the fruit should be “jammy” but it should not be thick or stiff.

3. Once the jam is ready, put to one side and leave to cool.

For the filling:

• 70g butter, soft
• 3 teaspoons ground cinnamon
• all the cooled apple jam

1. Mix the butter and cinnamon until smooth, then fold in the apple jam.

For the dough:

• 2 teaspoons instant yeast
• 50g brown sugar
• 60g butter
• 150ml milk, scalded and cooled
• 1 egg
• ½ teaspoon salt
• 1 generous teaspoon nutmeg or mace
• 325g strong white flour

1. First thing – whisk the egg and divide in two. You need half for the dough, and half for the glaze.

2a. If using a bread machine: put one portion of the egg and the rest of the ingredients into the mixing bowl. Run the “dough” cycle. Simples!

2b. If making by hand: put the flour and butter into a bowl, and rub with your fingers until the butter has been incorporated. Fold in the salt, sugar, cardamom and yeast. In a separate bowl, combine the milk and one portion of the egg, then pour into the dry ingredients. Stir with a spoon, then work with your hands until you have a smooth, stretchy, silky dough (at least 5 minutes). Leave the dough a warm place for an hour until the dough has doubled in size. Knock back and knead again for 2-3 minutes.

3. Once the dough is ready, turn it onto a floured surface. Roll into the largest rectangle you can. Spread with the filling, then roll up into a sausage. Use a sharp knife to cut into 12 slices.

4. Lay each slice, cut face up, on a bun case. Cover with cling film or a damp teacloth and leave to rise for at least an hour until doubled in size.

5. Preheat the oven to 200°C. Take the remaining egg (remember that?) and mix with a tablespoon of water. Brush the buns with the egg wash. Bake for about 12 minutes until golden. If they are browning too quickly, cover loosely with tin foil.

6. When the buns are done, remove from the oven and brush them while still warm with the hot glaze.

For the glaze:

• 50g soft brown sugar
• 50ml water

1. Put the sugar and water into a small saucepan. Bring to the boil for about a minute.

Worth making? Utterly delicious! These are like compact apple pies and add a whole new dimension to making cinnamon buns. I’m a convert!

19 Comments

Filed under London, On Location, Recipe, Sweet Things