Tag Archives: weihnachtsgebäck

{11} Bauernbrötchen

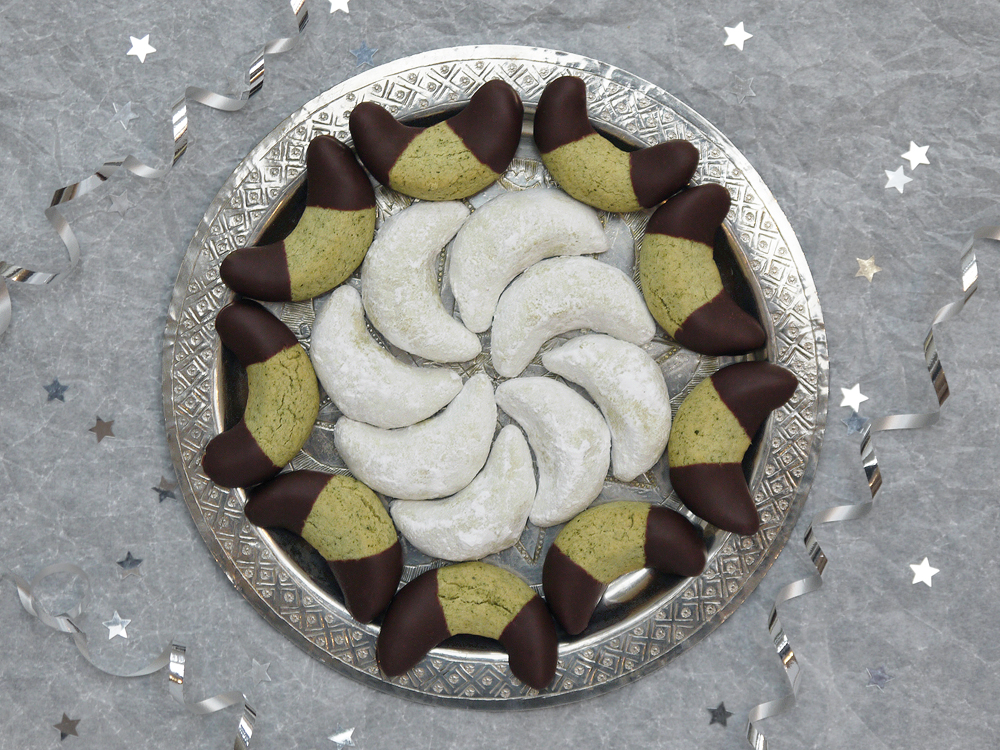
We’ve already had one culinary jaunt to Austria this year with our pumpkin seed crescent cookies, and we’re going back for our penultimate recipe: Bauernbrötchen which translates as “farmers rolls”. But plain and rustic little breads these certainly are not!


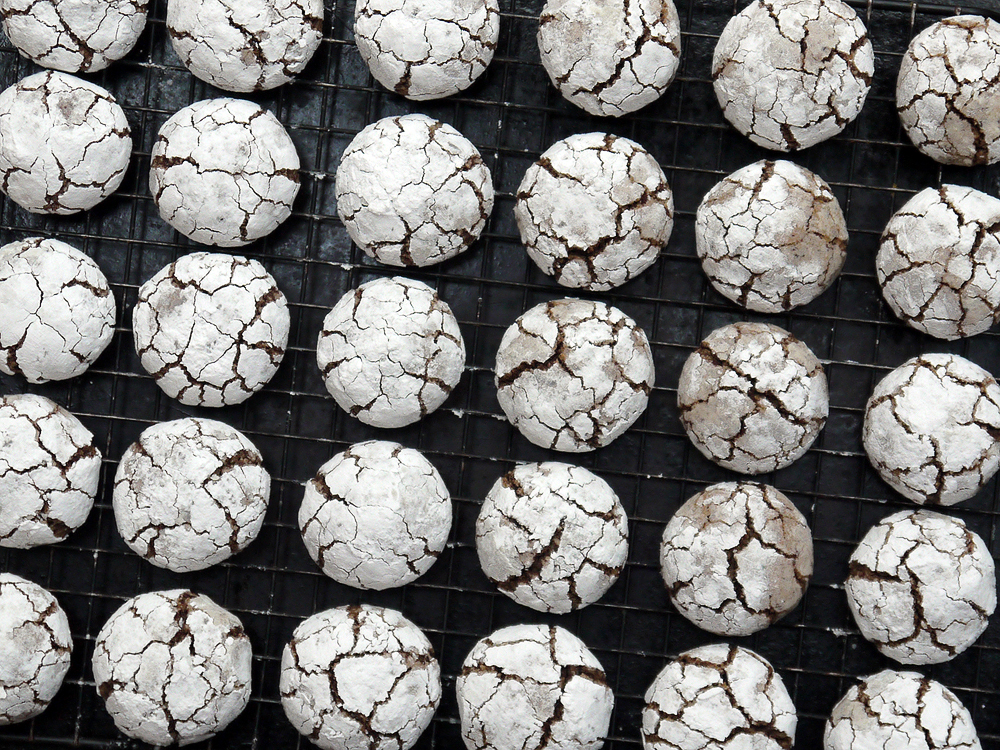
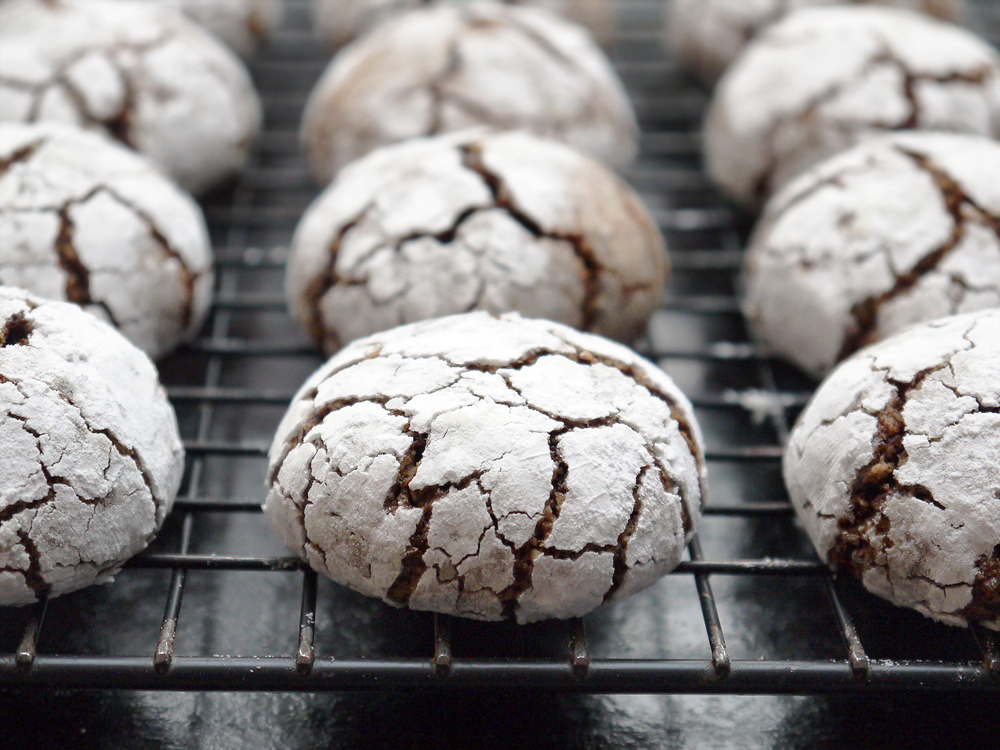
At first glance, these seem to be chocolate crinkle cookies. They look like they contain chocolate, they are white and have that distinctive cracked appearance. Have I just made some of those and called them Austrian?

Of course not! But maybe these are their ancestors from the old country? I did look to see if I could find out more about how these cookies got their name, but drew a blank. My first guess was that it is something to do with the fact they use a lot of nuts, and that nuts were prevalent on farms. Of course this theory fall down quickly – the recipe uses a lot of chocolate, which is historically a luxury ingredient. My second guess, which seems more likely, is that they have more than a passing resemblance to large loaves of Austrian rye bread which is coated in flour with decorative cuts. Which theory do you think is right? It’s got the be the second, right?

Anyway, the method and ingredients  for making these is very different from crinkle cookies. They are made mostly with ground nuts and grated dark chocolate, with just a little flour to hold everything together. So in my book, that makes them even better than crinkle cookies. They are rich but also substantial and taste very, very festive. They also skip spices or citrus flavours, so provide something different on a holiday cookie plate too. I also really like the random cracked appearance which is a real contrast to perfectly identical cookies.


For the nuts, I have used walnuts. These seem to be common in many recipes, and in my mind this is also a very Austrian ingredient. It features in Austrian baking, but there is also a giant walnut tree growing in the garden of the parents of an Austrian friend down near the Slovenian border. So in my head, they make a lot of stuff with walnuts there, and that was what I would do.

However, you can make some adjustments if you want (or depending on what you have to hand). Almonds, hazelnuts, cashews or pecans would all make fine substitutes, either on their own or in combination. I would steer clear of pistachios and pine nuts simply because their flavour would vanish in these cookies and they are are at the pricier end of the nut world.

There are also recipes (including on the Dr Oetker website) which use coconut. If you’re a coconut fan then I am sure this would work, but you may wish to use a mixture of coconut flour and coconut flakes as I can see the recipe remaining too moist otherwise. I’ve had past experience using using coconut flakes when I should have been using coconut flour. So take this with a warning that I have not tested this – if you want to have a go with coconut, do let me know how it works out.

You will see that some of the cookies have a lovely white appearance, while others are more mottled. This was due to oil from the nuts and chocolate coming to the surface during baking. It does not affect the taste in any way, but the easy way to fix this is double rolling. When you shape the cookies, you roll them into a ball, then roll them in icing sugar. Fill the whole tray, then roll each one again in icing sugar. This created a slightly thicker coating, and gives you that picture-perfect crinkle look.


I was pleased with how these turned out – they are pretty easy to make, and the only pain was grating the dark chocolate. With hindsight I might have done this in a food processor. I did it by hand, and chocolate on a grater goes crazy. It creates lots of static, with small pieces of chocolate flying everywhere. I’m not sure there is really anything you can to prevent this, but it is just useful to know so that you’re not wearing your best white clothes as you do this, and at least you are prepared for the mess. Good luck!

And finally, the taste test. The flavour is really good – in spite of containing a fair amount of sugar and chocolate, they are not particularly sweet. The flavour is delicious, rich and nutty. The combination of lots of walnuts with chocolate gives them what I think of as a very “central European flavour”. They also keep very well when stored in a tin. Indeed, I think they actually improve over a couple of days, which is helpful when the recipe makes 50!

To make Bauernbrötchen (makes around 50)

For the dough

• 3 medium eggs, separated
• 1 teaspoon vanilla
• 150g white caster sugar
• 250g ground nuts (traditionally walnuts)
• 160g grated dark chocolate
• 60g plain flour

To decorate

• icing sugar

1. Put the egg yolks, sugar and vanilla into a large bowl. Whisk until light and thick (around 3-4 minutes).

2. Fold in the ground nuts and grated chocolate. The mixture will seem very thick and dry.

3. In a separate bowl, beat the egg whites until you reach soft peaks. Vigorously mix the egg whites into the main mixture until evenly combined. Finally stir in the flour – the mixture should be soft and slightly sticky. Cover and leave to rest overnight.

4. The next day, preheat the oven to 175°C (345°F) and line a baking sheet with greaseproof paper.

5. Take generous teaspoons of the mixture (around 25g) and form into a ball. Roll in the icing sugar, then transfer to the baking sheet. Repeat until the tray is filled, leaving 5cm between each cookie to allow for spreading. At this point, you can re-roll each ball in icing sugar to get a good, even, thick coating.

6. Bake the cookies for 14 minutes, turning the tray half-way to get an even bake. Remove from the oven, allow to cool for a moment (they are very soft when hot), then transfer to a cooking rack.

Leave a comment

Filed under Christmas, Recipe, Sweet Things

{9} Kürbiskernkipferl

You missed me? I normally try to get all my festive baking done before Christmas day so that I can then relax and enjoy my bounty over the holidays. However this year was busy (plus I started late!) and I figured that it made sense to take a little break rather than rushing to complete everything by a self-imposed deadline. Was it the right thing to do? Of course! Less stress for me in the kitchen, and now I’m feeling a renewed sense of enthusiasm after my mini-hiatus.

So here is the final tranche of festive recipes. Today we have Kipferl. These are traditional shortbread cookies that appear across Germany, Austria and Hungary (plus other countries – borders and culinary traditions rarely match easily). They are shaped into crescents, baked and then, while still warm, coated in vanilla-flavoured icing sugar.

Kipferl are traditionally made with ground walnuts, but other flavours also work well. I’ve made these before with cardamom and pistachio, but this year I decided to add a twist by using a quintessentially Austrian ingredient – these cookies are Kürbiskernkipferl, or pumpkin seed crescents. Green pumpkin seeds are used in Austrian cooking and baking, sprinkled on breads and salads, and most famously, turned into oil.


Pumpkin oil is a speciality of the southern Austrian region of Styria. I’ve been on holiday there, and seen fields and fields of the things. I assumed they were grown for their flesh, but no – the prize is those seeds. They are pressed to extract their oil, which is deep green and has a delicious nutty flavour. Indeed, it is so valued that it is referred to as “green gold”.

I’ve also been warned by two separate Austrians that if you are travelling by plane with the stuff, you need to keep it in your hand luggage, and then open it mid-flight to release a build-up of pressure, otherwise the container with shatter and ensure that everything nearby is coated with a deep green oily stain that can never be removed.

Thankfully, you can also buy pumpkin oil it in delicatessens. And if you see it, buy it! It is wonderful in dips, and drizzled on salads, risotto or even ice cream.


You might be looking at the pictures and wondering whether these cookies really are that green? I thought the same thing. I assumed other bakers had added green food colouring to get the bright shade. This assumption appeared to be validated when I ground down some pumpkin seeds, as the mixture looked rather grey. Even when the dough the colour was still rather muted. But during baking, I was proved wrong. The colour appeared and I can only assume that the oil is released and that is what gives you this pretty shade of green.

One important thing to know when making this recipe is that the dough will seem quite dry. This is because I have added cornflour to help the cookie keep their shape and to give them a crumbly texture once baked. For this reason, when shaping the cookies you just need to form the dough into balls and then press them into a crescent shape with your fingers. The traditional way to do it is the roll the dough out between your hands and form a horseshoe shape, but this dough is too fragile for that. Just make sure you avoid adding any water to the dough – it will completely change the consistency and they won’t bake properly.

Once you have shaped, baked and witnessed the miraculous colour change, you need to finish your Kipferl. Traditionally this is by dipping them in vanilla-perfumed icing sugar. In fact, you want to dip them twice. The first time when they are warm, which means that the butter in the cookies mingles with some of the icing sugar to form a sweet coating. Once they are cool and you are ready to serve them, roll them again briefly so they look snowy-white and pristine. This is also a good way to disguise any cracked cookies, so if they come out of the oven and look less than perfect, icing sugar is going to cover it all up.

However, there is also an alternative. Show off that green colour by just dipping the ends into dark chocolate. They taste great, look pretty and have more than a passing resemblance to Swedish cakes that look like vacuum cleaners (really!).

To make Kürbiskernkipferl (makes around 20):

For the dough

• 60g pumpkin seeds
• 100g plain flour
• 25g cornflour
• 80g butter
• 50g white caster sugar
• 1/2 teaspoon vanilla extract
• generous pinch of salt
• 1 egg yolk

To finish

• icing sugar or dark chocolate

1. Put the pumpkin seeds into a food processor and grind to a fine powder. Mix with the flour and cornflour, and set aside.

2. In a large bowl, cream the butter, sugar, vanilla and salt until smooth. Mix in the egg yolk, then fold in the flour/pumpkin seed mixture. Mix to form a dough. It should be firm and seem quite dry. Wrap in cling film and chill for an hour in the fridge.

3. Preheat the oven to 175°C (345°F) and line a baking sheet with greaseproof paper.

4. Remove the dough from the fridge. Divide into 20 pieces – each is around 15g – and roll briefly into a ball. Place on the baking sheet, then use your fingers to form into a crescent shape.

5. Bake the crescents for around 15 minutes until lightly golden (turn the tray around half-way to get an even colour and bake).

If coating in icing sugar…

6. Put icing sugar into a wide bowl.

7. Remove the cookies from the own. Allow to cool for a moment, then transfer a few of the hot cookies at into the icing sugar, ensuring each is completely covered. Remove when coated, then leave on a wire rack to cool completely. Keep going until all cookies are covered in sugar.

8. Re-dip the cookies in icing sugar just before serving.

If dipping in chocolate…

9. Let the cookies cool completely.

10. Melt and temper your chocolate (BBC Good Food will explain all).

11. Dip one end of a cookie in chocolate, allow the excess to drip off, then dip the other. Transfer to a baking sheet. Repeat until all cookies are done. Leave to set.

Leave a comment

Filed under Christmas, Recipe, Sweet Things

{7} Hausfreunde

It is nearly Christmas, so we really need to have something with chocolate. On today’s cookie platter we have Hausfreunde, which are little German cookies made of shortbread, filled with apricot jam and marzipan, and topped with dark chocolate and walnuts.


I also find the name to be is utterly charming. Or I did. I translated it as “friend of the house” or “family friend”, but thought it might be good to double-check in case my German is rusty. According to the website of the Langenscheidt dictionary (which I spent hours leafing through in paper form when learning German all those years ago, and hence now have no need for Google Translate) it can also mean “lover”. So I was sitting there thinking that these were adorable, and the name reflected that they are wholesome and traditional and familiar at the most magical time of the year. Certainly I found the flavour to be very traditional, if anything on the less sweet side, and that felt like a nod back to times past. But now I am left wondering if they are a nod to forbidden fruit, and a platter of these little guys is more about irresistible temptation? I may, perhaps, be over-thinking this.

They certainly look impressive, and you might think they are difficult to make. Certainly there are a number of steps, but each is individually fairly easy and the recipe lends itself to being made over a couple of days.

But, of course, I did decide to make life a little harder than it has to be. This is mainly because in London we’re kind of not really going anywhere indoors at the moment, and I’ve had my fill of multiple trips to the local funfair in the freezing cold. Yes, once again socialising means lots of standing outside in the cold, or being harassed to hold yet another online game of bingo for a bunch of 6 year olds on Zoom. You can see why pottering (hiding?) in the kitchen is so appealing.

So what did I do? It was the marzipan. I could have used the perfectly good and high-quality marzipan I already had in the baking cupboard. But no, I decided to have a go at making it myself. I’d already done it with my Goan Marzipan sweets, so when on a roll keep rolling.

For these cookies, I used this recipe from Anna Olsen, and it is pretty straightforward. You make a syrup of white sugar and acacia honey, then pour the hot mixture onto almonds and mix it well. The flavour is good, so it is nice to know that it is very easy if you want to make marzipan with other nuts: pistachio, hazelnut and walnut are all options to explore. I get the creeping feeling we’ll get a lot of time to practice things in the kitchen come the new year…


The flavour of these cookies really is excellent. The combination of shortbread, apricot, marzipan and chocolate really is a winner. They have that “central European Christmas” flavour vibe and I’m here for it. I started out wondering whether such a labour of love was worth the effort, but I was pleased to discover that it was. They are surprisingly not particularly sweet and seem all the more sophisticated for it.

Now, are there any tips I can share with avid bakers keen to embark on a grand project? Really, it is just about the chocolate. It is best if you temper the chocolate so that it looks shiny and has a pleasing crack when you bite into the cookies. The easiest way I have found is to put chocolate in a bowl, and microwave for 30 seconds. Stir. Another 30 seconds. Stir. Another 30 seconds. Now the chocolate should be starting to melt. Now microwave in 10 second bursts, stirring after each. The key is you want to just melt it but to keep the temperature as low as possible. Basically chocolate in bars has been tempered, and it will return to that state if you melt it only slightly. But if you’re keen to get more scientific, then BBC Good Food will explain all!

Speaking of chocolate, I’ve suggested melting 300g (about two bars) of dark chocolate for dipping. This seems (and is) a lot, and you won’t use anywhere near all of it. But it makes it much easier for the dipping stage. Once I’m done, I just spread it onto a sheet of greaseproof paper and let it set. Then just break it up and use it in another recipe (unless someone else in the house finds it first and eats it).

So, Liebe Leute – we’ve passed the half-way mark in the 2021 edition of the Twelve Bakes of Christmas. I hope you’re enjoying them, and that they may even have provided a little inspiration. And I promise there is more chocolate to come!

To make Hausfreunde (makes 24)

For the dough

• 225g flour
• 25g cornflour
• 75g icing sugar
• 165g butter
• zest of 1/2 lemon

• 1 1/2 teaspoons vanilla extraxt
• 1 medium egg, beaten

For the marzipan

• 125g ground almonds
• 1/2 teaspoon almond extract
• 100g caster sugar
• 45g acacia honey
• 1 tablespoon water

To assemble

• 200g apricot jam

To finish

• 300g dark chocolate
• 24 walnut halves, lightly toasted

Make the cookies

1. Put the flour, cornflour and icing sugar in a bowl. Mix well and set aside.

2. In another large bowl, beat the butter until light and fluffy. Stir in the lemon zest and vanilla. Add in the dry ingredients. Stir in the beaten egg until you have a soft dough – if it is sticky add a little more flour.

3. Wrap the dough and chill for an hour, or overnight.

4. Time to bake. Preheat the oven to 180°C (355°F) and line a baking sheet with greaseproof paper.

5. Roll the dough out to around 1/2 cm (1/4 inch) and cut out circles (5m diameter). Keep going until you have 48 discs. You will need to bake them in batches.

6. Transfer the cookies the baking sheet. Bake for around 10-12 minutes, turning half-way for an even colour. The cookies should be lightly golden when done. Leave to cool.

Make the marzipan

7. In a heatproof bowl, mix the ground almonds and almond extract.

8. Put the sugar, honey and water into a pan, and heat until the sugar dissolves. As soon as it comes to a rolling boil, pour the syrup onto the almonds and work to a paste with a silicone spatula. When smooth, wrap in greaseproof paper and leave to cool at room temperature.

Assemble the cookies.

9. Match the cookies in pairs by size (there is always some variation in size no matter how careful you are).

10. Warm the jam in a saucepan. Sieve if you want (you don’t have to), then add a teaspoon of apricot jam to each base (keep some jam back for the tops of the cookies). Gently place the partner cookie on top, and leave for a moment so the jam can set.

11. Marzipan time! Knead your marzipan (if it is very stiff, you can add a few drops of water to soften it). Sprinkle a worktop with icing sugar, and roll the marzipan out to around 4mm. Cut out marzipan circles using the same cutter as you did for the cookies (5cm diameter). Brush the top of each cookie with the remaining jam, then place a disc of marzipan on top. Press down gently.

Time to dip in chocolate!

12. Melt and temper your chocolate (BBC Good Food will explain all).

13. Dip the top of each cookie into the chocolate so that the marzipan is covered, but the sides of the cookies are left exposed. Let any excess drip off, then flip back the right way up. Immediately place a walnut half on top of the cookie. Repeat until all cookies are done. Leave to set.

1 Comment

Filed under Christmas, Recipe, Sweet Things, Uncategorized

{5} Muskazinen

Today’s festive item is a regional German cookie associated with the town of Dettelbach in northwestern Bavaria. And they come with a delightfully whimsical origin story. Back when Dettelbach was a hotspot on the pilgrim trail, a local baker called Urban Degen sought to capitalise on all that passing trade. He created a spiced sweet, and derived the name from the German word for nutmeg (Muskat). Apparently Herr Degen was rather vain, and felt himself to be the best-dressed baker in town. As a tribute to himself, he shaped his sweets into the form of a bow tie.

The cookies themselves are fairly dry and crunchy, which is often the case with traditional bakes that needed to keep for extended periods. They are heavily spiced, with a lot of nutmeg.  Various different versions do exist, with a number of bakers in the town of Dettelbach selling versions based on their own secret recipes. I have used a recipe from the excellent site of Milk and Hanni which includes spices, walnuts and candied peel. I absolutely love them – spiced, fruity, crunchy and a really interesting bake with gives you the sense of something with a bit of history to it. They also keep very well in an airtight jar, so good to have on hand for your morning coffee or tea in the afternoon.

I have to confess when I first came across these, the shape did not scream “bow tie” to me. I thought they looked more like bunches of wheat which had been bound in the middle.  I did hunt high and low for the right mould, but the only one I could find was on Etsy and had been sold some time ago. My search for an exact match was otherwise fruitless. Either this is the must-have kitchen accessory for 2021, or they are just really hard to track down.

But fear ye not – I was able to buy a wooden shell mould which did the trick just as well. If you want to have a go and are struggling, a madeleine pan may work, or you an just form shapes freehand. They will taste as good, and it can be a good creative outlet on dark evenings.


The dough is really easy to make, with the art being in making the shapes. There is no fat in the recipe, so the dough is rather sticky. I tried using flour and icing sugar in the mould, but the cookies kept getting stuck (meaning I had to clean the mould, which delayed proceedings). It turns out the easy fix was to roll a ball of dough, put it on the tray, cover in cling film, then press the mould on top. Just like that – perfect little scallop shapes! They might not be bow ties, but I still think they look adorable.

One of the features of muskaziner is that when they bake, they puff up and develop “feet” similar to macarons. After shaping, it is essential to leave the surface to dry out (in this case, overnight) so that in the oven, all the lift in the cookie is directed downwards. It is a similar approach to making highly decorated German Springerle or  Swiss Chräbeli.

To make Muskazinen (makes around 60 cookies), recipe by Milk and Hanni

• 250g plain flour
• 1 1/2 teaspoons baking powder
• 75g finely chopped walnuts
• 1 teaspoon ground nutmeg
• 1/4 teaspoon ground mace
• 1/4 teaspoon ground cloves
• 2 teaspoons mixed spice 
• 1 1/2 teaspoons cinnamon
• 40g candied citrus peel
• 2 medium eggs
• 200g white caster sugar

1. Mix the flour and baking power. Set to one side.

2. Finely chop the walnuts, and then the candied peel. Put in a bowl with the spices and mix well. Set aside.

3. Put the eggs and sugar into a large bowl. Beat for at least 5 minutes until the sugar has dissolved and the mixture is pale and fluffy.

4. Add the nut-spice mixture and stir. Fold in the flour to form a dough.

5. Pinch off portions of the mixture and shape (freehand or using a mould). Place on sheets of greaseproof paper.

6. Leave the sheets of cookies to dry at room temperature overnight.

7. To bake, pre-heat the oven to 200°C (390°F). Bake the cookies for around 8 minutes until risen and lightly browned.

1 Comment

Filed under Christmas, Recipe, Sweet Things, Uncategorized

{6} Schwarz-Weiß-Gebäck

Today’s post is one that I’ve been in a bit of a muddle as to what to call it, as it seems to span borders. In German these cookies are called Schwarz-Weiß-Gebäck (black-white-cookies) but they also pop up in the Czech  tradition of vánoční cukrovi (Christmas sweets), which involves making lots and lots of cookies on the off chance you get visitors. And those Czechs have a name that just trips off the tongue…the very simple linecké dvoubarevné těsto, which as far as I can make out means Linzer two-coloured dough.

On the one hand, these cookies are easy – it is a simple rich butter dough which is quick to prepare. You just make one big batch, split in two, and colour one portion with some cocoa powder. So far, so easy. But the fun bit is when you have to combine the two doughs into all manner of different shapes and patterns. If we’re staying with the Czech terminology, you’ve got the choice of chessboards (šachovnice), pinwheels, (závitky) or salami (salam) – this last one is for those that don’t have a lot of time, or a good way to use up the scraps after you’ve made the intricate shapes!


I have something of a soft spot for these cookies, and I remember making them when I was very young. Or perhaps I just remember them being made while I watched? I’ll admit my memories of being a young child are not exactly crystal-sharp these days. But they do have a definite retro charm to them – they look striking and intricate, but this is nothing to do with layers of icing or complicated decorative techniques. And they also taste delicious – slightly sweet and buttery with vanilla and chocolate. Getting them looking good is just down to someone taking the time and having the patience to prepare everything very, very precisely.


While these might look complex, don’t be intimidated. The dough is done in about 5 minutes, and the design just needs time. Put the radio on and list to carols, a play or one of those overviews of the year that we’re about to finish, and it’s a great little job to take your mind off things. The chess pattern takes the longest, but all you are really doing is cutting strips of each dough which have the same width and height, and then building an alternating pattern. It’s not unlike playing with those number blocks we used to have in school for counting! The spiral is the easier option, as you just need to get two pieces of dough on top of each other and then roll it up like a small carpet.

Another approach which I’ve seen but not tried is to roll the dough as for plain cookies, then use smaller cutters to cut out shapes – so you can cut out a large dark star and a large plain star, then use a small circle cutter to swap the centres of each to get the contrast. And of course, when you have all the scraps left over, you just gather then up and make a marbled salami cookie – tastes as good as the rest, and an easy one to do with small children.


I was also very pleased with how these cookies turned out. They are cut just half a centimeter thick, and as there is no baking powder in them, they don’t spread or change their shape. So they are very thin, very crisp and I think really quite elegant. I think they look a little bit like the sorts of fancy cookies you see in a chocolatier or a patisserie wrapped in film with a little golden bow. And who knew that all you need to achieve the same thing at home is just patience, patience and more patience?

To make Schwarz-Weiß cookies (makes around 40-50)

For the plain dough

• 175g butter
• 110g caster sugar
• 1 teaspoon vanilla extract
• 1/4 teaspoon salt
• 1 egg yolk (reserve the egg white to assemble the cookies)
• 250g plain flour
• cold water

For the dark dough

• 10g cocoa powder

1. Put the butter, sugar, vanilla and salt in a bowl and beat until well combined. Add the egg yolk and mix well (keep the egg white for assembling the cookies). Add the flour until the mixture forms a crumbly dough. Add just enough cold water to get it to come together to make a firm dough (be careful with the water – add just half a teaspoon at a time – you really don’t need much).

2. Once you have your dough, divide it in two (ideally weigh it to be precise). Wrap one part in cling film and put in the fridge. Put the other half in a bowl, add the cocoa powder, and mix well until you have an even colour. Wrap the dark dough in cling film and put in the fridge. Leave both doughs to chill for at least an hour.

3. Time to make some patterns! Remove the dough from the fridge, and work it briefly so that it becomes malleable.

3a. Checked cookies – the time-consuming method. Roll out each piece of dough to 1 cm thickness (keep them separate). Now use a sharp knife to slice them into 1 cm strips. Once you have done the dark and light dough, start to build up the pattern. Take the first colour, the other, and alternate to make the first layer, brushing the pieces of dough with some beaten egg white to ensure they stick properly. Now build the second layer, being sure to alternate the colour (so if you started layer one with the light dough, start layer two with the dark). Repeat for the third later. Press everything to ensure you’ve got straight sides (or as straight as possible without squeezing too hard and ruining the pattern you’ve made!). Wrap the log in cling film and chill for at least 30 minutes, or overnight.

3b. Spiral cookies – the easier method. Roll the light dough to a rectangle of 20cm x 15cm and 1/2 cm thick. Do the same with the dark dough. Brush the light rectangle with lightly beaten egg white, and place the dark on top. Press gently. Brush the top with more lightly beaten egg white. Now roll it up from the long side like a Swiss roll. The dough might look like it is cracking initially, but don’t worry – just keep rolling it up tightly, then when you are done, roll it back and forward on the worktop to get as good a perfect cylinder as you can. Wrap it in cling film and chill for at least 30 minutes, or overnight.

3c. Marble cookies – the easiest method. Break the light and dark dough into chunks, mix them up and press together to create a marbled effect. You can fold and roll it as much as you want, but the more you play with the dough, the less pronounced the different colours will be. Form it into a fat sausage shape, wrap in cling film and chill for at least 30 minutes, or overnight.

4. Baking time. Preheat the oven to 170C (340F) and line a baking sheet with greaseproof paper.

5. Take your cookie log from the fridge. Make 1/2 cm marks along it, then use a very sharp knife to cut clean slices. Like magic, your pattern should appear! Lay them on the baking sheet, and when the sheet is full, pop it in the fridge for 2 minutes.

6. Take the baking sheet from the fridge and put straight into the oven. Bake for around 10 minutes, but watch them as they will burn easily. I found the best way is to bake them for 5 minutes, then turn the tray round to get even colouring. Set the timer for 5 minutes, and keep a close eye on them – as the cookies are thin, those at the edges may bake more quickly than those in the centre. If they need more baking, leave them in for another minute, then check again – remove any which have a slight golden colour, then pop the rest back in for another miniute. I know this sounds fussy, but when you think of all the work that went into making them, you really don’t want to burn them!

2 Comments

Filed under Christmas, Recipe, Sweet Things, Uncategorized

{2} Mandelhörnchen

Today we’re going to celebrate two of the most traditional flavours – chocolate and almonds! I think they are both delicious, so when I saw these nutty marzipan crescents, I knew I had to give them a go. Not only that, but they were also going to be my entry for our Festive Bake-Off at work (well, assuming that they worked!).

As with my Icelandic jólakaka I don’t really have much history to write about these little treats, other than they are very German and part of the wide range of Christmas baking from that part of the world.


This is a remarkably easy recipe, and I think you’re getting a lot of bang for your buck in terms of amount of effort as compared to the end result. The dough is just a simple marzipan, and you don’t even need to worry about letting it rest for hours in the fridge, which makes this a good recipe if you don’t have masses of time to wait.

But let’s be honest, you’re probably still something of an obsessive perfectionist given you’re in the realm of home-made cookies which involve playing around with a thermometer to temper the chocolate for that perfect shine? On that note, if you’re at a loss as to what to get from Father Christmas in your stocking, ask for a digital food thermometer – it’s brilliant for recipes that need a precise temperature. I used to just guess and hope for the best, which led to variable results, and it makes it easier when working with chocolate or making sweets.


So how did I get on in the competitive baking challenge? I submitted them into the “12 Identical Christmas Bakes” category, and I got good feedback, but did lose out to a colleague’s cranberry and orange spiced cupcakes, which frankly were really good. I guess that’s the thing with marzipan – it is often something people really love or really don’t care for. Hey ho…there is always next year!

If you are minded to give these a try, there is one tip I can share with you. It’s about the flaked almond decoration. Lots of pictures online show perfect cookies with whole flaked almonds on them, and I thought I would try to go for that too, but it ended up being a a complete pain to get them to stick to the marzipan after shaping without falling off. It was a case of each movement or slight puff of wind making yet more of them give up. It turns out that it really is a lot easier to roughly chop the flaked almonds. Then when you roll the marzipan in the nuts the adhere perfectly. I think if you went for smaller, fatter crescents then you would find it easier to get larger pieces of almond to stay put, but I had decided on the shape I wanted, and no bag of nuts was going to determine what I did!


One final thing to watch out for is that these cookies can dry out easily if you don’t keep them stored in a sealed container, which is not brilliant when you really want that tender marzipan texture. However, you can easily fix this by storing them in an airtight container with a slice of bread, which is basically magic and makes them soften up after a day or so, which is helpful if you want to make them in advance. Perhaps for a work baking challenge that you don’t win….!

To make Mandelhörnchen (makes around 20)

For the marzipan:

• 250g icing sugar
• 250g ground almonds
• 2 large egg whites, lightly beaten
• 1 teaspoon almond extract

To decorate:

• 150g flaked almonds, roughly chopped
• 1 egg white, beaten

To finish:

• 150g dark chocolate

1. Preheat the even to 160C. Line a baking sheet with greaseproof paper.

2. Make the marzipan. Put the ground almonds and icing sugar in a large bowl. Add the almond extract and mix well. Add about two-thirds of the egg white, and mix well. The marzipan will seem dry and crumble, but keep adding more of the egg white until you get a soft marzipan which holds is shape but is not too sticky. If it gets sticky, just add equal amounts of icing sugar and almonds to get the right consistency.

3. Shape the cookies. Take pieces of dough, around 20-25g (yes, I used my electric scales to get exact pieces) and roll into a ball. Roll on a worktop to form a sausage – mine were 15cm. Brush some egg white on a plate, and roll the marzipan on it to get a thin, even coating, then roll it into the chopped flaked almonds. Transfer the baking sheet and form into a crescent shape.

4. Bake the Mandelhörnchen for around 12 minutes until just turning golden. Turn the baking sheet half-way to get an even colour. Remove from the oven and allow to cool completely – they get firmer as they cool.

5. Melt and temper the chocolate. Dip each end of the cookies in the chocolate, transfer to a sheet of greaseproof paper and leave to set.

Leave a comment

Filed under Christmas, Recipe, Sweet Things

{1} Aachener Printen

Why does this post start with a number?

Well, it has reached that time of year again…Christmas is around the corner, and this year I’ve decided to take on the challenge of making the “12 goodies of Christmas”. I’ve veered away from just doing cookies as there is a lot more festive fare out there. I’ll leave it at that, but there are a few interesting things in the offing in the coming weeks!

That said, for the first post, I am actually revisiting something that I made last year, the famous Aachener Printen.

Printen are traditional German biscuits which originate from the town of Aachen, near the border with the Netherlands. They are made from honey, citrus, spices and flour, but no egg or milk (so good if you don’t/can’t eat dairy, and you can substitute the honey for beet or other syrup if you want a vegan cookie). Traditionally, all those spices made them expensive and they were considered to be health-giving, so they were sold in pharmacies. Mercifully, spices are now available to all of us, and while I make no health claims, but I can confirm they are really very tasty.

This is not, however, a carbon copy of last year’s attempt. I’ve made one seemingly small but fundamental change. The secret is the raising agent. Last time, I used baking powder. This year, I have been pounding London’s pavements in search of a magic ingredient.  After much searching, I managed to track down the thing that the Germans traditionally use – Pottasche, or potassium carbonate. This both gives the dough a “lift” but also causes it to keep absorbing moisture after baking, so the biscuits will become softer with time. As the Printen have sugar crystals in them, this makes for a nice texture contrast too.

That’s the theory. But does it work and was it worth it?

Well, the difference using the potassium carbonate was clear almost right away. The biscuits puffed up much more than last time, and they are softer from the out. Last year, I was left with some rather hard cookies that took a long, long time to soften. No need to wait this time. But if you can leave them, they do get better with time. In short – if you are able, I really, really recommend trying to get your hands on this magic powder!

Another quite nifty little thing about making Printen is that they lend themselves to being made when you have a spare few minutes. You make the dough ahead of time, let it sit for a few days so that the aroma of the spices can develop, then shape and bake them a few days later.

If you’re feeling fancy, you can also dip them in dark chocolate. The soft, spicy gingerbread, crunch sugar crystals and smooth, dark chocolate is quite a revelation. Enjoy!

To get potassium carbonate in London, you can buy this from the German Deli at Borough Market (3 Park Street, London SE1 9AB), tel: 020 7378 0000. Tube: London Bridge.

To make the Printen (makes around 20 large or 40 small biscuits):

• 250g honey(*)
• 25g sugar
• 250g plain flour
• pinch of salt
• 1/2 teaspoon ground cinnamon
• 1/2 teaspoon ground aniseed or star anise
• 1/4 teaspoon ground cloves
• 1/4 teaspoon ground nutmeg
• 50g candied orange peel
• 1 teaspoon potassium carbonate (“Pottasche”)
• 1 tablespoon water or orange blossom water
• 50g candy sugar (the large crystals for coffee)

Stage 1: The dough

Chop the orange peel very finely. Either do this by hand, or pulverise in a food processor.

Put the honey and sugar in a saucepan and heat gently until the sugar dissolves. Turn off the heat and put the pan to one side.

Add the flour to a bowl with the salt, cinnamon, aniseed/star anise, cloves and nutmeg.

Add the orange peel and the warm honey to the flour. Mix until the ingredients are well combined. The dough will be soft initially, but will start to become very firm as it cools.

Place the dough in a plastic container, seal, and leave at room temperature for at least two days. I’ve left it for up to two weeks with no ill effects.

Stage 2: baking the cookies

Pre-heat the oven to 200°C (400°F). Lightly grease a sheet of greaseproof paper.

Mix the Pottasche and the water (or orange blossom water) in a cup until the powder dissolves. Add to the dough and mix until smooth. It doesn’t seem like much, but it turns from being very stiff to quite pliable.

On a lightly floured surface, roll out the dough to 1/2 or 3/4 cm thickness. Sprinkle with the candy sugar(**) and pass the rolling pin lightly over to press the sugar crystals into the dough.

Cut the dough into pieces of 4 x 8 cm (large cookies) or 4 x 4cm (smaller cookies). Place on the baking sheet, and bake for around 12 minutes until risen and brown. Turn the baking sheet half way through.

If you like your cookies to have a nice shine, when they come out of the oven, brush with a simple sugar syrup made with 100g white sugar dissolved in 100ml water (heat in a pan until the sugar dissolves). Store the cookies in an airtight tin – they will keep for several months.

(*) If you want to make a vegan version of Printen, replace the honey with the syrup of your choice, such as beet syrup or dark corn syrup. Aim for something that has the consistency of thick runny honey.

(**) You might have to crush the sugar crystals to make them smaller. The ones I bought were about 1cm long, so I used a mortar and pestle to break them down into pieces of 2-3mm.

Worth making? The ones I made with baking powder last year tasted nice, but these are sensational. If you can get hold of the Pottasche, then these are straightforward and delicious, with the real “taste of Christmas”.

9 Comments

Filed under Christmas, Recipe, Sweet Things