Tag Archives: italy

{12} Pignoli

We’ve made it to the end of another instalment of the 12 Days of Baking! This cycle has gone on a little longer than I planned and well into the New Year, but I’d rather that than pile on the stress of trying to do everything by Christmas Eve. Also, spreading things out gives friends and family a sporting chance of being able to enjoy what I bake, rather than turning it into an endurance event whereby cookies need to be eaten as fast as they are made…

To bring things to a conclusion, we’re finishing with a classic Italian cookie: pignoli.

These morsels are delicious almond cookies, crisp and lightly golden on the outside and with a soft and chewy centre. They are generously coated in pine nuts which toast lightly in the oven. They are simultaneously simple and luxurious. I love their festive appearance which will look good on any cookie tray, but they are equally at home any time of the year with a cup of good coffee for a quiet moment of reflection.


Pignoli originate from the island of Sicily in Southern Italy, where both almonds and pine nuts feature in local cookies. They’ve also made their way to the US, where there are also a favourite in Italian-American families at Christmas.

While my festive baking this year has included some complex bakes, pignoli are (comparatively) easy. One bowl, no resting, no chilling, just roll, coat in nuts and bake. And this is a delightful recipe as it gives you a lot of deliciousness for minimal effort.

When it comes to pignoli recipes, many are based on almond paste, which is mixed with sugar and egg whites. Almond paste is a 50/50 mixture of almonds and sugar, and not the same thing as marzipan here in Britain (marzipan here is typically 25/75 almonds to sugar). However, almond paste is not an ingredient that is easily available in stores here, so I’ve come up with an easy recipe that just uses ground almonds and sugar. It gets us to the same place, and I think it is easier – there is no need to break down a lump of almond paste into a smooth mixture.  Essentially I’m offering a route that involves less work, getting you more quickly to delicious pignoli.


However, even if there is less work involved, we need to be honest. These are clearly luxury cookies. A good amount of almonds, and then lots and lots of pine nuts. This is not a cheap recipe, but hey, they are called pignoli and so pine nuts should be used generously. And you want them to taste of something. I tipped two large bags of pine nuts into a bowl for coating the cookies and assumed I had over-calculated. The rest could be toasted and sprinkled into a salad perhaps? But no. I think I ended up with about a dozen pine nuts left in the bowl at the end. So just a word of warning – get those nuts in, and don’t think you’ll be able to wing it with that half-used bag lurking in the baking cupboard.

If you want to play around with the flavours you can add lemon or orange zest, and they would still be pignoli. Or you could skip the pine nuts and use other nuts to coat the cookies – flaked almonds, or chopped hazelnuts, pistachios or cashews would all work – except that you’re then not making pignoli. They’ll still taste great, but they will be something else. This is, of course, a good way to make a batch of visually different cookies using one basic recipe (or if you ignored my warning and ran short of pine nuts…).

One final point worth knowing – there is no flour, butter or milk in pignoli so these little guys just happen to be naturally gluten and lactose-free. This makes them a great choice if you want to impress and you know someone who needs to avoid either in their diet.

To make Pignoli (makes around 20):

For the dough

• 2 large egg whites
• 175g ground almonds
• 100g icing sugar
• 100g granulated sugar
• 1/2 teaspoon almond extract

To decorate

• 200g pine nuts
• icing sugar

1. Preheat the oven to 175°C (345°F) and line a baking sheet with greaseproof paper.

2. In a large bowl, briefly whisk the egg whites until foamy. Add the rest of the dough ingredients and mix to a smooth dough. It should be sticky but you should be able to form it into balls. If too dry, add a little water. If too sticky, add a teaspoon each of ground almonds, granulated sugar and icing sugar and mix well.

3. Take a teaspoon of the dough (around 25g) and form into a ball. Roll in the pine nuts. Transfer to the baking sheet. Leave around 5cm between each cookie, and keep going until all the dough is used up.

4. Lightly press each cookie to flatten slightly, then bake for 15 minutes (turn the tray around half-way to get an even colour). When baked, remove from the oven, allow to cool on the tray. Lightly dust with icing sugar before serving.

3 Comments

Filed under Christmas, Recipe, Sweet Things

{1} Spongata Di Natale

Season’s Greetings to everyone! Yes, we’re back for the Twelve Days of Festive Baking 2020 edition!

You don’t need me to tell you that this has, quite frankly, been a year that we’d all like to forget. And given what we’ve all been through it makes those chances where we can come together all the more important. Our original plans were for a low-key Christmas at home and the chance to see a few friends, mostly outside and from a distance. And then about six hours ago we got the news that London would be going into a new top tier of lockdown restrictions. Stay home, no household mixing at all, and you can meet one person in a park. It does put a whole new spin on the Judy Garland song “have yourself a Merry Little Christmas”.

I’m a little late to this year’s baking series as I was not actually sure I would do it. In part I wasn’t sure I was in the mood for it when the news seems unrelentingly grim. And working at home, staring at a screen all day, leaves me less inclined to look at a screen in my free time. But then, it’s just not Christmas without lots of home baking and those lovely aromas drifting up from the kitchen. The trying times that we find ourselves in also lend a different slant to this year’s tour of festive treats from around the world. We might be at home, but we can still take a little gastronomic tour in anticipation of being able to actually travel more next year. So here goes!

I’ve been doing my Twelve Festive Bakes for a few years now, and there has been a strong leaning towards cookies. We’re starting this year off with a recipe that swings the pendulum in the other direction, as we’re going to have a go at a sweet festive tart called spongata di natale from the Italian region of Emilia Romagna. To me this seems like something from the renaissance, and the compete opposite of picture-perfect sugar cookies coated in thick, neat icing.


This tart has a rich filling of fruit, nuts and spices wrapped in pastry, which reminded me of British mincemeat pies. I always like to look around at different recipes before having a go at something to get an idea of whether a recipe is very standard or allows some variety. I found quite a few differences among the recipes – some have more nuts, while others favour using figs, jam and other dried fruits. Personally I liked the idea of something that was a bit further from our mincemeat pies – we’ve been dodging them in the UK since mid-October – so I plumped for a version that was big on nuts and citrus, with the filling bound together with acacia honey and flavoured with spices.


The original recipe that I found actually makes 15 of these tarts! While I’m absolutely in favour of sharing the fruits of my baking efforts at this time of year, that was too much even for me. I mean, I could find 14 other people to give them to, but there is that pesky Tier 4 and the need to limit social contact, so it would have been irresponsible of me to visit lots of different homes with baked goods. So I had reduced the recipe by a factor of five, so that I could make three of them. One for me, one for a friend, and a spare in case it was delicious and I regretted giving one away.

The recipe below seems quite long-winded, as I’ve tried to lay out the various steps, but it is actually quite straightforward. You do it over several days, starting with the filling, then you just need to make a fairly simple dough which you roll out, fill, cover and bake. You are supposed to make the filling and leave this to rest, so it’s a good job to do in a chilly evening, so it is ready a day or two later when you’re full of the joys of Christmas and want to spend time fiddling with pastry. I left my filling to rest for three days as suggested in the recipe I looked at, but in all honesty I don’t know that it really makes that much difference. I did not have the patience to make two versions and compare them, but I like the idea of a bit of ritual in making my Christmas goodies, and it also spreads out the mess in the kitchen and the tidying up. But if you make the filling one day and bake the next, I’m sure it will still taste great.

For the filling, I had to work out the spice quantities as the original amounts were ten grams of cloves, one-third of a nutmeg and a stick of cinnamon. I’ve no idea how those convert into tablespoons and teaspoons, so I’ve ended up with amounts that suit my taste. I would recommend going easy with the cloves, as they are a dominant flavour and it can be easy to go too far. I happen to really like it, but remember the old culinary adage – you can always add more. My experience is that the flavour will also intensify over time after baking, so by judicious with the heavy spices like cloves. They work well here with the nuts and honey, but it is very easy to go to far.


One the filling had lingered in the kitchen for a few days, I got round to making the tarts themselves. The dough is simple – it’s a shortcrust pastry that uses white wine rather than water as the binding agent. It might seem a bit silly, but I always think it seems really decadent to use wine like this. And note that the recipe doesn’t make a lot of dough. At first I thought at first that it was never going to work. The key is that you work the dough a lot – it’s a dough, not pastry, and you want some gluten to develop in there. I persevered and duly managed to roll the dough out very thinly. And lo and behold, it worked like a charm. If you have a go at these, it is just a matter of taking time – roll out the base thinly; add the filling gently and pat it down; then cover it neatly, press out any trapped air, and make sure the edges are nicely finished. During baking the dough does not really move, but it will puff up very slightly and taken on a lightly golden colour. If you’ve ever been disappointed by the pastry-to-filling ratio of a British mince pie, then you’ll like the generous filling ratio of a spongata di natale.

I also made one final tweak to finish off the tart. I brushed the cooled tart with a simple water icing to make it a little more festive. This was not in the recipe, but seemed to be in the picture, and helped to make the whole thing seem a little less like a giant mince pie. If you’re going to keep them for a few days, the icing will dry out completely and take on a lightly frosted appearance, further enhancing their festive appeal.


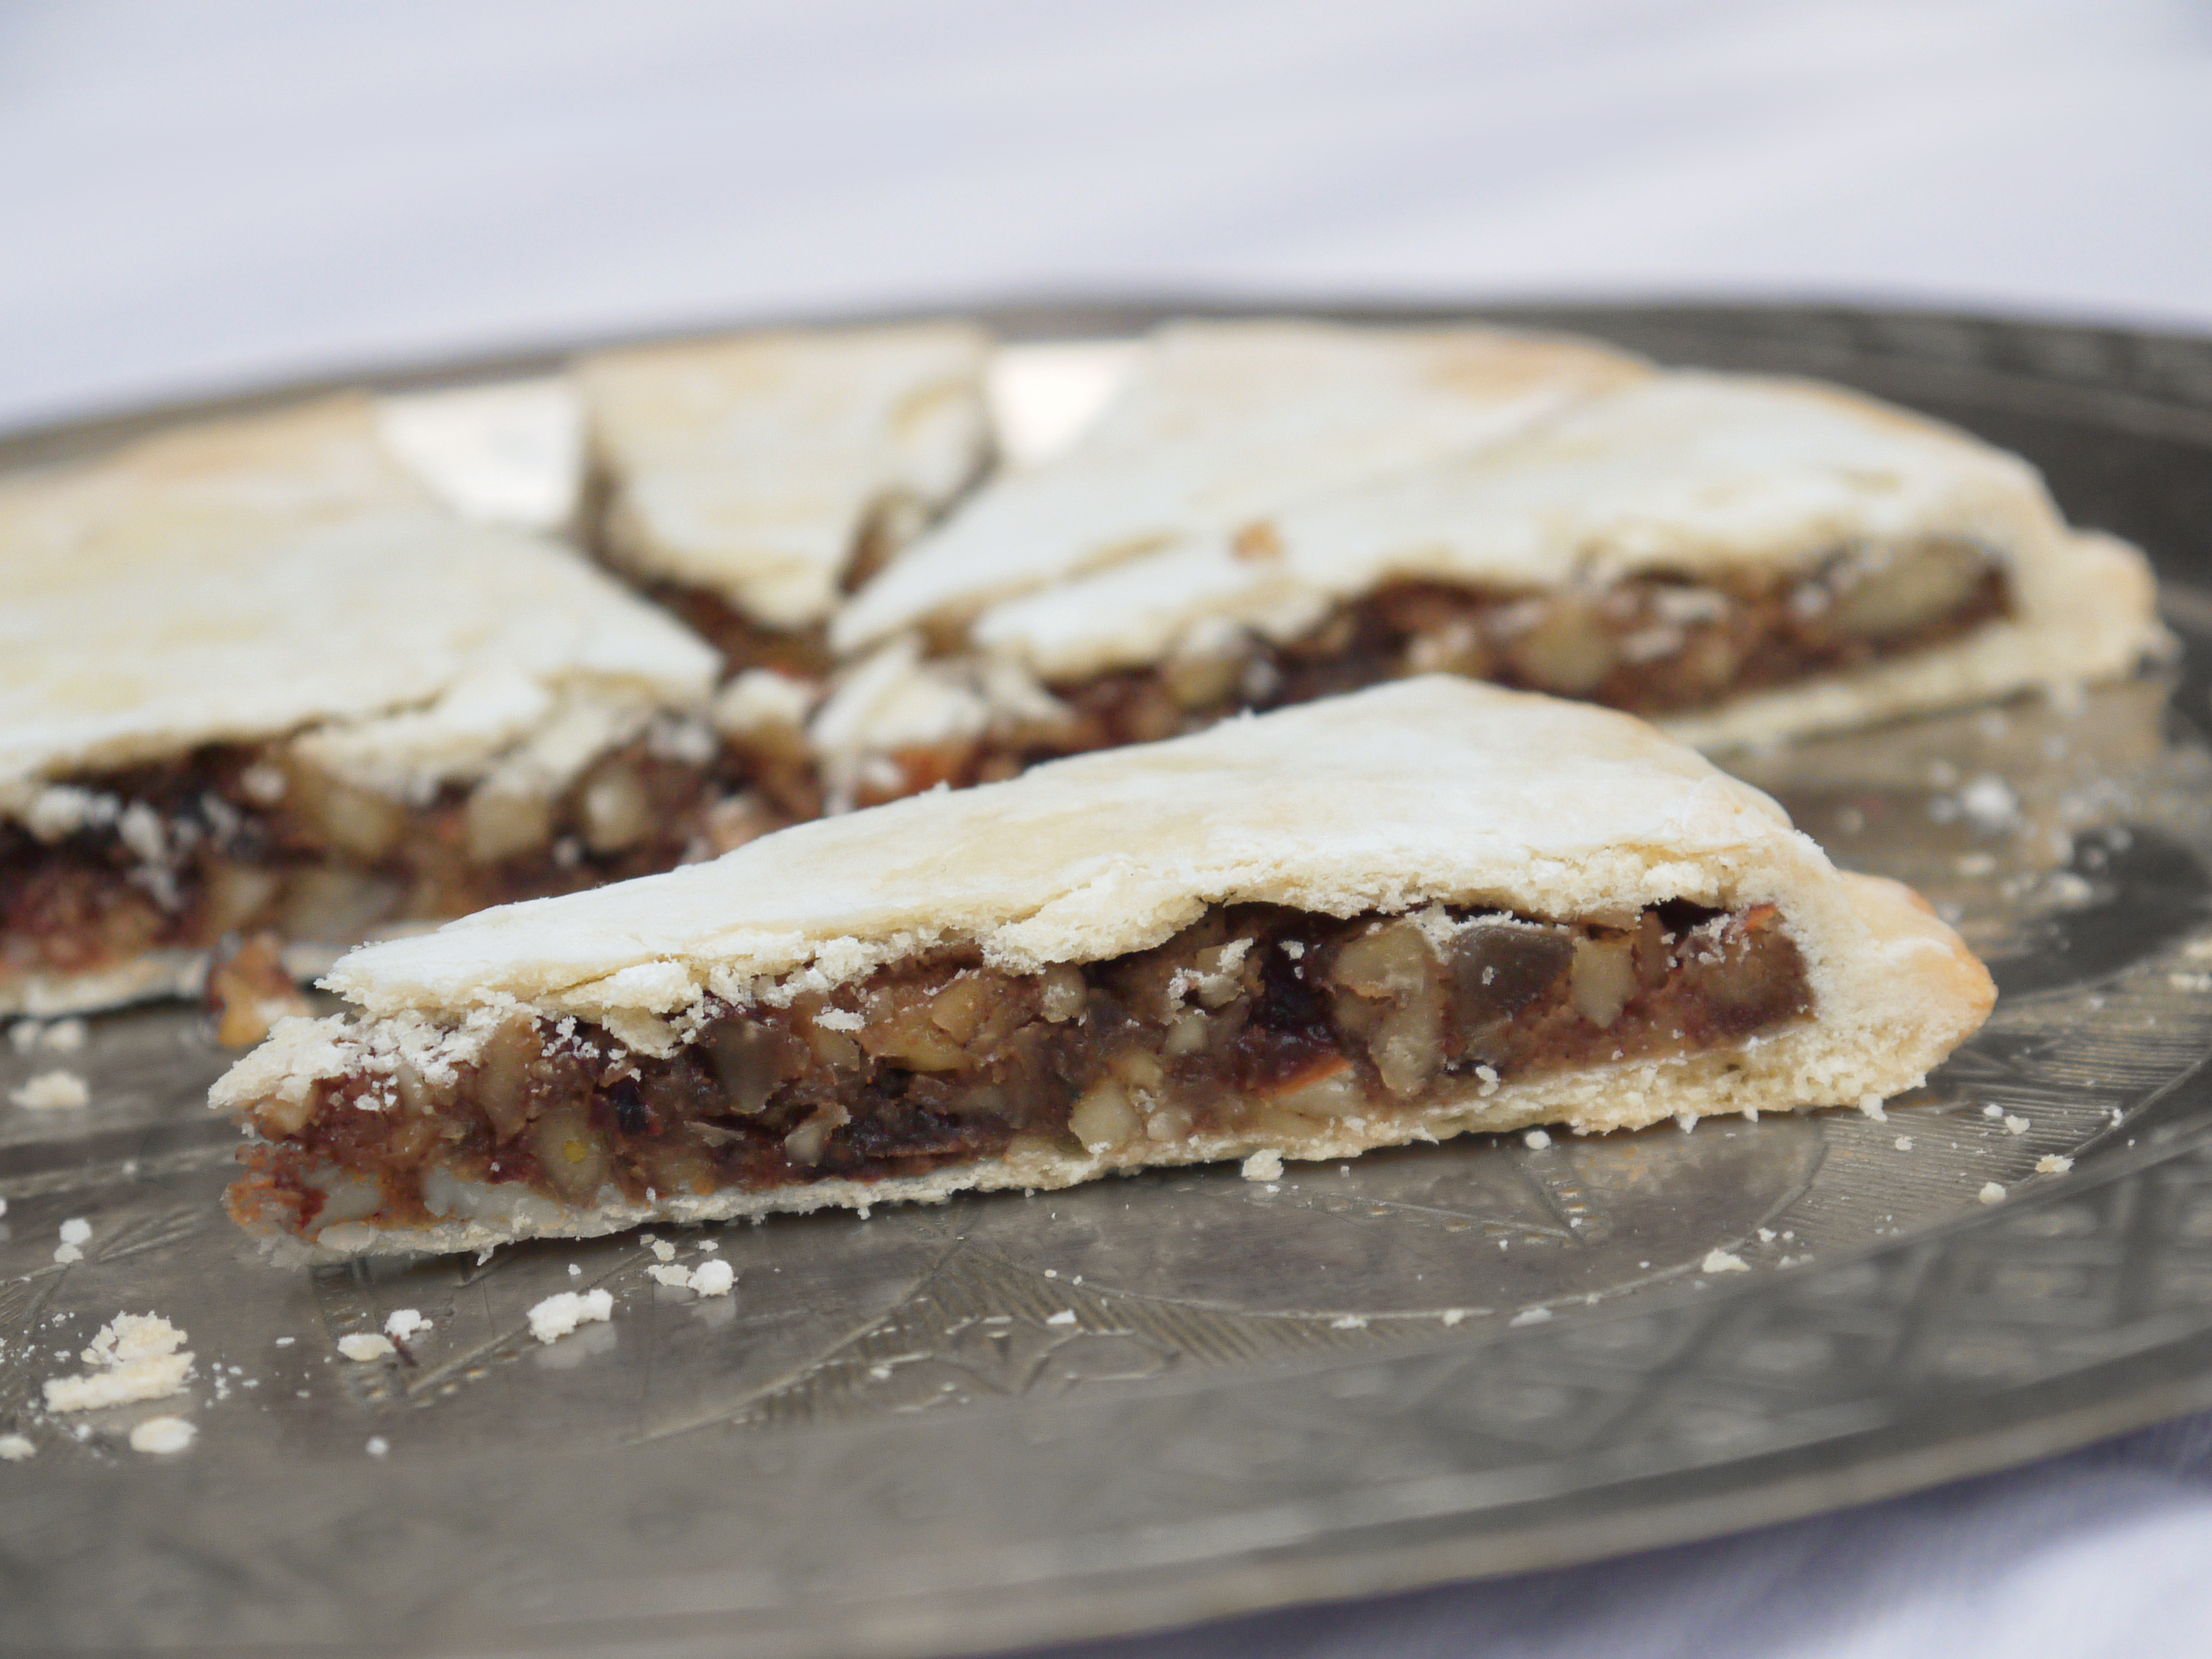
And the verdict? I really like these. They are really delicious, very festive, and they do seem to be quite medieval in their character. The filling is rich, sweet and sticky, and very aromatic, packed with all the things that would have been outrageously expensive to a medieval Italian merchant looking for a good time at Christmas. They cut well into dainty slivers to enjoy with tea, coffee or an espresso for a dash of la dolce vita that we’re all craving this year!

To make spognata di natale (makes 3 tarts):

For the filling

• 40g breadcrumbs
• 40g sultanas
• 4 tablespoons dry white wine
• 100g walnuts, chopped
• 50g hazelnuts, chopped
• 50g almonds, chopped
• 200g acacia honey
• 30g pine nuts, roughly chopped
• 20g candied citron, finely chopped
• 1/4 teaspoon ground cloves
• 1 teaspoon ground nutmeg
• 2 teaspoons ground cinnamon
• 1 tablespoon olive oil
• pinch of salt

For the pastry

• 200g plain flour
• 80g unsalted butter
• 80g caster sugar
• 40ml dry white wine
• pinch of salt

To finish

• 30g icing sugar
• cold water

1. Preheat the oven to 160°C (320°F). Put the breadcrumbs on a baking tray and toast in the oven until just golden. Watch them like a hawk – there is very little time between done and burned! Remove them when done and leave to cool.

2. Put the sultanas and the white wine in a bowl. Microwave for 1 minute, then cover and leave the sultanas for 30 minutes to absorb the wine.

3. In a large bowl, add the chopped nuts, toasted breadcrumbs, pine nuts, candied citron, spices and salt. Mix well. Drain the sultanas and squeeze out any excess moisture (keep the liquid). Chop them and add to the bowl.

4. Gently warm the honey to lukewarm in a saucepan over a low heat. Stir in 2 tablespoons of the reserved sultana wine. Pour it into the bowl, and mix well. Taste the mixture and add any more spices if you think they are needed. The resulting mixture should be sticky and very thick. Cover the bowl, and leave it in a quiet corner either overnight or up to 3 days, at room temperature, for the flavours to mingle.

5. Make the dough. In a bowl mix the flour, sugar and salt. Add the butter and work until it resembles breadcrumbs. Now add enough wine to make a dough which is smooth, shiny and pliable. Knead it for around 10 minutes.

6. Time to assemble the spognata. First, preheat the oven to 190°C (375°F). Mix a tablespoon of wine with the filling, then divide the filling into three (200g) portions, and place to one side.

7. Divide the dough into 6 pieces. Take one piece and place it on a large piece of greaseproof paper. Roll to a thickness of 1-2mm (i.e. very thin). Cut a circle of 25cm – the easiest way to do this is to find a saucepan lid or a dinner plate of the correct size, and use that as a template.

8. Now take one portion of filling and spoon it onto the disc. Gently press it into a disc that covers most of the dough, leaving a 3cm border (i.e. 19cm diameter). Place this on top of the pastry disc.

9. Take another piece of dough and roll out to make another disc. Brush the exposed edge of the first disc with a little water, and place the second disc on top. Press down lightly, then gently use a rolling pin to go back and forwards over the cake a couple of times, then press the pastry down all around the cake to press out any air bubbles. Seal the pastry with your fingers, then cut around the edge with a fluted pastry cutter or a knife. Pierce the top of the spognata several times with a fork – either randomly, or try to make some sort of pattern.

10. Slide a baking tray under the spognata, and put in the oven. Bake for 15-20 minutes until the pastry is golden (turning half-way to get an even colour). Do not leave it in any longer or it will dry out the filling. Remove from the oven and allow to cool.

11. Repeat with the remaining filling and pastry.

12. Finish the spognata either with a dusting of icing sugar, or by brushing the top with a simple water icing glaze.

7 Comments

Filed under Christmas, Recipe, Sweet Things

{11} Baci di Dama

For my eleventh post this year, I decided that I had to make something with chocolate. When I look back at my bakes so far in the 2019 edition of the 12 Bakes of Christmas, I was struck by the fact I’ve only used chocolate once, and I’m not sure that the other recipe with just cocoa really counts.

To rectify this I decided to attempt baci di dama – these are two little hazelnut biscuits sandwiched together with a little dark chocolate. Their name means “lady’s kisses” as they resemble a pair of plump puckered lips ready to lavish romance on someone fortunate. I’ve seen these cookies described as a symbol of sensuality.

Something I am also very curious about is what you think of the pictures I took of these cookies. I tried a few different setups to set a festive mood, some using tinsel, some using ribbon and some with a textured cloth. But none of them quite hit the mark for me, and I felt that I was going to have to resign myself to using shots I was not completely in love with. Then, as I was packing up, I noticed how they were reflected on the white surface and I thought that was the way to capture how they look – a sort of stripped-back, wintery look as if they are reflected in ice. Lady’s kisses, but that lady happens to be the White Queen of Narnia!


I have to be honest and declare that these are not really Christmas cookies per se, it just happens that they look adorable and they have flavours that seem very festive. They were created around a century ago in the city of Tortona in Piedmont, an area famed for its hazelnuts. One story says that they were the creation of a pastry chef in the employ of the House of Savoy, who was asked by Prince Vittorio Emanuele II to create something new. The chef could only use what he had to hand – nuts, sugar, butter and chocolate – and so baci were born. The other story is that they were born of fierce competition between two pastry chefs in Tortona. One created a version using hazelnuts and the other using almonds, and they both sought to obtain protection for their own special creations. Passion and rivalry seem somehow fitting for a cookie symbolising sensuality, not?

I started to do a little bit of digging for the “authentic” way to make these, and they all seem to be a bit of a variation on a theme – ground nuts, butter, flour and sugar in various quantities. But the recipe that really piqued my interest was this recipe from David Leibowitz using rice flour, and I decided to stop there and try that recipe. I liked the idea of using the rice flour as I expected it to provide a particular crispness and slight crunch to the cookies after baking in a way that plain old flour would not.


In following his recipe, I did find that the dough does seem to be very dry when you’re working it. He does recognise this and suggests you just keep working it until it does come together. I kept going and while I definitely noticed that the heat from my hands did help the mixture become more cohesive as I kept kneading, I also knew that I had gone way past the point I would have gone with a recipe using just flour. Ultimately I gave in and added tiny extra amounts of butter to get the dough to form. I didn’t need much, so when I say tiny, I mean tiny. The other option he suggests is adding a tiny amount of water, but this one I was really dubious about. That approach might work if you didn’t need to do too much with the dough, but I was concerned that given all the shaping and rolling of lots of small cookies that the rice flour would absorb the water and the texture would be affected (and that the dough would probably turn crumbly again and be impossible to work when you’re rolling the last of the cookies). The choice is yours, but this is basically a nutty shortbread. I’m Scottish, we’re shortbread experts, and would never add water when making shortbread!

For the hazelnuts, you have a few choices. You can use whole hazelnuts, and gently toast them in the oven until the skins start to come off. You then remove them from the oven, roll them in a teatowel, then carefully pick out the nuts as you try to avoid spreading the pieces of nut skin around your kitchen like brown confetti. I mean it – keep doors closed, as otherwise the slightest puff of wind and you’ll be finding bits of hazelnut skin for months. Otherwise you can use the cheat’s method and use ground hazelnuts, and just spread them on a piece of greaseproof paper on a baking sheet – bake at around 150°C (300°F), checking every few minutes until they are toasted. While less rustic than grinding your own hazelnuts, it does make life a lot simpler!

You don’t need to limit yourself to hazelnuts, although the flavour is delicious and combines wonderfully with the dark chocolate – the success of Nutella alone testifies to a winning combination. However, I think toasted ground almonds would also be good perhaps paired with some milk chocolate, and you could get very creative and use ground pistachios and white chocolate to create a little festive selection.

And in case you’re wondering, what does that rice flour do? It means when they come out of the oven the cookies are utterly fragile – I accidentally brushed against one and it collapsed. But they do firm up and go hard if you leave them, so patience if useful here. The texture is very crisp, and the rice flour and the hazelnuts give them an almost gritty texture (think breadstick rolled in polenta). I really liked it makes for a more interesting biscuit. However, in the interests of science, I also made a few using plain flour. The texture is closer to what you would expect from a nutty shortbread, so if you prefer to keep them classical, go with that. They are both, of course, delicious and they’ve been one of the most popular cookies I’ve made this year. They are wonderful with coffee, and their dainty size means you can easily nibble your way through a few of them without the feeling that you have over-indulged. I mean, you probably have, but you just don’t feel that way!


To make Baci di Dama (makes 40-50) – recipe by David Leibowitz (here)

For the dough

• 140g ground toasted hazelnuts
• 140g rice flour
• 100g unsalted butter, plus more if needed
• 100g white caster sugar
• pinch of salt

For the filling

• 60g dark chocolate

1. Put the ground hazelnuts, rice flour, sugar and salt in a bowl. Add the butter and use your hands to work it until you have a dough. Keep kneading it as the heat from your hands will soften the butter. If you find you’re really struggling to get it to come together, add a tiny amound more butter and keep going.

2. Preheat the oven to 160°C (325°F) and line a baking sheet with greaseproof paper.

3. Divide the dough into 4 pieces. Take the first piece and roll to a long sausage – I did mine 22cm, as I worked out that this would give me pieces of 5g each. Then use a knife and cut into equal pieces. I lined my dough up against the ruler and cut into 1cm pieces – they came out very even.

4. Take each piece of dough and roll into a ball. I found it easiest to press the dough into as round as shape as possible, then to work the dough quickly between my palms to get a perfect sphere. Place each ball on the baking sheet, leaving some room for them to expand. Repeat until you’ve used up all the dough. Do the same with the remaining 3 chunks of dough.

5. Bake the cookies for around 12-14 minutes until they look slightly golden – they will have puffed up ever so slightly, formed little dome shapes, and have slight cracking. Remove from the oven and allow to cool – they are extremely fragile when they come out of the oven, but they will become firm when cool. When they have stabilised, transfer them to a wire rack to cool completely.

6. Once the cookies are completely cool, match them up in pairs of the same size. I recommend you then line them up in rows, one row with the base facing upwards, and its partner immediately above it.

7. Melt and temper the chocolate (the easy way – finely chop all the chocolate. Melt 1/3 in the microwave, then add the next 1/3 and stir until melted, then add the final 1/3 and stir until smooth, and reheat in the microwave for 5 seconds on full power). Put the chocolate in a piping bag, then put a little chocolate, the size of a chocolate chip, onto the base of a cookie, and gently place its partner on top – you want chocolate peeking out of the edges. Keep going until they are all done, and leave to set completely.

2 Comments

Filed under Christmas, Recipe, Sweet Things

{7} Bruttiboni

Sometimes I am all for making something that looks neat and precise, and I get a certain pride when each cookie in a batch ends up looking identical. The most recent case in point was my checkerboard cookies.

However, today we’re going to the opposite end of the scale with these little guys. They’re from Italy and they’re called bruttiboni. The name roughly means “ugly-good” because they look as they look, but the are utterly delicious.

As with many Italian celebratory cookies, their precise origin is not clear. Today they are typical of the city of Prato in Tuscany, and they are also known as brutti ma buoni (“ugly but good”) or the more poetic-sounding mandorlati di san clemente. They are delicious little cookies made from meringue and hazelnuts.


To make them, you start with a simple meringue mixture, which I flavoured with some vanilla and a little hint of cinnamon. I don’t know if the spice addition is tradition, but I think it works well with the flavour of the nuts. Then you fold in ground, toasted almonds and hazelnuts – you can grind them to a fine powder, or leave a few more chunky bits if you prefer a bit more texture. And then…you do something plain weird. You put the whole bowl over a pan of barely simmering water, and then stir it gently. This makes the mixture somewhat looser, and all I can think that this does is to cook the meringue mixture in a similar way to making Swiss meringue. I’ve never come across this technique before, and in fact, not every recipe that I saw for bruttiboni thought this was necessary. One recipe even suggested making a Swiss meringue and just adding nuts. But I’m all for experimentation so I decided to give this strange approach a go.

From what I could tell, this extra step makes the mixture both a little softer and more stable, as once I had done it, the batter certainly seemed to keep its volume. I think it might also have impacted on the texture – these really are nothing like the miniature meringues I had been expecting – there was no brittle exterior and or marshmallow centre. They are more like the sort of thing I would expect from a “traditional” cookie made with flour and butter, so there is clearly some kind of magic at play here. But they do have a crisper outside and a softer middle. And they are, indeed, absolutely delicious!

To make Bruttiboni (makes around 24)

• 125g ground almonds
• 125g skinned hazelnuts
• 3 large egg whites
• pinch of salt
• 140g white caster sugar
• 1/2 teaspoon vanilla extract
• 1/4 teaspoon ground cinnamon

1. Start by toasting the nuts. Preheat the oven to 150°C (300°F). If you are using whole nuts, ground them in a food processor. They can be fine or you can leave chunks for texture. Spread the ground nuts on a baking sheet lined with greaseproof paper, and until the nuts are golden and fragrant (tip: I put them in for 5 minutes with the timer on; check them, then keep doing them in 2 minute intervals, in each case using the timer to make sure they don’t burn). When done, remove them from the oven and allow to cool.

2.When you’re ready to make the cookies, start by preheating the oven to 170°C (340°F). Line two baking sheets with greaseproof paper. Also put a saucepan of water on the stove over a medium heat.

3. Now make the meringue. Get a heatproof bowl. Add the egg whites and salt. Whisk to the soft peaks stage. Now add the sugar, a spoonful at a time, mixing well after each addition, until you have a stiff meringue. Fold in the vanilla and ground cinnamon. Finally fold in the cooled nuts.

4. Now put the bowl over the pan of water – it should be barely simmering. Gently stir the mixture with a spatula for 10 minutes. It will become slightly darker and slightly more runny by the end, but don’t expect to see massive changes.

5. Next, remove the bowl from the heat. Take tablespoons of the mixture and put them on the prepared baking sheet. The neatest way to do this is with an ice-cream scoop, but spoons work just as well. Just don’t expect them to be too neat or too regular!

6. Bake the cookies for around 25 minutes until golden, turning half-way to get an even colour. When done, remove from the oven and leave to cool on a wire rack. The cookies will become firmer as they cool.

1 Comment

Filed under Christmas, Recipe, Sweet Things

{9} Parrozzo

A couple of years ago, I made Marquesas de Navidad, some little Spanish Christmas cakes which at first I thought had some ancient pedigree, but which were actually created in the early part of the 20th century. Traditional recipes and classic bakes are great, but I also think it is nice that new things still appear from time to time.

And today is another fairly new kid on the block. This cake is called a Parrozzo. It was created in 1920 by an Italian gentlemen called Luigi d’Amico, who ran a pastry shop in Pescara in the Abruzzo region of Italy.

However Luigi’s idea was actually a modern take on a traditional local recipe called pane rozzo which means “rough bread”. This loaf had a domed shape and a dark colour due to being baked in a hot wood-fired oven. So his sweet Parrozzo kept the domed shape in homage to the source of his inspiration, and the chocolate glaze imitated the dark colour the bread would have gained during baking.


The Parrozzo is actually an almond sponge. It is traditionally flavoured by the judicious use of a few bitter almonds to provide the distinctive flavour. I’ve written already this year about how these can be risky if eaten in quantity, but I’ve taken the lazier route of using normal (sweet) almonds and added some almond extract. Some recipes also use lemon zest, which I’ve opted to use as I think it works very well with almonds, and lifts the flavour of the cake. You could miss out the lemon, or swap it for orange zest if you fancy something a little punchier.

The cake is finished with a simple chocolate glaze, but fret not – you don’t need to worry about tempering chocolate to get a nice sheet, you just melt chocolate with butter, and forget about the science of tempering and getting the right sort of chocolate crystals for a set. It’s Christmas and we’ve all got too many things to get done! You just melt, add butter, stir and pour. Job done!

This makes a fairly large cake, and it looks quite impressive as a centrepiece. I think it benefits from being made a couple of days in advance. The texture is light but not too fluffy, cuts well, and stays moist thanks to the butter, eggs and almonds in the batter. We really enjoyed this one – it tastes festive, but is very different to the fruit and spices of a British Christmas cake.

And as if a chocolate-covered dome cake that is impersonating a loaf of peasant bread is not exciting enough, this cake even has its own song: La Canzone del Parrozzo (the Song of the Parrozzo) written by poet and politician Gabriele D’Annunzio. It is a tango, and reminds me a little of the Italian socialist classic Ciao Bella.

To make a Parrozzo:

For the cake:

• 150g plain flour
• 150g ground almonds (skin on)
• 1 teaspoon baking powder
• 6 large eggs
• 50g butter, melted and cooled
• 250g caster sugar
• 2 teaspoons almond extract
• 1 teaspoon vanilla
• 1 tablespoon lemon juice
• zest of 1/2 lemon

For the glaze

• 200g dark chocolate
• 50g unsalted butter

1. Preheat the oven to 170°C (340°F). Prepare the cake mould (I used  20cm /8 inch hemispherical tin). Rub the inside really well with butter then dust liberally with flour. Shake out the excess.

2. Mix the flour, almonds and baking powder. Set aside.

3. Separate the eggs.

4. Beat the egg yolks, sugar, melted butter, almond extract, lemon zest and lemon juice for about 5 minutes until pale, thick and creamy.

5. In a separate bowl, whisk the egg whites to stiff peaks, around 4-5 minutes.

6. Folk the yolk mixture into the egg whites.

7. Fold in the flour mixture in 3 batches, as gently as you can until just combined.

8. Carefully pour the batter into a cake tin and bake for around an hour until an inserted skewer comes out clean. If the top looks like it is getting too dark cover it loosely with tin foil. When it is ready, remove from the oven and allow to rest for 10 minutes, then turn the cake onto a wire rack to cool completely.

9. Finish with the chocolate glaze. Melt the chocolate in a microwave (or use a bowl over a pan of barely-simmering water) then add the chocolate butter and stir until completely smooth. Pour the glaze over the cold cake, and either try to get it as smooth as possible, or make life easy and aim for generous swirls.

2 Comments

Filed under Christmas, Recipe, Sweet Things

{6} Canestrelli

No selection of festive baking is complete without at least one trip to Italy, so here goes!


These cookies are canstrelli. They originate from the northern province of Liguria and their name means “little baskets”. They might look like simple shortbread cookies flavoured with lemon and vanilla, but they do have one little twist.

They are enriched with cooked egg yolks, which are crumbled and then added to the mixture. I thought this seemed pretty weird, but from my online digging, this does indeed seem to be the correct way to make them. This technique even appeared in this year’s Great British Bake Off. While it caused a raised eyebrows among the judges, the resulting biscuits were praised when it came to tasting time. So I had to try it!


I happened to make these after agreeing to make a bunch of macarons for a party, so I was left with egg yolks that had already been separated. I thought about trying to make them with uncooked egg yolks, but that would have resulted in a different consistency and we’d possibly be missing out on making authentic canstrelli. I then wondered if I could cook the yolks separately, and then I found some sites that suggested that you can cook the yolks on their own by poaching gently in simmering water. I did this, and it was a complete doddle. Just bring the water to a simmer, gently add the yolks, and simmer for about 5 minutes. When cooked, I transferred them to cold water, and then used them in the recipe.

When it comes to shaping these cookies, you can go with whatever shape you like, but the traditional one is a flower with the centre cut out so they look like a daisy. Normally I just roll dough out using flour, but this time I did it between two sheets of greaseproof paper to avoid adding more flour to the dough. Since it was cold and contained a lot of butter, there was no sticking and it worked easily. I’ll admit it is a little more of a faff than using flour, but it does mean you can roll up all the scraps and make more cookies, and the first ones will be the same as the last ones. If you’ve wondered by the end of a batch seem to look different to the first ones, it’s the extra flour you’re incorporating as you roll and re-roll those offcuts.


The resulting canstrelli were delicious – they have a very short texture and buttery flavour, enhanced with the vanilla and lemon. They are rich, but not in any way though, as you’re not really adding any liquid (which would have been the case if I had used uncooked egg yolks in the dough). So there we have it – two new baking techniques (well, new for me) that I look forward to trying elsewhere in the New Year!

To make Canestrelli (makes around 30-35)

• 150g flour
• 100g cornflour
• 75g icing sugar
• 1/2 teaspoon salt
• zest of 1 lemon
• 150g butter
• 1 vanilla pod, seeds only
• 3 egg yolks, hard boiled

1. Mix the flour, cornflour, icing sugar and salt. Sieve to ensure if is well-combined and there are no lumps.

2. Add the lemon zest, vanilla seeds and extracts (or vanilla bean paste) and cold butter. Mix with your hands until just combined (or whizz in a food processor).

3. Now take those egg yolks. Press these through a very fine sieve. Add to the mixing bowl, then knead the lot until it comes together as a pliable dough. Flatten to a disc, wrap in cling film and leave to rest in the fridge for an hour.

4. Preheat the oven to 170°C (340°F). Line a baking sheet with greaseproof paper.

5. Remove the dough from the fridge. Roll out on a floured worktop or between two sheets of greaseproof paper to around 1cm thickness. Cut out flower or scalloped shapes and then cut a circle from the middle (a round piping nozzle is good for this). Transfer each to the baking sheet. Chill the cookies in the fridge for 2 minutes.

6. Put the cookies in the oven and bake for around 15 minutes until pale golden – I recommend turning the tray half-way, and keep a close eye on them. Go by colour rather than time.

7. Remove from the oven and allow to cool for a moment – the cookies will be fragile. Transfer to a cooling rack.

8. Store in an airtight tin, and dredge with icing sugar before serving.

Leave a comment

Filed under Christmas, Recipe, Sweet Things

{6} Panpepato

It’s the sixth post in this year’s Twelve Bakes of Christmas, and the kitchen is still standing! I know I’ve still got six more recipes to go, but where would the fun be if I wasn’t surrounded by sugar, spice and all things nice at this time of year? Well, that plus a whole lot of mess, a sugar thermometer and more than a few burns due to my tendency to use tea towels rather than proper oven gloves…

Today’s recipe is a delicious Italian sweet treat called panpepato, which means “peppered bread”. It is associated with the Province of Ferrera on the Adriatic coast. It has more than a passing resemblance to panforte, but panpepato is dark in colour, flavoured with cocoa, chocolate and pepper, and sometimes even coated in yet more chocolate.


This is a cake with a long history, with some sources suggesting it can be traced back to the 11th century. Panforte and panpepato would originally have been consumed by the aristocracy – with sweet candied fruit and spices, these were firmly luxury confectionery. And as with many traditional recipes, there are various origin myths about which came first.

Some suggest it started with panforte, and panpepato was later created during a siege with candied fruit to address the lack of fresh fruit or less choice in terms of ingredients for the panforte. Others suggest panpepato is where it was at originally, and panforte was a later creation with lighter ingredients in honour of Queen Margherita of Savoy’s visit to Siena in 1879. Of course, just where cocoa and chocolate came from in medieval Italy is left unclear! Whichever version is true, they’re both delicious. And finally…those spices? They were thought to have aphrodisiac properties, bringing troubled couples together. Perhaps a slice of panpepato promises not just delicious flavours but a night of romance when it is chilly outside?


I was really pleased with how easy this was to make and how this turned out. Sometimes a recipe can feel like a slog, especially where you have lots of steps to follow, but it was really pleasant to prepare the almonds, hazelnuts and candied peel, and then measure out the various spices.

Beyond the measuring, you don’t need to more than pour all the dry ingredients into a large bowl, make a syrup from honey, butter, sugar and a few pieces of dark chocolate, them mix the lot and bake it. Once it came out of the oven and had cooled down, I dusted it with cocoa and rubbed it with a pastry brush. Some recipes suggested icing sugar, but I thought this would look a little more sophisticated. Other recipes suggested a coating of chocolate, but I think that would have been too rich even for me!


The flavour is reminiscent of British fruit cake, but without all the dried vine fruits – you’ve got nuts and candied citrus, plus spices and a bit of depth from the cocoa and chocolate. There isn’t really a chocolate flavour as such, but I think the cocoa helps provide a balance to the sweetness of the honey and sugar. And of course the cocoa also provides a dramatic contrast to the pale cream colour of the almonds and hazelnuts. Some recipes suggest coarsely chopping the nuts, but I love the pattern of the whole nuts when you slice into the panpepato.


From what I have found, there is no single “correct” recipe that you have to follow. You can play around with the types of nuts you use – just almonds, just hazelnuts, or add some pine nuts or pistachios – and there are various different dried fruits you could use. Some recipes have figs or sultanas, and even more exotic items like candied papaya or melon could be interesting. Finally, you can also try different spices in this recipe, but I do think you need to have that black pepper as a nod to this recipe’s origins.

I’d look at this as a sweet, rather than a cake or a bread. It is absolutely delicious, but it is also incredibly rich, so you might be surprised just how little of it you want to eat in one go. It is also a treat that will last for a while, so a good one to have prepared for surprise guests. I think it is great with tea or coffee, cut into very thin slices and then into nibble-sized morsels.

To make Panpepato (makes 1 slab)

• 150g skinned hazelnuts
• 150g blanched almonds
• 100g candied orange peel
• 100g candied lemon peel
• 50g plain flour
• 30g cocoa powder
• 1 teaspoon ground cinnamon
• 1/2 teaspoon ground black pepper
• 1/2 teaspoon ground nutmeg
• 1/2 teaspoon ground coriander
• 1/4 teaspoon ground cloves
• 100g caster sugar
• 225g orange blossom honey
• 3 tablespoons water

• 50g dark chocolate
• 25g unsalted butter
• Cocoa powder, for dredging

1. Preheat the oven to 180°C. Put the nuts on two separate trays, and toast in the oven for 10-15 minutes until fragrant and just golden. Watch them closely – the hazelnuts will be done before the almonds. When ready, remove from the oven and leave to cool.

2. Rub some greaseproof paper with a little vegetable oil, and use it to line a 20cm square tin. If you prefer, you can also use rice paper but this will stick to the finished panpepato – it’s a question of personal preference.

3. Reduce the oven heat to 150°C.

4. Chop the peel into fairly small chunks. Place in a bowl with the nuts, flour, cocoa powder and ground spices. Mix well.

5. Put the sugar, honey, water, butter and chocolate into a saucepan. Heat gently until the sugar dissolves, and boil until the mixture reaches the “soft ball” stage (or 113°C/235°F on a thermometer).

6. Pour the syrup onto the dry ingredients and mix well. Transfer to the tin. Use a metal spoon or spatula rubbed with a little butter or oil to flatten the mixture.

7. Bake the panpepato for 35-40 minutes. The surface will look “set” when the panpepato is done. Remove from the oven and leave to cool completely. If you have an uneven panpepato, take a piece of greaseproof paper rubbed with a little oil – lay on top of the still-warm panpepato and press to even it out.

8. Remove the panpepato from the tin, peel off the greaseproof paper and trim off the edges (they will be a bit hard). If using rice paper, leave it on the panpepato. Dust the top lightly with cocoa and rub lightly with your fingers or a pastry brush so a bit of the fruit and nut detail shows up.

9. Store in an airtight container. Cut into thin slices to serve.

Leave a comment

Filed under Christmas, Recipe, Sweet Things

{12} Nadalin de Verona

And here we are! The final installment of 2016’s edition of the Twelve Bakes of Christmas!

Today I’ve turned my hand to a very traditional Italian cake, the Nadalin de Verona. This is a rich dough raised with yeast, which should hint that it has a long history, pre-dating our modern raising agents. It is flavoured with butter, vanilla and lemon zest, and topped with pine nuts, chopped almonds and sugar.

nadalin2

It is fair to say that the big name of the Italian festive cake world is the panettone, closely followed by the pandoro. I make panettone fairly often, as it is easy with a bread machine and it always proves popular. However, I’ve never had a go at pandoro. The name means “golden bread” and it gets this colour from many, many, many egg yolks in the dough. I’m sometimes a very lazy baker and don’t like ending up with lots of spare egg whites. I guess I’ll get round to making a pandoro the next time I have to make a pavlova…

nadalin1

But back to the star of today. The nadalin (also called the “natalino”) dates back as far as the 13th century, and is suggested as the ancestor of the modern pandoro. It is said to have been created to mark the investiture of the Della Scala family as the Lords of Verona. It is often linked to the most famous tragic romance of all time – the nadalin appears first in 1303, the same time that the events of Romeo and Juliet as said to have taken place. I’m not clear quite what the link is, but this cake may have featured on a medieval banquet table where either of the star-crossed lovers were present.

nadalin3

Now, in the interests of Christmas, I’ve actually made the nadalin not just once, but twice!

I looked at a few recipes before making the nadalin, and settled on the “authentic” version on the website of the City of Verona tourist office. However I am sorry to say it didn’t quite work for me. It is made from eggs, a lot of butter and quite a bit of sugar. My baking instincts said this would be a very rich dough and the yeast might struggle to get a good rise, and it turned out to be so. It was of course perfectly tasty, but it didn’t have the lightness I prefer from sweet breads. This is all personal preference, but what to do?

Well I mentioned that I make panettone quite often, so I looked at my own recipe and adjusted to reflect the flavours of the nadalin – out with the dried fruit, and in with the vanilla and lemon zest. I also added a small handful of crushed sugar cubes to add some additional sweetness to the dough. Entirely optional, but this seemed like a sensible way to get a bit more sugar in the dough without making it too rich to rise well. I’m pleased to say this all worked very well, and the result is a light, sweet and fragrant festive bread.

To finish the nadalin, it is brushed with melted butter and topped with pine nuts and chopped almonds. They were a delicious addition, as they toast during baking to provide some crunch and flavour contrast.

Traditionally the nadalin is baked in a star shape. However I’ve bought so many pieces of baking equipment recently that I had to make do with the round cake tin I already had.  To make up for my cake being the “wrong shape” I made a simple star template and placed it on top of that nadalin before dusting with icing.

The nadalin is traditionally enjoyed with cocoa or a special wine after Christmas Eve mass. I would also quite happily much on a piece of this on a chilly winter evening too!

And with that, my 12 Days of Christmas Baking is over for 2016. I hope you’ve enjoyed it – I’ve enjoyed finding new inspiration, trying new baking techniques and eating the results! See you for the 2017 edition – if you have any suggestions of local specialities that I should try, leave a comment below.

To make a Nadalin de Verona (nom-traditional)

For the dough:

• 2 eggs
• 150ml milk, boiled and cooled
• 75g butter
• 50g sugar
• Zest of 1 lemon
• 1 teaspoon vanilla extract
• 1 1/2 teaspoons dried yeast

• 400g strong white flour
• small handful of sugar cubes, crushed

To decorate:

• melted butter, to brush
• 50g pine nuts
• 50g chopped almonds
• 20g pearl sugar

To finish:

• 100g icing sugar
• water
• icing sugar, to dust

1. Make the dough – I used a bread machine for all the hard work. Put everything apart from the sugar cubes into the bread machine. Run the dough cycle.

2. Crush the sugar cubes. Work into the finished dough.

3. Line a cake tin (or wide saucepan) with greaseproof paper. Take the dough out of the machine, form into a ball, and press into the tin. Leave in a warm place, loosely covered with clingfilm, until the dough has doubled in size. Traditionally this is for 3 hours, but as my recipe is lighter, this could happen more quickly.

4. Just before you’re ready to bake, preheat the oven at 180°C (350°F).

5. Now prepare the topping. Melt some butter, and mix the pine nuts, flaked almonds and pearl sugar in a bowl.

6. Brush the nadalin generously with the melted butter. Sprinkle over the nut mixture and press down very gently.

7. Bake the nadalin for around 45 minutes to an hour until risen and golden, and it sounds hollow when tapped. If the nuts are browning too quickly, cover loosely with tin foil.

8. When baked, remove the nadalin from the oven. Make a simple icing with 100g icing sugar and 3 tablespoons of boiling water, and drizzle on top of the nadalin – this will form a glaze, and help keep the nuts in place.

9. Leave to cool completely, then dust with icing sugar before serving. I used a star template as a nod to the traditional shape.

6 Comments

Filed under Christmas, Recipe, Sweet Things

{5} Cavallucci

When I started doing my annual Christmas baking project all those years ago, I tended to focus on what I knew, and with the exception of panettone, pretty much everything was from Northern Europe. Over the years I’ve looked beyond the well-known bakes, which has led me to look more and more at Italian Christmas cookies.

We have all seen those rainbow cookies with a chocolate glaze, but what I find interesting are the traditional regional specialities. Every part of the country seems to have its own unique baked goods, often reflecting the traditions and ingredients of the area the recipe comes from, which makes it rewarding to explore, as well as to make and then eat. Yes, unlike looking at lots of churches and medieval villages, exploring the culinary landscape has the bonus of being delicious. And today’s Christmas treat takes us to the city of Siena. Meet my batch of cavallucci.

cavallucci1
The name cavallucci literally means “little horses”. They are said to date back to the time of Lorenzo de’ Medici (also known rather modestly as Lorenzo the Magnificent and who ruled Florence in the late 1400s). Their name comes either from the fact that the original cookies had an impression of a horse on top, or due to the fact they were eaten by stable hands who worked as part of whatever passed for the postal system of the gentry in those days.

Fortunately the flavour of cavallucci is very far removed from anything horse-like. They contain a lot of walnuts and candied orange peel, as well as traditional spices including coriander and aniseed.

cavallucci2
Luckily, this is a recipe that is fairly simple to make. Once you’re prepared the dry ingredients (flour, nuts, spices, candied and dried fruits), you add a sugar and honey syrup to forma dough. This is left to cool for a moment, then rolled out and sliced into individual cookies for baking. No fancy moulds, no intricate decoration, no gilding and no messing around with icing or tempered chocolate. What a relief! And if you’re looking for a vegan option, swap the honey for your favourite syrup. Or if you’re a honey fan, you can swap some of the sugar and water for more honey.

cavallucci3
These are very rustic-looking little morsels of festive cheer. They look like they have been dipped in sugar, but they’ve actually been rolled in flour before baking. I think it looks rather nice, as it goes them a slightly snowy appearance, and it means the cookies have a more balances level of sweetness.

As I was making these, I was reminded of that other Siena classic, panforte. You prepare the dry ingredients, add lots of spices, nuts and candied peel, then bind it all with a sugar syrup, although the ratios of ingredients are different, and cavallucci include some raising agent. I did wonder if a raising agent was traditional, and I think it probably is not, but most of the classic recipes that I found, including that of the Siena tourist board, suggest using baker’s ammonia. I used this too as I have some in my baking cupboard, and I’m always on the look out for a recipe that uses this most stinky of ingredients. It certainly makes the cavallucci puff up nicely in the oven and you get a lovely light texture, with a crisp outside and slightly soft centre. If you can’t get hold of baker’s ammonia, other recipes suggest using baking soda, so it should be alright to use that instead – if you do give it a go, let me know how you get on.

To make Cavallucci (makes 50)

• 200g shelled walnuts
• 100g candied peel (e.g. orange, lemon, citron)
• 30g icing sugar
• 2 teaspoons baker’s ammonia
• 2 teaspoons ground coriander
• 1 teaspoon mixed spices
• 1/4 teaspoon aniseeds, crushed
• pinch of black pepper
• 650g plain flour
• 300g white sugar
• 150ml water
• 25g honey

1. Preheat the oven to 150°C and line a baking sheet with greaseproof paper rubbed lightly with some neutral oil.

2. Roughly chop the walnuts and candied fruits. Put in a large bowl and add the icing sugar, spices, baker’s ammonia (or baking soda) and flour. Mix well.

3. Put the sugar, water and honey into a saucepan. Heat gently until the sugar has dissolved and there are no crystals left (you want the sugar to just dissolve, but do not let it boil). Remove from the heat, allow to cool for a few minutes, then pour the liquid over the dry ingredients. Mix well with a wooden spoon. It should be firm but sticky.

4. When the mixture is still warm but cool enough to handle, take teaspoons of the mixture and drop onto a plate dusted with flour.

5. Roll each piece into a ball (it should be coated lightly with flour), place on the baking sheet and flatten to around 1cm thickness.

6. Bake the cavallucci for around 15 minutes until they are puffed up, but they are still pale (they only get a very slight colour during baking).

4 Comments

Filed under Uncategorized

{3} Biscotti di Regina

Biscotti di Regina originate from Sicily, and the name means “queen’s cookies”. I’m not sure if they are named for or after a particular queen, but with a name like that, they are promising a lot!

These delightful little morsels are sweet and buttery, with a coating of sesame seeds the pop slightly when you bite into them. They also look very pretty, as the seeds form a neat pattern on the outside of the dough. I think they are a nice addition to the festive table, providing a contrast to all that chocolate, ginger, citrus and dried fruit. Yes, I know, shocking to believe that those flavours can all get a bit much, but sometimes you want something simple to enjoy with a cup of tea.

biscottiregina4
I think these cookies have something of a Middle Eastern flavour, what with the sesame seeds and orange blossom water. Hardly surprising when you think about the history of trade across the Mediterranean.

However, if you want to play around with the flavours, you could swap the vanilla and orange blossom water for something else – aniseed is a typically Italian choice, and orange or lemon zest would add a stronger citrus note than the orange blossom water. If you’re feeling particularly creative, you could really depart from Italian flavours, and add things  like cardamom or even rose water. There are even versions that use saffron, if you want cookies with a spectacular golden glow.

biscottiregina1
These biscotti are very straightforward to make – just rub the butter into the dry ingredients, then add egg and flavourings to get a soft dough that is just very slightly sticky. You’re rolling these guys in seeds, so you want it to be a bit sticky. If it is clinging to your fingers in great lumps, you’ve probably got too much liquid, so just add a bit more flour.

I shaped the biscotti by rolling into balls, then flattening into a squat sausage shape, so when they baked they formed an oval shape. If you prefer, roll them into very long, thin fingers for a more elegant shape to dip in coffee or vin santo, and adjust the baking time accordingly. For finishing, I used hulled white sesame seeds, which I think makes them look quite festive, almost like they’re coated in snowflakes. If you’re feeling adventurous, add a few black sesame seeds for some contrast, or go the whole hog and roll them in only black sesame seeds for a dramatic look.

biscottiregina2

To make Biscotti di Regina (makes 30)

For the dough:

• 375g plain flour
• 225g butter
• 150g caster sugar
• 1 1/2 teaspoons of baking powder
• 1/2 teaspoon of salt
• 1 egg
• 1 teaspoon vanilla extract
• 1 teaspoon orange blossom water
• cold milk, to bind

To decorate:

• 100g sesame seeds

1. Preheat the oven to 175°C (350°F) and line a baking sheet with greaseproof paper.

2. In a bowl, combine the flour, sugar, baking powder and salt. Add the butter and work until it resembles breadcrumbs.

3. Beat the egg with the vanilla and orange blossom water. Add to the main bowl, and work to a smooth dough. If necessary, add cold milk, a tablespoon at a time, to bring the mixture together. It should be firm, but slightly sticky.

4. Divide the dough into three batches. Roll each piece into a long sausage about 30cm long, and cut into 10 pieces (3cm each).

5. Roll each piece into a ball, then form into a sausage shape between your hands. Roll in the sesame seeds to coat completely, then transfer to a baking sheet (leave enough space between each piece to expand).

6. Bake for around 25 minutes until golden, turning after 15 minutes to get an even bake.

3 Comments

Filed under Christmas, Recipe, Sweet Things